


搜索到
19
篇与
的结果
-
 PHP THINKPHP6 预打印SQL public static function getPageList(array $params = array(), int $page = 1, int $limit = 10) { $where = self::getWhere($params); $model = new HolidayBenefitExclusionModel(); // $model = $model->alias('HolidayBenefitExclusionModel'); +++++++ $query = HolidayBenefitExclusionModel::buildWith($model, $params); $query = $query->where($where); return $query->order('id', 'desc') ->paginate(array( 'list_rows' => $limit, 'page' => $page, )) ->toArray(); } /** * 构建Query的With关联 * @author: LiSongKun * @date: 2025/9/11 14:23 * @param $query * @param array $params * @return mixed */ public static function buildWith($query, array $params) { return $query->with([ 'user' => function ($innerQuery) { $innerQuery->field('oa,name'); } ])->hasWhere('user', function ($innerQuery) use ($params) { $innerQuery->where(1, 1); $innerQuery->field('oa,name'); if (isset($params['name_like']) && $params['name_like'] !== '') { $innerQuery->where('name', 'like', '%' . $params['name_like'] . '%'); } }); }在使用模型查询同时调用 with 和 hasWhere 时候会遇到 :SQLSTATE[42S22]: Column not found: 1054 Unknown column 'HolidayBenefitExclusionModel.oa' in 'on clause'" 问题需要加一个别名:alias('HolidayBenefitExclusionModel')通过如下的方式可以在不执行语句的时候获取预执行的SQL输出。<?php $list = Vod::order('vod_addtime desc') ->where($where) ->fetchSql(true) // true 代表不执行语句 ->select(); dump($list);exit; ?>
 -
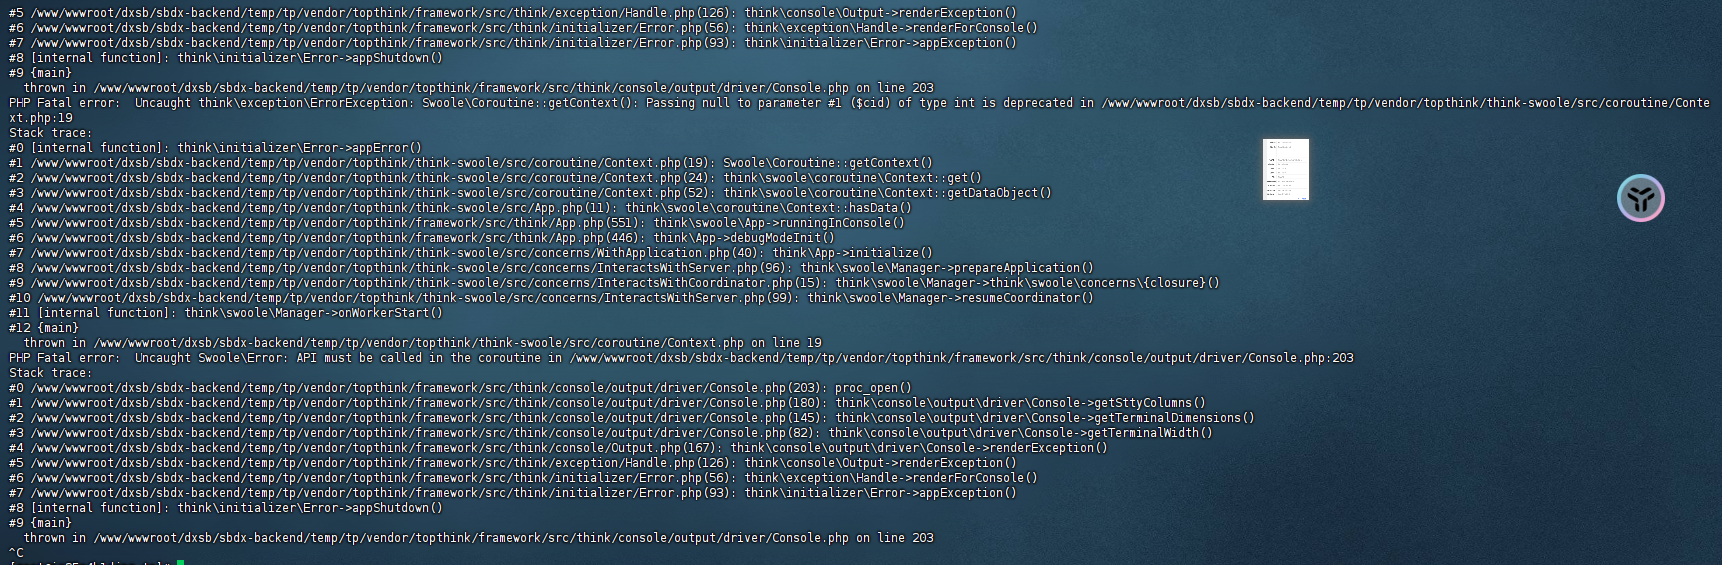
thinkphp-swoole运行报错和wss无法访问的问题 thinkphp-swoole运行报错和wss无法访问的问题thinkphp6.0项目,在运行swoole服务时log日志疯狂报错$ php think swoole restart整了好几个小时结果是php版本问题,当时默认切到了php8...更换命令为73就好了$ /www/server/php/73/bin/php think swoole restart运行起来后ws:协议正常访问,wss无法访问问题如下:You are trying to use the same port (8090) for ws:// and wss:// - this will most likely not work. While you don't show any server side configuration I suspect that your websocket server on port 8090 can only do plain WebSockets (i.e. ws:// and not wss://) and that you expect the TLS from the HTTP server (port 443) to be magically applied to wss:// on port 8090 too. This is not the case. By trying wss:// with port 8090 you are instead trying to do a TLS handshake with a server which does not speak TLS, which then results in net::ERR_SSL_PROTOCOL_ERROR.The common setup is instead to use a web server like nginx or Apache as reverse proxy for the websocket server and terminate the TLS at the web server. This way both ws:// and wss:// work on the standard ports (i.e. 80 and 443) from outside and the internet plain websocket server on port 8090 is will be made unreachable from outside. See for example NGINX to reverse proxy websockets AND enable SSL (wss://)? or WebSocket through SSL with Apache reverse proxy for how to setup something like this.需要为项目配置一个反向代理 #REWRITE-START URL重写规则引用,修改后将导致面板设置的伪静态规则失效 include /www/server/panel/vhost/rewritexxxx.conf; #REWRITE-END location /app { proxy_pass http://127.0.0.1:9999; proxy_http_version 1.1; proxy_set_header Upgrade $http_upgrade; proxy_set_header Connection "upgrade"; proxy_set_header Host $host; proxy_set_header X-Real-IP $remote_addr; proxy_set_header X-Forwarded-For $proxy_add_x_forwarded_for; proxy_set_header X-Forwarded-Proto $scheme; proxy_buffering off; proxy_request_buffering off; } #禁止访问的文件或目录 location ~ ^/(\.user.ini|\.htaccess|\.git|\.env|\.svn|\.project|LICENSE|README.md)引用1.WebSocket error: net::ERR_SSL_PROTOCOL_ERROR: https://stackoverflow.com/questions/59542929/websocket-error-neterr-ssl-protocol-error
-
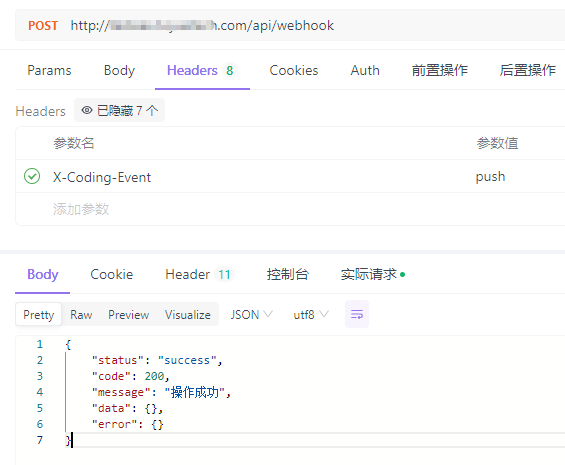
Laravel对接Coding仓库WebHooks实现自动部署 上下文环境都是基于宝塔的,因为Bash操作都使用的www用户,其他环境并不适用项目执行bash主要使用的是exec函数,项目跑在nginx上。nginx使用的用户为www,所以会有权限问题权限解决:vim /etc/sudoers # 文件内容如下 # www ALL=(ALL) NOPASSWD: /usr/bin/git # + # www ALL=(www) NOPASSWD: /www/server/php/81/bin/php /usr/local/bin/composer install # + 第一行配置:允许用户www以任何用户身份运行/usr/bin/git命令,而无需输入密码。 第二行配置:允许用户www以自身身份运行指定的composer install命令,而无需输入密码。路由:/** * 处理WebHook的请求 * 自动化部署 */ Route::post('webhook', [App\Http\Controllers\Deploy\WebHookController::class, 'handle']); 控制器:解释: 当发现仓库有push操作后,自动执行git pull拉取代码,然后执行composer install安装依赖class WebHookController extends Controller { /** * 监听Coding仓库代码更新操作 * 自动部署最新版项目 * @return \Illuminate\Http\JsonResponse|\Illuminate\Http\Resources\Json\JsonResource */ public function handle(Request $request) { Log::info('接收到Coding WebHook', [$request]); $hookEvent = $request->header('X-Coding-Event'); if (!\Str::contains($hookEvent, 'push')) return \Response::ok(); Log::info("开始执行自动部署任务"); // Git Pull exec('cd .. && sudo git pull' . ' 2>&1', $output, $status); if ($status != 0) { Log::error('拉取代码失败', [$output, $status]); \Response::fail('拉取代码失败', ResponseCodeEnum::SYSTEM_ERROR); } Log::info("拉取代码成功", [$output, $status]); // Composer Install exec('cd .. && /www/server/php/81/bin/php /usr/local/bin/composer install' . ' 2>&1', $output, $status); if ($status != 0) { Log::error('composer安装失败', [$output, $status]); \Response::fail('composer安装失败', ResponseCodeEnum::SYSTEM_ERROR); } Log::info("composer安装成功", [$output, $status]); // 后端完成部署 Log::info("自动部署任务执行完毕"); return \Response::ok(); } }模拟:Coding公司的项目使用腾讯旗下的Coding来管理项目,也是有WebHook的功能引用1.Coding WebHook:https://coding.net/help/docs/project-settings/open/webhook.html2.如何实现Git Push之后自动部署到服务器?:https://blog.csdn.net/ll15982534415/article/details/136669152
-
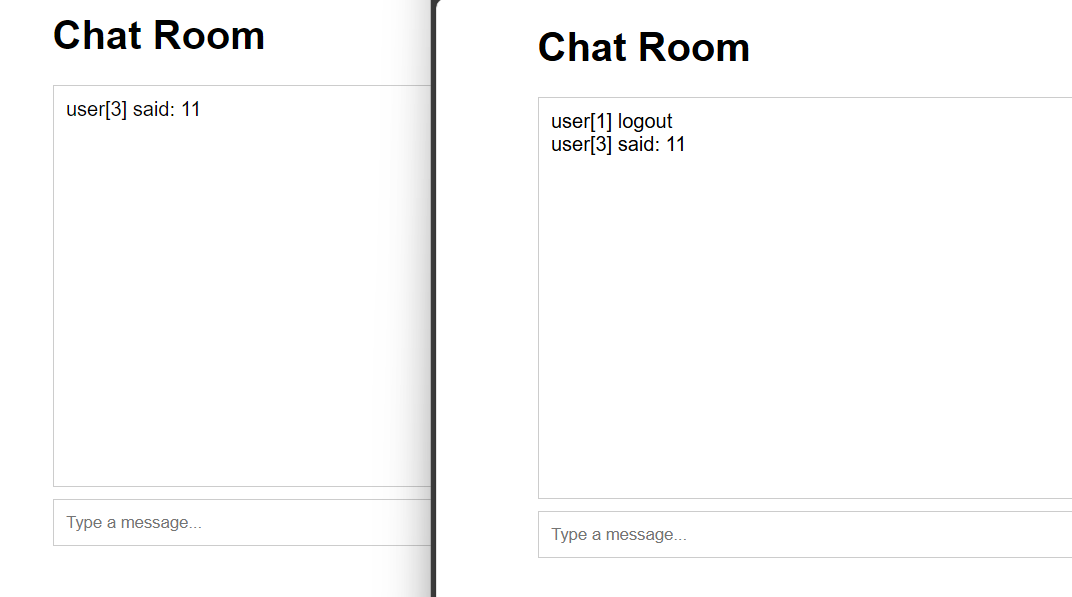
用workman框架开发网络聊天室(PHP) 任意位置建立项目目录如 SimpleChat/进入目录执行 composer require workerman/workerman然后编写一个chat.php:<?php use Workerman\Worker; use Workerman\Connection\TcpConnection; require_once __DIR__ . '/vendor/autoload.php'; $global_uid = 0; // 当客户端连上来时分配uid,并保存连接,并通知所有客户端 function handle_connection($connection) { global $text_worker, $global_uid; // 为这个连接分配一个uid $connection->uid = ++$global_uid; } // 当客户端发送消息过来时,转发给所有人 function handle_message(TcpConnection $connection, $data) { global $text_worker; foreach($text_worker->connections as $conn) { $conn->send("user[{$connection->uid}] said: $data"); } } // 当客户端断开时,广播给所有客户端 function handle_close($connection) { global $text_worker; foreach($text_worker->connections as $conn) { $conn->send("user[{$connection->uid}] logout"); } } // 创建一个文本协议的Worker监听2347接口 $text_worker = new Worker("websocket://0.0.0.0:2347"); // 只启动1个进程,这样方便客户端之间传输数据 $text_worker->count = 1; $text_worker->onConnect = 'handle_connection'; $text_worker->onMessage = 'handle_message'; $text_worker->onClose = 'handle_close'; Worker::runAll(); 前端页面:<!DOCTYPE html> <html lang="en"> <head> <meta charset="UTF-8"> <meta name="viewport" content="width=device-width, initial-scale=1.0"> <title>WebSocket Chat Room</title> <style> body { font-family: Arial, sans-serif; } #chat { width: 90%; max-width: 600px; margin: 0 auto; } #messages { border: 1px solid #ccc; height: 300px; overflow-y: scroll; padding: 10px; } #input { display: flex; margin-top: 10px; } #input input { flex: 1; padding: 10px; border: 1px solid #ccc; } #input button { padding: 10px; border: 1px solid #ccc; background: #007BFF; color: white; cursor: pointer; } </style> </head> <body> <div id="chat"> <h1>Chat Room</h1> <div id="messages"></div> <div id="input"> <input type="text" id="messageInput" placeholder="Type a message..."> <button onclick="sendMessage()">Send</button> </div> </div> <script> const ws = new WebSocket('ws://localhost:2347'); const messagesDiv = document.getElementById('messages'); const messageInput = document.getElementById('messageInput'); ws.onopen = () => { console.log('Connected to the chat server'); }; ws.onmessage = (event) => { const message = document.createElement('div'); message.textContent = event.data; messagesDiv.appendChild(message); messagesDiv.scrollTop = messagesDiv.scrollHeight; }; function sendMessage() { const message = messageInput.value; if (message) { ws.send(message); messageInput.value = ''; } } messageInput.addEventListener('keydown', (event) => { if (event.key === 'Enter') { sendMessage(); } }); </script> </body> </html> 最后使用 php chat.php运行
-
laravel jwt 无感刷新token 为保证和前端交互过程中,用户可以自动刷新token创建一个中间件文件,命名为 RefreshToken<?php namespace App\Http\Middleware; use Auth; use Closure; use Tymon\JWTAuth\JWTAuth; use Tymon\JWTAuth\Exceptions\JWTException; use Tymon\JWTAuth\Http\Middleware\BaseMiddleware; use Tymon\JWTAuth\Exceptions\TokenExpiredException; use Symfony\Component\HttpKernel\Exception\UnauthorizedHttpException; class RefreshToken extends BaseMiddleware { function handle($request, Closure $next) { // 检查此次请求中是否带有 token,如果没有则抛出异常。 $this->checkForToken($request); // 使用 try 包裹,以捕捉 token 过期所抛出的 TokenExpiredException 异常 try { // 检测用户的登录状态,如果正常则通过 if ($this->auth->parseToken()->authenticate()) { return $next($request); } throw new UnauthorizedHttpException('jwt-auth', '未登录'); } catch (TokenExpiredException $exception) { // 此处捕获到了 token 过期所抛出的 TokenExpiredException 异常,我们在这里需要做的是刷新该用户的 token 并将它添加到响应头中 try { /* * token在刷新期内,是可以自动执行刷新获取新的token的 * 当JWT_BLACKLIST_ENABLED=false时,可以在JWT_REFRESH_TTL时间内,无限次刷新使用旧的token换取新的token * 当JWT_BLACKLIST_ENABLED=true时,刷新token后旧的token即刻失效,被放入黑名单 * */ // 刷新用户的 token $token = $this->auth->refresh(); // 使用一次性登录以保证此次请求的成功 Auth::guard('api')->onceUsingId($this->auth->manager()->getPayloadFactory()->buildClaimsCollection()->toPlainArray()['sub']); } catch (JWTException $exception) { // 如果捕获到此异常,即代表 refresh 也过期了,用户无法刷新令牌,需要重新登录。 throw new UnauthorizedHttpException('jwt-auth', $exception->getMessage()); } } // 在响应头中返回新的 token return $this->setAuthenticationHeader($next($request), $token); } }修改App\Http\Kernel.pho文件protected $routeMiddleware = [ //...... 'token.refresh' => \App\Http\Middleware\RefreshToken::class, //...... ];修改routes.api.php文件// 需要 token 验证的接口 $api->group(['middleware' => ['token.refresh','auth.jwt']], function($api) { //....... });修改.env文件#Jwt JWT_SECRET=HSKxIUfwCdJj5gadbqfQo5im9zje95g9 #token有效时间,单位:分钟, 有效时间调整为2个小时 JWT_TTL=120 #为了使令牌无效,您必须启用黑名单。如果不想或不需要此功能,请将其设置为 false。 #当JWT_BLACKLIST_ENABLED=false时,可以在JWT_REFRESH_TTL时间内,无限次刷新使用旧的token换取新的token #当JWT_BLACKLIST_ENABLED=true时,刷新token后旧的token即刻失效,被放入黑名单 JWT_BLACKLIST_ENABLED=true #当多个并发请求使用相同的JWT进行时,由于 access_token 的刷新 ,其中一些可能会失败,以秒为单位设置请求时间以防止并发的请求失败。 #时间为10分钟,10分钟之内可以拿旧的token换取新的token。当JWT_BLACKLIST_ENABLED为true时,可以保证不会立即让token失效 JWT_BLACKLIST_GRACE_PERIOD=6005.备注:JWT token的三个时间,config/jwt.php查看a.有效时间,有效是指你获取token后,在多少时间内可以凭这个token去获取资源,逾期无效。'ttl' => env('JWT_TTL', 60), //单位分钟b.刷新时间,刷新时间指的是在这个时间内可以凭旧 token 换取一个新 token。例如 token 有效时间为 60 分钟,刷新时间为 20160 分钟,在 60 分钟内可以通过这个 token 获取新 token,但是超过 60 分钟是不可以的,然后你可以一直循环获取,直到总时间超过 20160 分钟,不能再获取。这里要强调的是,是否在刷新期可以一直用旧的token获取新的token,这个是由blacklist_enabled这个配置决定的,这个是指是否开启黑名单,默认是开启的,即刷新后,旧token立马加入黑名单,不可在用。'refresh_ttl' => env('JWT_REFRESH_TTL', 20160),c.宽限时间,宽限时间是为了解决并发请求的问题,假如宽限时间为 0s ,那么在新旧 token 交接的时候,并发请求就会出错,所以需要设定一个宽限时间,在宽限时间内,旧 token 仍然能够正常使用// 宽限时间需要开启黑名单(默认是开启的),黑名单保证过期token不可再用 'blacklist_enabled' => env('JWT_BLACKLIST_ENABLED', true) // 设定宽限时间,单位:秒 'blacklist_grace_period' => env('JWT_BLACKLIST_GRACE_PERIOD', 600)
-
FastAdmin速查手册-常见解决方案 FastAdmin速查手册-常见解决方案忘记密码怎么办?数据库修改fa_admin表的两个字段密码(password):c13f62012fd6a8fdf06b3452a94430e5密码盐(salt):rpR6Bv登录密码是 123456为了你的站点安全,登录后台后请及时修改密码。【分享】忘记 FastAdmin 后台密码了怎么办?:https://ask.fastadmin.net/article/43.html引用1.一张图解析FastAdmin中的表格列表的功能:https://ask.fastadmin.net/article/323.html
-
Discuz X论坛二开速查文档 Discuz X论坛二开速查文档前言公司最近要做一个论坛的小程序,没找到合适的就想用discuz进行二开要购买一套主题,选用themebox的:https://bbs.themebox.cn/portal.php?mobile=2一、数据库操作所有的用户输入数据都建议先使用daddslashes函数处理,以防止SQL注入攻击。1.1 常用API函数功能DB::table($tablename)获取正确带前缀的表名。DB::delete($tablename, 条件,条数限制)删除表中的数据DB::insert($tablename, 数据(数组),是否返回插入ID,是否是替换式,是否silent)插入数据操作DB::update($tablename, 数据(数组)条件)更新操作DB::fetch(查询后的资源)从结果集中取关联数组,注意如果结果中的两个或以上的列具有相同字段名,最后一列将优先。DB::fetch_first($sql)取查询的第一条数据fetchDB::fetch_all($sql)查询并fetchDB::result_first($sql)查询结果集的第一个字段值DB::query($sql)普通查询DB::num_rows(查询后的资源)获得记录集总条数DB::_execute(命令,参数)执行mysql类的命令DB::limit(n,n)返回限制字串DB::field(字段名, $pid)返回条件,如果为数组则返回 in 条件DB::order(别名, 方法)排序注意:由于 X1.5 里增加了SQL的安全性检测。因此,如果你的SQL语句里包含以下开头的函数 load_file,hex,substring,if,ord,char。 或者包含以下操作 intooutfile,intodumpfile,unionselect,(select')都将被拒绝执行。1.2 格式化参数替换参数功能%t表名%s字串,如果是数组就序列化%f按 %F 的样式格式化字串%d整数%i不做处理%n若为空即为0,若为数组,就用',' 分割,否则加引号1.3 C对象方法名参数返回值说明C::t($tablename)->insert()数据数组新插入记录的 ID 或影响行数插入一条新记录到数据表C::t($tablename)->update()条件,更新数据影响行数根据条件更新记录C::t($tablename)->delete()条件影响行数根据条件删除记录C::t($tablename)->fetch()条件单条记录的数组根据条件获取一条记录C::t($tablename)->fetch_all()条件所有符合条件的记录的数组根据条件获取多条记录C::t($tablename)->count()条件记录数根据条件统计记录数C::t($tablename)->truncate() 清空表C::t($tablename)->fetch_all_field() fetch所有的字段名C::t($tablename)->optimize() 优化表二、Discuz源码结构DISCUZ使用自己的框架,与现在主流的web框架不同,DISCUZ没有路由表,他的路由是由入口文件来实现的。2.1 目录讲解api: Discuz 论坛和其他系统的接口文件文件名功能uc.phpUCenter 通信文件/api/addons应用中心/api/connect通讯互联/api/googleGoogle引擎结构处理/api/javascript数据和广告的js调用/api/manyoumanyou应用及搜索等相关服务/api/remote远程更新/api/trade支付宝、财付通等交易接口archiver: 论坛Archiver静态化目录 config: 论坛配置文件目录文件名功能config_global.php论坛核心参数配置文件config_ucenter.phpUCenter核心参数配置文件data: 论坛数据缓存目录文件名功能install论坛安装目录source程序后端功能处理目录discuz_version.php程序版本号文件source: 程序核心目录文件名功能/source/admincp后台管理/source/archiver论坛archiver静态化程序目录/source/class核心类库/source/functiondiscuzX自定义函数库/source/include程序功能组件目录/source/language程序语言包(kv结构)/source/module程序功能模块程序包/source/plugin插件扩展目录static: 程序资源目录(头像、图片、下载文件、js文件等等)template:前端模板目录文件名功能/default/common基础css文件、header、footer等公共引入文件/default/collage大学计划页面/default/digedige专区页面/default/forum首页、帖子页面/default/member会员页面/default/home家园页面/default/group群组页面/default/mobile移动端页面/default/portal文章页面/default/search搜索页面uc_client: UCenter客户端目录文件名功能/uc_client/controlUC业务处理操作类/uc_client/data缓存文件目录/uc_client/lib类库目录(包括数据库操作类,XML类,UCCODE类,邮件发送类)/uc_client/modelUC业务模型类uc_serverUCenter服务端 后台ucenter功能实现目录根目录文件文件名功能admin.php后台入口文件api.phpAPI输出 入口文件connect.php云平台接口文件forum.php帖子信息入口文件group.php群组入口文件home.php家园入口文件index.php首页member.php用户入口文件(登录、注册、退出等)misc.php程序杂项扩展入口plugin.php插件入口文件portal.php门户入口文件robots.txt搜索引擎限制文件search.php搜索频道入口文件2.2 运行逻辑discuz的入口文件起到了路由的作用。一个标准的discuz请求如下:http://localhost/home.php?mod=space&uid=1&do=profile三、广告3.1、获取自定义广告下的所有item这里自定义的广告位于pre_common_advertisement_custom要查某一个类型下的所有文章可以通过名字来获取到id// 1.首先查询pre_common_advertisement_custom表获取name为小程序的id $adid = DB::result_first("SELECT id FROM " . DB::table('common_advertisement_custom') . " WHERE name = '小程序'");再根据id查询pre_common_advertisement表,关联字段位于parameters字段,需要拼接判断// 2.查询pre_common_advertisement表获取广告信息 $flag = ':"' . $adid . '";}s:'; $ad = DB::fetch_all("SELECT parameters FROM " . DB::table('common_advertisement') . " WHERE available = '1' AND parameters LIKE '%$flag%'"); $adresult = []; // 3.将所有的code存入数组 foreach ($ad as $key => $value) { $unse = unserialize($value['parameters']); $adresult[] = [ 'link' => $unse['link'], 'url' => $unse['url'] ]; }序列化的内容为:array(9) { ["extra"]=> array(1) { ["customid"]=> string(1) "1" } ["style"]=> string(5) "image" ["link"]=> string(9) "baidu.com" ["alt"]=> string(0) "" ["width"]=> string(0) "" ["height"]=> string(0) "" ["url"]=> string(67) "https://www.baidu.com/img/PCtm_d9c8750bed0b3c7d089fa7d55720d6cf.png" ["html"]=> string(130) "" ["displayorder"]=> string(0) "" }引用1.主题盒子官网:https://www.themebox.cn/2.主题盒子Themebox演示站:https://bbs.themebox.cn/portal.php?mobile=23.黄聪:Discuz!X/数据库操作方法、DB::table、C::t :https://www.cnblogs.com/huangcong/p/4080179.html4.全栈程序员站长:https://cloud.tencent.com/developer/user/8223537
-
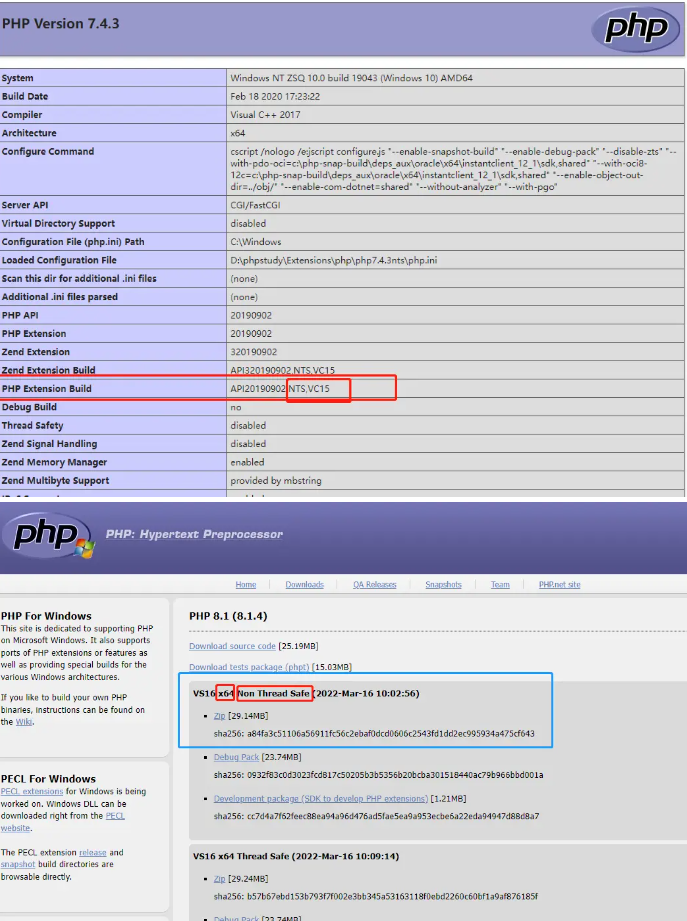
PHPStudy自己扩展php8.1等其他版本 首先需要下载php8.1https://windows.php.net/download#php-8.1php8.1下载地址根据自己的电脑情况选择 32位还是64位的点击下载即可,下载完成后需要找到安装phpstudy的位置找到了放php版本的目录就好了然后在下载下来的文件放入即可 可根据上面文件夹名字适当修改保持队形放置好后可以查看一下 创建的网站也能使用php8.1版本了这样就ok了 。设置好后 需要把文件夹中的配置文件复制一下修改一下名称修改配置项ext前,先将extension_dir = "ext"解开注释这样就可以在phpstudy中直接打开配置文件了引用1.https://www.kancloud.cn/zsq1104/php_study/1730384
-
Composer registry manager基本使用汇总 https://github.com/slince/composer-registry-manager$ composer global require slince/composer-registry-manager ^2.0 $ composer repo:ls # 查看所有镜像 $ composer repo:use [imageName] # 使用某一个镜像,填写名称 $ composer install -vvv # 在项目下使用,安装项目所需要的依赖,-vvv显示详细信息 $ composer config -g repo.packagist composer [imageAddr] # 添加一个镜像服务1.镜像源修改后需要删除composer.lock文件,这里面锁定了原来是如何下载这些包的。
-