


搜索到
5
篇与
的结果
-
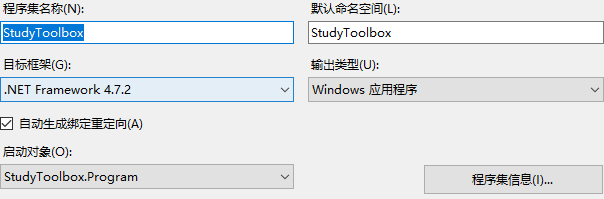
 Winform基于.Net Framework4.7.2 启动宿主Web服务 前言编写的客户端需要启动WEB服务,接受其他项目的回调项目使用的框架版本:.NET Framework 4.7.2步骤一、引入依赖Microsoft.AspNet.WebApi.ClientMicrosoft.AspNet.WebApi.SelfHost二、编写HttpServer.cs,作为HTTP服务的启动类using System.Threading.Tasks; using System.Web.Http; using System.Web.Http.SelfHost; namespace StudyToolbox { public class HttpServer { private HttpSelfHostServer server; public HttpServer(string ip, int port) { var config = new HttpSelfHostConfiguration($"http://{ip}:{port}"); //创建宿主服务 config.MapHttpAttributeRoutes(); //添加路由属性 config.Routes.MapHttpRoute("DefaultApi", "api/{controller}/{action}"); //指定路由规则 // 默认首页路由 config.Routes.MapHttpRoute(name: "Root", routeTemplate: "", defaults: new { controller = "Home", action = "Index" }); server = new HttpSelfHostServer(config); } /// <summary> /// 开启服务(异步任务方式) /// </summary> /// <returns></returns> public Task StartHttpServer() { return server.OpenAsync(); } /// <summary> /// 关闭服务(异步任务方式) /// </summary> /// <returns></returns> public Task CloseHttpServer() { return server.CloseAsync(); } } }三、编写控制器using System; using System.Collections.Generic; using System.Linq; using System.Text; using System.Threading.Tasks; using System.Web.Http; namespace StudyToolbox.Web.Controller { public class HomeController:ApiController { [HttpGet] public IHttpActionResult Index() { return Json("成功接入StudyToolbox的服务端页面"); } [HttpGet] public IHttpActionResult HelloWork() { return Json("xxx"); } } } 四、访问引用1.Winform窗体利用WebApi接口实现ModbusTCP数据服务:https://blog.csdn.net/hqwest/article/details/130797598
 -
C# 生成程序目录避免生成多余的XML和pdb 1:用记事本打开你C#项目工程下的.csproj 文件2:搜索找到你的生成类型一行:比如我用的是'Release|x64'生成程序3:在此行下添加以下代码,即可以屏蔽随dll一起的xml和pdb文件在Release中生成<AllowedReferenceRelatedFileExtensions>.allowedextension</AllowedReferenceRelatedFileExtensions> <PropertyGroup Condition=" '$(Configuration)|$(Platform)' == 'Debug|AnyCPU' "> <PlatformTarget>x64</PlatformTarget> <DebugSymbols>false</DebugSymbols> <DebugType>none</DebugType> <Optimize>false</Optimize> <OutputPath>bin\Debug\</OutputPath> <DefineConstants>DEBUG;TRACE</DefineConstants> <ErrorReport>prompt</ErrorReport> <WarningLevel>4</WarningLevel> <AllowedReferenceRelatedFileExtensions>.allowedextension</AllowedReferenceRelatedFileExtensions> </PropertyGroup> <PropertyGroup Condition=" '$(Configuration)|$(Platform)' == 'Release|AnyCPU' "> <PlatformTarget>AnyCPU</PlatformTarget> <DebugType>pdbonly</DebugType> <Optimize>true</Optimize> <OutputPath>bin\Release\</OutputPath> <DefineConstants>TRACE</DefineConstants> <ErrorReport>prompt</ErrorReport> <WarningLevel>4</WarningLevel> <AllowedReferenceRelatedFileExtensions>.allowedextension</AllowedReferenceRelatedFileExtensions> </PropertyGroup> 生成程序目录去除pdb的另一方法:项目=>属性=>生成=>高级=>调试信息 选【无】
-
山西省成人高考成绩批量查询工具 目标站点:https://gkpt.sxkszx.cn/Ck-student-web/#一、步骤分析1.登录的时候有个验证码需要过2.成绩查询是html解析,正则匹配一下就取出来了二、工具及源码技术点:网络爬虫,dataGridView导出为excel适合初学者入门学习和二次开发github链接:https://github.com/lisongkun/shanxi-adult-education-batch-query-score引用1.SunnyUI Github:https://github.com/yhuse/SunnyUI2.C# Winform中DataGridView导出为Excel看这一篇就够了,详细!!!(完整快速版):https://blog.csdn.net/Houoy/article/details/1060278793.Fluent HTTP:https://flurl.dev/docs/fluent-http/
-
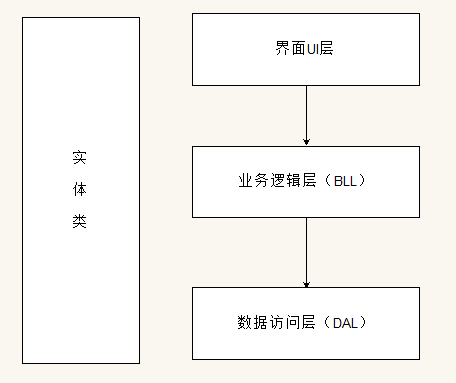
Winform的三层架构详细案例分析 写了几个Winform程序后发现一个类的行数直逼2000行...维护十分困难,想起来之前学过三层架构,转篇文章记录一下!三层架构将整个业务应用划分为:(1)界面UI层;(2)业务逻辑层;(3)数据访问层。对于复杂的系统分层可以让结构更加清晰,模块更加独立,便于维护。各层的任务:(1)数据访问层:负责数据库的操作。(2)业务逻辑层:实现功能模块的业务逻辑。(3)界面UI层:绘制界面,以及负责界面相关代码。(4)实体类:将数据库中的表转化为面向对象思想中的类。一、案例需求使用三层架构实现学生管理:(1)专业下拉框绑定专业表数据,网格控件绑定学生数据,并且点击"搜索"按钮可以多条件组合查询。(2)选中某一行,右键可以弹出"删除"菜单,点击"删除"菜单可以删除学生数据。(3)点击"新增"按钮,弹出新增窗体,在此窗体中完成学生的新增操作。(4)选中某一行,点击"编辑"按钮,弹出编辑窗体,在此窗体中完成数据的修改。备注:其中性别的单选框,以及爱好的多选框分别用两个Pannel容器包含。数据库准备:--专业 create table ProfessionInfo ( ProfessionID int primary key identity(1,1), --专业编号 ProfessionName varchar(50) not null unique --专业名称 ) --学生 create table StudentInfo ( StuID varchar(20) primary key, --学生学号 StuName varchar(50) not null, --学生姓名 StuAge int not null check(StuAge > 0 and StuAge < 130), --学生年龄 StuSex char(2) not null check(StuSex in('男','女')), --学生性别 StuHobby nvarchar(100), --爱好 ProfessionID int not null references ProfessionInfo(ProfessionID), --所属专业编号 ) --添加专业信息 insert into ProfessionInfo(ProfessionName) values('电子竞技') insert into ProfessionInfo(ProfessionName) values('软件开发') insert into ProfessionInfo(ProfessionName) values('医疗护理') --插入学生信息 insert into StudentInfo(StuID,StuName,StuAge,StuSex,StuHobby,ProfessionID) values('001','刘备',18,'男','',1) insert into StudentInfo(StuID,StuName,StuAge,StuSex,StuHobby,ProfessionID) values('002','关羽',20,'男','',2) insert into StudentInfo(StuID,StuName,StuAge,StuSex,StuHobby,ProfessionID) values('003','张飞',19,'男','',2) insert into StudentInfo(StuID,StuName,StuAge,StuSex,StuHobby,ProfessionID) values('004','孙尚香',17,'女','',3)二、项目结构(1)创建一个空白解决方案。(2)在解决方案中创建类库项目MyEntity代表"实体类"。(3)在解决方案中创建类库项目MyDAL代表"数据访问层"。(4)在解决方案中创建类库项目MyBLL代表"业务逻辑层"。(5)在解决方案中创建Windows窗体应用程序MyUI代表"界面UI层"。三、实体类编写在MyEntity项目中添加两个实体类,实体类代码如下:ProfessionInfoEntity: public class ProfessionInfoEntity { public ProfessionInfoEntity() { this.ProfessionID = 0; this.ProfessionName = ""; } public int ProfessionID { get; set; } //专业编号 public string ProfessionName { get; set; }//专业名称 }StudentInfoEntiy:public class StudentInfoEntiy { public StudentInfoEntiy() { this.StuID = ""; this.StuName = ""; this.StuAge = 0; this.StuSex = ""; this.StuHobby = ""; this.ProfessionID = 0; this.ProfessionName = ""; } public string StuID { get; set; } //学生学号 public string StuName { get; set; } //学生姓名 public int StuAge { get; set; } //学生年龄 public string StuSex { get; set; } //学生性别 public string StuHobby { get; set; } //学生爱好 public int ProfessionID { get; set; } //学生所属专业编号 public string ProfessionName { get; set; } //学生所属专业名称 }四、数据访问层编写(1)由于数据访问层需要使用实体类,所以需要添加实体类的引用。即在MyDAL项目上右键-->添加-->引用-->项目,在项目中勾选MyEntity项目。(2)将之前封装好的DBHelper文件复制到MyDAL项目中,并通过添加现有项,将DBHelper加入项目。(3)在MyDAL项目中添加两个类,类代码如下:ProfessionInfoDAL:public class ProfessionInfoDAL { #region 新增 public int Add(ProfessionInfoEntity entity) { string sql = "insert into ProfessionInfo(professionName) values(@professionName)"; DBHelper.PrepareSql(sql); DBHelper.SetParameter("ProfessionName",entity.ProfessionName); return DBHelper.ExecNonQuery(); } #endregion #region 删除 public int Delete(int id) { string sql = "delete from ProfessionInfo where ProfessionID=@ProfessionID"; DBHelper.PrepareSql(sql); DBHelper.SetParameter("ProfessionID", id); return DBHelper.ExecNonQuery(); } #endregion #region 修改 public int Update(ProfessionInfoEntity entity) { string sql = "update ProfessionInfo set professionName=@professionName where ProfessionID=@ProfessionID"; DBHelper.PrepareSql(sql); DBHelper.SetParameter("professionName", entity.ProfessionName); DBHelper.SetParameter("ProfessionID", entity.ProfessionID); return DBHelper.ExecNonQuery(); } #endregion #region 列表 public List<ProfessionInfoEntity> List() { string sql = "select * from ProfessionInfo"; DataTable dt = new DataTable(); DBHelper.PrepareSql(sql); dt = DBHelper.ExecQuery(); List<ProfessionInfoEntity> list = new List<ProfessionInfoEntity>(); foreach (DataRow item in dt.Rows) { ProfessionInfoEntity entity = new ProfessionInfoEntity(); entity.ProfessionID = int.Parse(item["ProfessionID"].ToString()); entity.ProfessionName = item["ProfessionName"].ToString(); list.Add(entity); } return list; } #endregion #region 详情 public ProfessionInfoEntity Detail(int id) { string sql = "select * from ProfessionInfo where ProfessionID=@ProfessionID"; DataTable dt = new DataTable(); DBHelper.PrepareSql(sql); DBHelper.SetParameter("ProfessionID", id); dt = DBHelper.ExecQuery(); if (dt.Rows.Count == 0) return null; ProfessionInfoEntity entity = new ProfessionInfoEntity(); entity.ProfessionID = int.Parse(dt.Rows[0]["ProfessionID"].ToString()); entity.ProfessionName = dt.Rows[0]["ProfessionName"].ToString(); return entity; } #endregion }StudentInfoDAL:public class StudentInfoDAL { #region 新增 public int Add(StudentInfoEntiy entity) { string sql = "insert into StudentInfo(StuID,StuName,StuAge,StuSex,StuHobby,ProfessionID) values(@StuID,@StuName,@StuAge,@StuSex,@StuHobby,@ProfessionID)"; DBHelper.PrepareSql(sql); DBHelper.SetParameter("StuID", entity.StuID); DBHelper.SetParameter("StuName", entity.StuName); DBHelper.SetParameter("StuAge", entity.StuAge); DBHelper.SetParameter("StuSex", entity.StuSex); DBHelper.SetParameter("StuHobby", entity.StuHobby); DBHelper.SetParameter("ProfessionID", entity.ProfessionID); return DBHelper.ExecNonQuery(); } #endregion #region 删除 public int Delete(string id) { string sql = "delete from StudentInfo where StuID=@StuID"; DBHelper.PrepareSql(sql); DBHelper.SetParameter("StuID", id); return DBHelper.ExecNonQuery(); } #endregion #region 修改 public int Update(StudentInfoEntiy entity) { string sql = "update StudentInfo set StuName=@StuName,StuAge=@StuAge,StuSex=@StuSex,StuHobby=@StuHobby,ProfessionID=@ProfessionID where StuID=@StuID"; DBHelper.PrepareSql(sql); DBHelper.SetParameter("StuName", entity.StuName); DBHelper.SetParameter("StuAge", entity.StuAge); DBHelper.SetParameter("StuSex", entity.StuSex); DBHelper.SetParameter("StuHobby", entity.StuHobby); DBHelper.SetParameter("ProfessionID", entity.ProfessionID); DBHelper.SetParameter("StuID", entity.StuID); return DBHelper.ExecNonQuery(); } #endregion #region 列表 public List<StudentInfoEntiy> List() { string sql = "select * from StudentInfo"; DataTable dt = new DataTable(); DBHelper.PrepareSql(sql); dt = DBHelper.ExecQuery(); List<StudentInfoEntiy> list = new List<StudentInfoEntiy>(); foreach (DataRow item in dt.Rows) { StudentInfoEntiy entity = new StudentInfoEntiy(); entity.StuID = item["StuID"].ToString(); entity.StuName = item["StuName"].ToString(); entity.StuAge = int.Parse(item["StuAge"].ToString()); entity.StuSex = item["StuSex"].ToString(); entity.StuHobby = item["StuHobby"].ToString(); entity.ProfessionID = int.Parse(item["ProfessionID"].ToString()); list.Add(entity); } return list; } #endregion #region 详情 public StudentInfoEntiy Detail(string id) { string sql = "select * from StudentInfo where StuID=@StuID"; DataTable dt = new DataTable(); DBHelper.PrepareSql(sql); DBHelper.SetParameter("StuID", id); dt = DBHelper.ExecQuery(); if (dt.Rows.Count == 0) return null; StudentInfoEntiy entity = new StudentInfoEntiy(); entity.StuID = dt.Rows[0]["StuID"].ToString(); entity.StuName = dt.Rows[0]["StuName"].ToString(); entity.StuAge = int.Parse(dt.Rows[0]["StuAge"].ToString()); entity.StuSex = dt.Rows[0]["StuSex"].ToString(); entity.StuHobby = dt.Rows[0]["StuHobby"].ToString(); entity.ProfessionID = int.Parse(dt.Rows[0]["ProfessionID"].ToString()); return entity; } #endregion }五、业务逻辑层编写(1)由于业务逻辑层需要使用实体类,所以需要添加实体类的引用。即在MyBLL项目上右键-->添加-->引用-->项目,在项目中勾选MyEntity项目。(2)由于业务逻辑层需要调用数据访问层,所以需要添加数据访问层的引用。即在MyBLL项目上右键-->添加-->引用-->项目,在项目中勾选MyDAL项目。(3)在MyBLL项目中添加两个类,类代码如下:ProfessionInfoBLL:public class ProfessionInfoBLL { ProfessionInfoDAL dal = new ProfessionInfoDAL(); #region 新增 public int Add(ProfessionInfoEntity entity) { return dal.Add(entity); } #endregion #region 删除 public int Delete(int id) { return dal.Delete(id); } #endregion #region 修改 public int Update(ProfessionInfoEntity entity) { return dal.Update(entity); } #endregion #region 列表 public List<ProfessionInfoEntity> List() { return dal.List(); } #endregion #region 详情 public ProfessionInfoEntity Detail(int id) { return dal.Detail(id); } #endregion }StudentInfoBLL:public class StudentInfoBLL { StudentInfoDAL dal = new StudentInfoDAL(); #region 新增 public int Add(StudentInfoEntiy entity) { return dal.Add(entity); } #endregion #region 删除 public int Delete(string id) { return dal.Delete(id); } #endregion #region 修改 public int Update(StudentInfoEntiy entity) { return dal.Update(entity); } #endregion #region 列表 public List<StudentInfoEntiy> List() { return dal.List(); } #endregion #region 详情 public StudentInfoEntiy Detail(string id) { return dal.Detail(id); } #endregion }六、界面UI层代码编写(1)由于界面UI层需要使用实体类,所以需要添加实体类的引用。即在MyUI项目上右键-->添加-->引用-->项目,在项目中勾选MyEntity项目。(2)由于界面UI层需要调用业务逻辑层,所以需要添加业务逻辑层的引用。即在MyUI项目上右键-->添加-->引用-->项目,在项目中勾选MyBLL项目。查询窗体界面及代码:(1)由于查询学生需要多条件组合查询,所以给数据访问层和业务逻辑层添加条件搜索的方法。给数据访问层MyDAL中StudentInfoDAL类添加方法:#region 条件查询 public List<StudentInfoEntiy> Search(StudentInfoEntiy searchObj) { string sql = "select * from StudentInfo inner join ProfessionInfo on StudentInfo.ProfessionID = ProfessionInfo.ProfessionID where 1 = 1"; if (searchObj.ProfessionID != 0) sql += " and StudentInfo.ProfessionID = " + searchObj.ProfessionID; if (!searchObj.StuName.Equals("")) sql += " and StuName like '%" + searchObj.StuName + "%'"; DataTable dt = new DataTable(); DBHelper.PrepareSql(sql); dt = DBHelper.ExecQuery(); List<StudentInfoEntiy> list = new List<StudentInfoEntiy>(); foreach (DataRow item in dt.Rows) { StudentInfoEntiy entity = new StudentInfoEntiy(); entity.StuID = item["StuID"].ToString(); entity.StuName = item["StuName"].ToString(); entity.StuAge = int.Parse(item["StuAge"].ToString()); entity.StuSex = item["StuSex"].ToString(); entity.StuHobby = item["StuHobby"].ToString(); entity.ProfessionID = int.Parse(item["ProfessionID"].ToString()); entity.ProfessionName = item["ProfessionName"].ToString(); list.Add(entity); } return list; } #endregion给业务逻辑层MyBLL中StudentInfoBLL类添加方法:#region 条件查询 public List<StudentInfoEntiy> Search(StudentInfoEntiy searchObj) { return dal.Search(searchObj); } #endregion(2)在此界面中多个功能需要调用业务逻辑层,定义两个业务逻辑层对象:ProfessionInfoBLL proBll = new ProfessionInfoBLL(); StudentInfoBLL stuBll = new StudentInfoBLL();(3)查询窗体绑定专业信息、绑定学生信息以及搜索功能代码:#region 绑定下拉框 private void BindPro() { List<ProfessionInfoEntity> list = new List<ProfessionInfoEntity>(); list = proBll.List(); list.Insert(0,new ProfessionInfoEntity { ProfessionID=0,ProfessionName="--请选择--"}); this.cmbPro.DataSource = list; this.cmbPro.DisplayMember = "ProfessionName"; this.cmbPro.ValueMember = "ProfessionID"; } #endregion #region 绑定学生数据 private void BindData() { StudentInfoEntiy searchObj = new StudentInfoEntiy(); searchObj.ProfessionID = int.Parse(this.cmbPro.SelectedValue.ToString()); searchObj.StuName = this.txtName.Text; this.dataGridView1.AutoGenerateColumns = false; this.dataGridView1.DataSource = stuBll.Search(searchObj); } #endregion #region 窗体加载 private void FrmSelect_Load(object sender, EventArgs e) { BindPro(); BindData(); } #endregion #region 搜索按钮 private void btSearch_Click(object sender, EventArgs e) { BindData(); } #endregion(4)删除菜单代码:private void 删除ToolStripMenuItem_Click(object sender, EventArgs e) { //添加是否确定删除的对话框 DialogResult result = MessageBox.Show("确定要删除数据吗,删除之后无法恢复!", "提示框", MessageBoxButtons.OKCancel, MessageBoxIcon.Question); if (result == DialogResult.Cancel) return; string stuid = this.dataGridView1.SelectedRows[0].Cells[0].Value.ToString(); if(stuBll.Delete(stuid) == 1) MessageBox.Show("删除成功!"); else MessageBox.Show("删除失败!"); BindData(); }新增窗体界面及代码:ProfessionInfoBLL proBll = new ProfessionInfoBLL(); StudentInfoBLL stuBll = new StudentInfoBLL(); #region 绑定下拉框 private void BindPro() { List<ProfessionInfoEntity> list = new List<ProfessionInfoEntity>(); list = proBll.List(); list.Insert(0, new ProfessionInfoEntity { ProfessionID = 0, ProfessionName = "--请选择--" }); this.cmbPro.DataSource = list; this.cmbPro.DisplayMember = "ProfessionName"; this.cmbPro.ValueMember = "ProfessionID"; } #endregion private void FrmAdd_Load(object sender, EventArgs e) { BindPro(); } private void btAdd_Click(object sender, EventArgs e) { //性别处理 string sex = ""; if (this.rbBoy.Checked == true) sex = this.rbBoy.Text; if (this.rbGirl.Checked == true) sex = this.rbGirl.Text; //爱好处理 string hobby = ""; foreach (CheckBox ck in this.panel2.Controls) { if (ck.Checked == true) { if (!hobby.Equals("")) hobby += ","; hobby += ck.Text; } } StudentInfoEntiy entity = new StudentInfoEntiy(); entity.StuID = this.txtId.Text; entity.StuName = this.txtName.Text; entity.StuAge = int.Parse(this.txtAge.Text); entity.StuSex = sex; entity.StuHobby = hobby; entity.ProfessionID = int.Parse(this.cmbPro.SelectedValue.ToString()); if (stuBll.Add(entity) == 1) MessageBox.Show("新增成功!"); else MessageBox.Show("新增失败!"); this.Close(); }编辑修改窗体界面及代码:public string StuID { get; set; } //学生编号 ProfessionInfoBLL proBll = new ProfessionInfoBLL(); StudentInfoBLL stuBll = new StudentInfoBLL(); #region 绑定下拉框 private void BindPro() { List<ProfessionInfoEntity> list = new List<ProfessionInfoEntity>(); list = proBll.List(); list.Insert(0, new ProfessionInfoEntity { ProfessionID = 0, ProfessionName = "--请选择--" }); this.cmbPro.DataSource = list; this.cmbPro.DisplayMember = "ProfessionName"; this.cmbPro.ValueMember = "ProfessionID"; } #endregion #region 绑定详情 private void BindDetail() { StudentInfoEntiy entity = new StudentInfoEntiy(); entity = stuBll.Detail(this.StuID); this.txtId.Text = entity.StuID; this.txtName.Text = entity.StuName; this.txtAge.Text = entity.StuAge.ToString(); this.cmbPro.SelectedValue = entity.ProfessionID; //性别处理 if (entity.StuSex.Equals("男")) this.rbBoy.Checked = true; else this.rbGirl.Checked = true; //爱好处理 string[] arrHobby = entity.StuHobby.Split(','); foreach (string hobby in arrHobby) { foreach (CheckBox ck in this.panel2.Controls) { if (ck.Text.Equals(hobby)) ck.Checked = true; } } } #endregion private void FrmEdit_Load(object sender, EventArgs e) { BindPro(); BindDetail(); } private void btUpdate_Click(object sender, EventArgs e) { //性别处理 string sex = ""; if (this.rbBoy.Checked == true) sex = this.rbBoy.Text; if (this.rbGirl.Checked == true) sex = this.rbGirl.Text; //爱好处理 string hobby = ""; foreach (CheckBox ck in this.panel2.Controls) { if (ck.Checked == true) { if (!hobby.Equals("")) hobby += ","; hobby += ck.Text; } } StudentInfoEntiy entity = new StudentInfoEntiy(); entity.StuID = this.txtId.Text; entity.StuName = this.txtName.Text; entity.StuAge = int.Parse(this.txtAge.Text); entity.StuSex = sex; entity.StuHobby = hobby; entity.ProfessionID = int.Parse(this.cmbPro.SelectedValue.ToString()); if (stuBll.Update(entity) == 1) MessageBox.Show("修改成功!"); else MessageBox.Show("修改失败!"); this.Close(); }查询窗体中"新增"和"编辑"按钮代码:private void btAdd_Click(object sender, EventArgs e) { FrmAdd frm = new FrmAdd(); frm.Show(); } private void btEdit_Click(object sender, EventArgs e) { string stuid = this.dataGridView1.SelectedRows[0].Cells[0].Value.ToString(); FrmEdit frm = new FrmEdit(); frm.StuID = stuid; frm.Show(); }本文来自博客园,作者:码农阿亮,转载请注明原文链接:https://www.cnblogs.com/wml-it/p/15967883.html
-
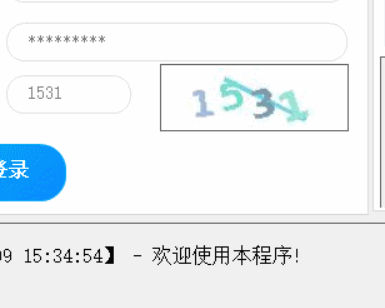
csharp调用OCR和DDDDOCR的DLL进行验证码识别 一、方式1:使用OCR.dll参考了一下精易论坛的这个易语言版的例程:https://bbs.125.la/forum.php?mod=viewthread&tid=14273813效果图:工具类代码:public class OCR { [DllImport("ocr.dll", EntryPoint = "init")] public static extern int Init(); [DllImport("ocr.dll", EntryPoint = "ocr")] public extern static string ocr(byte[] img, int imgLength); } }将ocr.dll放在项目工程的bin\Debug目录下即可。Winform程序中使用:// 1.OCR初始化,全局初始化一次即可,建议放在Program.cs的Main方法中 OCR.Init(); // 2.请求验证码图片 byte[] tmp = "https://passport2.chaoxing.com/num/code" .WithHeader("User-Agent", Constant.USER_AGENT) .WithCookies(out cookies) .GetBytesAsync().Result; // 3.调用DLL进行识别 code = OCR.ocr(tmp, tmp.Length);分流下载链接:{cloud title="OCR.DLL和易语言调用例程" type="bd" url="https://pan.baidu.com/s/1mmHUKscFIMghlm0l7ADS-A?pwd=xq82 " password="xq82 "/}二、方式2:使用DDDDOCR之前写过一篇python调用这个库的文章:记录一次调用OCR验证码识别库的过程,识别率不是很高,最终没有采用今天看到网络上有大神打成了DLL包:ddddocr 单dll版本,记录一下使用,算是多一种验证码的解决方案。效果图:工具类代码:public class OCR { [DllImport("ddocr_qs.dll", EntryPoint = "InitModel")] public static extern int Init(int threadnum); [DllImport("ddocr_qs.dll", EntryPoint = "Identify")] public extern static string ocr(byte[] img, int length); [DllImport("ddocr_qs.dll", EntryPoint = "FreeModel")] public extern static void FreeModel(); } }将ddocr_qs.dll放在项目工程的bin\Debug目录下即可。Winform程序中使用:// 1.OCR初始化,全局初始化一次即可,建议放在Program.cs的Main方法中 // 这里的参数是Thread Number OCR.Init(1); // 2.请求验证码图片 byte[] tmp = "https://passport2.chaoxing.com/num/code" .WithHeader("User-Agent", Constant.USER_AGENT) .WithCookies(out cookies) .GetBytesAsync().Result; // 3.调用DLL进行识别 code = OCR.ocr(tmp, tmp.Length);{cloud title="DDDDOCR_DLL和易语言调用例程" type="bd" url="https://pan.baidu.com/s/1yqY8uTIieeicYt2yow9ogw?pwd=py1l " password="py1l "/}三、附:查看DLL中的可用函数本小白第一次在csharp中调用DLL中的函数,刚拿到OCR.dll后不知道怎么写调用的代码于是上网查了一下,有推荐使用Dependency和Dependencies这两个工具,都有下载使用,感觉上还是后者更强打开GUI界面后直接将OCR.DLL拖入,可以看到函数名这样子但是参数和类型是看不到的 = =,似乎只能问开发者中获取引用1.C#调用论坛发布过的一个OCR.dll崩溃(易语言调用没问题):https://bbs.125.la/forum.php?mod=viewthread&tid=14451756&highlight=ocr.dll2.几百种网站的本地验证码识别源码(字母和数字通杀):https://bbs.125.la/forum.php?mod=viewthread&tid=142738133.ddddocr 单dll版本https://bbs.125.la/forum.php?mod=viewthread&tid=147328384.好工具推荐系列:VC++开发必备神器 -- Dependencies,查看依赖库DLL,支持win10,比depends更好用:https://blog.csdn.net/libaineu2004/article/details/896707265.Dependency Walker 2.2:http://www.dependencywalker.com/6.Dependencies GITHUB : https://github.com/lucasg/Dependencies