


搜索到
8
篇与
的结果
-
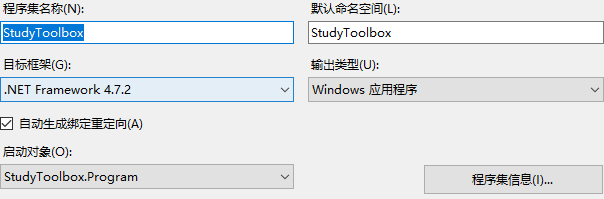
 Winform基于.Net Framework4.7.2 启动宿主Web服务 前言编写的客户端需要启动WEB服务,接受其他项目的回调项目使用的框架版本:.NET Framework 4.7.2步骤一、引入依赖Microsoft.AspNet.WebApi.ClientMicrosoft.AspNet.WebApi.SelfHost二、编写HttpServer.cs,作为HTTP服务的启动类using System.Threading.Tasks; using System.Web.Http; using System.Web.Http.SelfHost; namespace StudyToolbox { public class HttpServer { private HttpSelfHostServer server; public HttpServer(string ip, int port) { var config = new HttpSelfHostConfiguration($"http://{ip}:{port}"); //创建宿主服务 config.MapHttpAttributeRoutes(); //添加路由属性 config.Routes.MapHttpRoute("DefaultApi", "api/{controller}/{action}"); //指定路由规则 // 默认首页路由 config.Routes.MapHttpRoute(name: "Root", routeTemplate: "", defaults: new { controller = "Home", action = "Index" }); server = new HttpSelfHostServer(config); } /// <summary> /// 开启服务(异步任务方式) /// </summary> /// <returns></returns> public Task StartHttpServer() { return server.OpenAsync(); } /// <summary> /// 关闭服务(异步任务方式) /// </summary> /// <returns></returns> public Task CloseHttpServer() { return server.CloseAsync(); } } }三、编写控制器using System; using System.Collections.Generic; using System.Linq; using System.Text; using System.Threading.Tasks; using System.Web.Http; namespace StudyToolbox.Web.Controller { public class HomeController:ApiController { [HttpGet] public IHttpActionResult Index() { return Json("成功接入StudyToolbox的服务端页面"); } [HttpGet] public IHttpActionResult HelloWork() { return Json("xxx"); } } } 四、访问引用1.Winform窗体利用WebApi接口实现ModbusTCP数据服务:https://blog.csdn.net/hqwest/article/details/130797598
 -
Flurl4.0 应用handler https://github.com/tmenier/Flurl/issues/346handler定义:public class PollyHandler : DelegatingHandler { private readonly IAsyncPolicy<HttpResponseMessage> _policy; public PollyHandler(IAsyncPolicy<HttpResponseMessage> policy) { _policy = policy; } protected override Task<HttpResponseMessage> SendAsync(HttpRequestMessage request, CancellationToken cancellationToken) { return _policy.ExecuteAsync(ct => base.SendAsync(request, ct), cancellationToken); } }配置var policy = Policy .Handle<HttpRequestException>() .OrResult<HttpResponseMessage>(r => !r.IsSuccessStatusCode) .RetryAsync(5); FlurlHttp.Clients.WithDefaults(clientBuilder => clientBuilder.AddMiddleware(() => new PollyHandler (policy)));
-
C# 生成程序目录避免生成多余的XML和pdb 1:用记事本打开你C#项目工程下的.csproj 文件2:搜索找到你的生成类型一行:比如我用的是'Release|x64'生成程序3:在此行下添加以下代码,即可以屏蔽随dll一起的xml和pdb文件在Release中生成<AllowedReferenceRelatedFileExtensions>.allowedextension</AllowedReferenceRelatedFileExtensions> <PropertyGroup Condition=" '$(Configuration)|$(Platform)' == 'Debug|AnyCPU' "> <PlatformTarget>x64</PlatformTarget> <DebugSymbols>false</DebugSymbols> <DebugType>none</DebugType> <Optimize>false</Optimize> <OutputPath>bin\Debug\</OutputPath> <DefineConstants>DEBUG;TRACE</DefineConstants> <ErrorReport>prompt</ErrorReport> <WarningLevel>4</WarningLevel> <AllowedReferenceRelatedFileExtensions>.allowedextension</AllowedReferenceRelatedFileExtensions> </PropertyGroup> <PropertyGroup Condition=" '$(Configuration)|$(Platform)' == 'Release|AnyCPU' "> <PlatformTarget>AnyCPU</PlatformTarget> <DebugType>pdbonly</DebugType> <Optimize>true</Optimize> <OutputPath>bin\Release\</OutputPath> <DefineConstants>TRACE</DefineConstants> <ErrorReport>prompt</ErrorReport> <WarningLevel>4</WarningLevel> <AllowedReferenceRelatedFileExtensions>.allowedextension</AllowedReferenceRelatedFileExtensions> </PropertyGroup> 生成程序目录去除pdb的另一方法:项目=>属性=>生成=>高级=>调试信息 选【无】
-
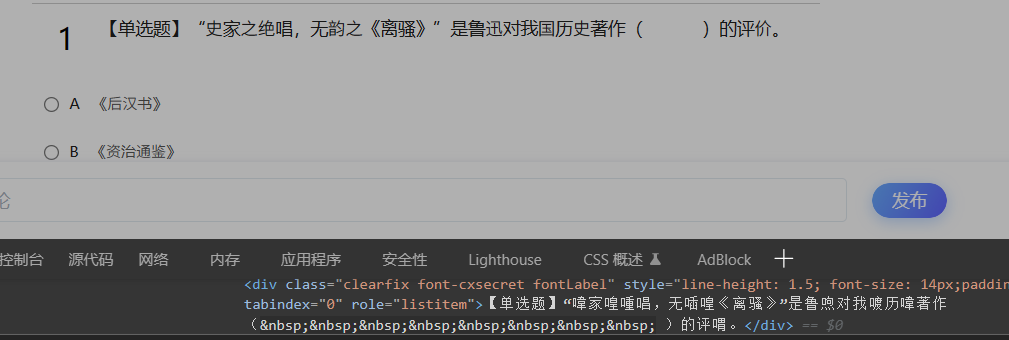
页面字体加密解决和csharp下的Ttf文件元信息混淆分析 页面字体加密解决和csharp下的Ttf文件元信息混淆分析1.前言之前获取获取未加密题目是通过安卓协议绕过题目解密,但需要多访问一个请求。打算重构一下旧项目,就研究一下解密问题。网上的文章都是基于python,javascript讨论实现的。对于csharp提取ttf元信息的文章 国内搜索引擎实在找不到资料,经过两天的google,还是淘到了...记录一下2.正文页面的字体文件为页头的AAEAAAAMAIAAAwBAQkFTRRuOGNgAAG+gAAAA5E9TLzKUGwCtAAABSAAAAGBWT1JHUavDeAAAcIQAAAN0Y21hcNpjHkAAAAKkAAACXGdseWY29gc2AAAG9AAAWFBoZWFkBmbCYQAAAMwAAAA2aGhlYQzu/tUAAAEEAAAAJGhtdHgQmAzYAAABqAAAAPpsb2NhABLFOAAABQAAAAH0bWF4cACmASsAAAEoAAAAIG5hbWWAs0JrAABfRAAAEDlwb3N0/4YAMgAAb4AAAAAgAAEAAAABAAD6ItY5Xw889QADA+gAAAAAz87zegAAAADP+IsO/Bj76AtwBxAAAAADAAIAAQAAAAAAAQAAA3D/iAH0A+j8GPtjC3AAAQAAAAAAAAAAAAAAAAAAAAEAAQAAAHwBKwApAAAAAAAAAAAAAAAAAAAAAAAAAAAAAAAEA9wBXgAFAAgCigJYAAAASwKKAlgAAAFeADIBRQAAAgsEAAAAAAAAACAAAAMq3zwQAAAAFgAAAABBREJFAYAAAf//A3D/iAH0BDEBLmAGAQcAAAAAAh8C3QAAACAABgPoAGQAMABEADgAMQA3AD8AZQA8ACQAPAA8ADMAMAAWACkAOAAxACkAPAAoADsAOgBDACoAJAA5ADUAUQAeAFgAPABRAF0ALAArADkAMgAuACIANQA3AD4AKABQAEMAIQBEACQAJwAlACwAXwA9ADYAIgAgACEAKQAlACQALwAsAC8AVQApACoAJwAqAC0AJQCKAC8AKAAoACoALwAvADsAJwA4AC4ALwArACUAXACjACIAIQAqAB8AMQAlACQAOwA5ADsAQQAqACAAKQA6ACcAMAAxADIAMQAxADAAPgArACoALABSADEAOAArAF0AOAAuAC0ALAA0ACgAAAAAAAEAAwABAAAADAAEAlAAAABcAEAABQAcVxFXFVcbVx5XIlcnVyxXL1c2VzhXPFdBV0ZXSVdNV1ZXWVdjV2VXZ1dpV3RXdleBV4pXkVefV6VXqFesV7FXs1e1V+JYClgWWE9Y2ljfWOJcvGfGa25seJ0q//8AAFcPVxRXF1cdVyBXJFcqVy5XMVc4VztXQVdFV0hXS1dSV1hXYldlV2dXaVdrV3ZXeFeHV4xXk1ekV6hXqleuV7NXtVfhWApYFlhPWNlY31jiXLxnxmtubHidKv//AAAAAAAAAAAAAAAAAAAAAAAAqOAAAKjzAAAAAAAAAAAAAAAAqP2o66i2AACo2QAAAAAAAAAAAACopAAAAACoiaiNAACoP6fwp7MAAKdhp3ajUZg/lQeTkGLmAAEAXABgAGIAagBsAHAAdgB6AHwAAACEAAAAhACGAIgAjACUAJYAAAAAAAAAkgAAAKIAtAC6AMQA3AAAANwA4AAAAAAA4gAAAAAAAADeAAAAAAAAAAAAAAAAAAAAAAABACkALwBVACQAXwA/AFAAdgAuAEcADgBhADEAJwAcAF0ADAAHABkAVABnAFYAMABeABsAPQBOADoAKwBXAFkAIQB0AD4ANgBbAHMARABgAFwAUwAWADIAbQBlAAsAUQBjABEAegAJAHkAKgBNAGwAIwBIABcAcQB3ACgALQBBABMAaABwAGYANwByABUAOwBDABQAbwAzAB4ACgAdAHsASwBaAEoADwAmACUAAwAiAGkAbgBGACwAGgAEAGoARQBrADgANQASADkAeABkACAAAAAAAAAAWAAAAHQAAACsAAAA3AAAATAAAAGMAAACOAAAApAAAALoAAADjAAAA7QAAAQcAAAEwAAABVgAAAX8AAAGyAAAB0gAAAfQAAAIgAAACRwAAAnoAAAKtAAACugAAAuoAAAMDAAADNQAAA2kAAAOLAAADpgAAA8oAAAPmAAAECQAABEEAAARgAAAEfgAABJoAAATGAAAE5QAABRkAAAVKAAAFYgAABYwAAAWtAAAFzAAABekAAAYJAAAGIgAABk0AAAZ/AAAGqgAABswAAAcFAAAHNwAAB3cAAAejAAAHxQAAB/cAAAgwAAAIZgAACI4AAAjHAAAI8wAACSAAAAleAAAJggAACagAAAnRAAAKCQAACkAAAAp/AAAKxgAACusAAAsRAAALRAAAC3cAAAvKAAAL8wAADBcAAAx4AAAMswAADMoAAAz6AAANJQAADVgAAA17AAANpwAADbkAAA35AAAOMQAADm8AAA6wAAAO5wAADy0AAA9eAAAPegAAD6wAAA/XAAAQFAAAEFcAABCIAAAQvAAAENgAABEzAAARXAAAEZcAABHaAAASHgAAElQAABKQAAASvwAAEu0AABMgAAATXgAAE5EAABPVAAAT/wAAFDUAABRjAAAUnwAAFPEAABVFAAAVjAAAFeMAABYUAAFAGT/iAOEA3AAAwAGAAkADAAPAAATIREhASEJAREJAycJAWQDIPzgAs79hAE+AV7+wgEe/sL+wiABPv7CA3D8GAO2/mf+PgMy/mf+PgGZ/mcpAZkBmQAAAQAwAWEDuQGpAAMAAAEVITUDufx3AalISAAAAAMARAAAA6AC4gADAAcACwAAARUhNQEVITUBFSE1A2z9EgKg/Z4C5PykAuJDQ/67Q0P+pkNDAAAAAQA4/+QDrwMzAAsAACUVITUhETMRIRUhEQOv/IkBeEYBev6GJkJCAw3+ykP+bAAAAgAx/7YDugL8AA8AFQAAAQYHESMRBgcmJyQTITUhFQUWFwcmJwJgGDFHpM0UGgExqv49A1f+wuxsNHfeArkpSP1uAjm+bR0cmAEkQ0Osl3AyfpAAAgA3//gDswM/AAMAHQAAAREzEQERIxEhFSERIzUzNTMVMzUzFTM1MxUzFSMRAg/H/ve9Aob9NJOTRr1Cx0WYmAII/wABAP7CAT7+MEACEEDg4Pf37OxA/sIAAAACAD//swOqAv0AAwA4AAABNSMVOwERFAcGIyYnFjcyNREjBgcWFwcmJwYHJic2NyMGBxYXByYnBgcmJzY3IxEjETM1ITUhFSECUL7/7ysilgUSYz0YrwIIeS0oLGElZhQbhg2/AQlPGygZOShiEB6FDaRC5/7uA2v+5wItkJD94D8PCyEiBAMYAeA2L45UMlR3lGceEX/7KT9gNTUzTZViGxSB+f3FAnqQQEAAAwBl/7YDgQNEAAMABwAXAAABESERIxEhEQERIzUhESMRIRUjESE1MxUDPf7XRf7YAtpE/tdF/thCAWpFAT4BEv7uARL+7gFT/jE6/roBRj8B1LOzAAAAAAEAPP/WA7EDPwAaAAAlFSE1ITUhNSE1ITUhJic3FhcHIRUhFSEVIRUDsfyLAZX+xgE6/poBwD1yNnk9LwFG/pgBP/7BF0FB/0DkQEpWJVdMIkDkQP8AAAADACT/tAPEAzMADAAQADAAAAEzFRQHBgcmJzY3NjUlMxEjExYXBgcmJyMGByYnNjchNSE2NwYHJickNxcGBwYHIRUBL0MkMoIRIXkuIAE8REQhb8kXFt92onbYGxO9b/7qAUEjF6SRAg0B294xh9UWIwHpAXp0bUZiPRwVN1Q7XXL+PAJVkkASJk68sl8mEUqQQD5CCwMcHQwxNR0QQUVAAAAAAAIAPAAbA60CtAADAAcAAAEVITUBFSE1A1n9NwMd/I8CtEdH/bBJSQACADz/7AOvAuIABQAdAAABBgchNjcTFSE1MzY3IzUzNjchNSEVIQYHITcXBgcBthwgASMVC/L8jfYeIL3IFwr+4ALq/n0KGAEICzIKGwF/raTCj/6vQkKJyEGVS0JCRpoDBbTcAAAAAAMAM/+0A7wDSAAOABwAKwAAAQYHFgUGByYnBgUmJyQTAyYnBgcmJzYTFwYHFhcTBgcSFwYHJicGByYnNhMCMQwPkgEUFxf9nI/+/BMcAUR6Hz5jPYUWI7sqQwkThzjECAtMtBMbl1M5hw4qvyEDLhkX1EkWJU/XzGAkGWoBAf0RTFXOcRQWjAFuBkxTakcBSkc5/wBcESlZ0sdtDhyLAXEAAAAAAgAw/7YDvQNCABcAKwAAEyEVIQYHJSYnNxYXByYnBAcmJzY3NjchAQcWFwYHJicGByEVITUGByYnJDdcAzb+R29jAddENTiaSjsOK/2zIQ0KFzRVWP7cAd0dpvsZFuewXo8B2v4jUlUVGwFChwFOQJNcJUwzHYl+Ixs4MgwtGAQxTnsCGSixWRUlXrlrWj48NCchGIrPAAACABb/tAO1A0AACwAyAAABBgcRIxEGByYnNjcBBgchNxcGBxYXByYnNxYXNjchNjcjNTM3IzUzNjcXByEVIQYHIRUBTzI3QCZEERWfWwERBSIBRwovTZBKJjJepDArN1VH/pkOL7jLJLbGEQ1BHAEh/s4SEgGDAy17X/1jAjo4SicanPX+kxJrBR5anzgmMmVoJxskXFMmlT5/PTw2CWk9RTo+AAYAKf+zA8IDPgAHABMAFwAlACoAQAAAASE1MzUjNSElBgcRIxEGByYnNhMXFTM1AxUjESERIxUzFSMVMxU3Fhc2PwEGBxYXBgcmJwYHJic2NyYnNyM1ITcDi/7p2toBF/2MHiY/IyQKGnE+opaWPgEP0bq6xWQbOjseSCVZSF8WE1xIUnwNFXdWQCQsQgEPCwHnOrs6GXBi/VgCHkIvHyOVAQVhvr79osgDX/7QcTmEOd1qWVJxLrByWCYUHypZVTIcFSpdYoQLOQIAAAMAOP+9A8ADLAAGABoAIQAAAQYHJic2NwEWFwcmJwQHJic2NzY3FwIHJSYnExYXBgcmJwGQaLIlGbJhAVihUEAeJv23IQsPGj92fEaOiwHiN0ktdLkeGrZ/AxL8nyAPi/T+Cr6RIzc4JwwoHQZPgv4g/v6jG1BaAhntkBcio/oABgAx/7UDrAMwAAMACQAQABYAHAAiAAABFSE1BRYXByYvAQYHJic2NwMWFwcmJyUWFwcmJwUGByc2NwOs/I0CZLdYPFez6nKpFxmqWrlvLT8rbgFmWhtBG1cCM3xqPH9dAWJAQHmfailwoAimdB8WbJMB/pqGHoafYqGMGYumH/SPG6nZAAAAAAQAKf+2A5QDGgAFAAsADwAyAAA3NjcXBgcTFhcHJicBITUhNwYHAgcGBwYnJicWMzI3NhMhNSM2NxcGByE2NyE1ITcXBgMpU0Q6PlIHayo/KGkCyf4lAduVAQIfNxo1PGoCElBUIg4sHf40FhMNQQoOAR0TEP5IAcQLMAkeBZ69IK+sAzWOXx9jjv2TPsAWCf6bNBsDBAghHAgMKAErAXi0BXxuh69ABAZs/vgAAAAAAwA8/68DlQNAAB0AIQAuAAATIRUhBgczNxcCBSYnNjcmJzcWFzY3IwYHJic2EyMBIxEzNxEUBwYjJicWNzI1EUIB+P7yFBnnDChF/qkRGJ1jRVgnWUE+HOs1QxkbczqnAoVBQc4nH3UHEGAaFgMMQFRKAw3+KJ0gGD+RQjgxODlwj4ZTGRKIAQL92AIpc/zOOhAMICACAhYDMgAAAwAo/7MDlgNDAAUAIAA9AAATJic3FhcTJicRIxEGByYnNjcjNSE3FwYHFzY3FwYHFhcBAgcGBwYnJicWMzI3NhMjAgcGByYnNjc2EyM1IfsaPDM+Gk0tP0RBPxITr2L/ASANJytRJDYbLzsmNR0B7xIyGjE0XwQQTEIaDysTyg4wO4UTIIA2LAuqAfkCmztRHE05/gFCTP5qAYpMMywRhtA9AxtvcSg4KiY9ITohAdT9Wz4jBgUHJhoGETACdP7ZocJwHBdiuZUBF0AABAA7/7YDmANHAB8ALQAxAD4AAAEGBSYnNjcGByYnNjc2NyM1ISYnNxYXBzMVIQYHNzY3FwYHFhcHJicGByYnJBMXIxEzNxEUBwYjJicWNzI1EQIMhv7rEBqkeuAXBRATJjg5yAEEEyU8MBIG2P76RkzVJxV+OlZwMTAvbISjFRcBPpLRPz+2KCGCBhBaLRgCKv6VHhhNiQ4JGSYDJjtZPjg5EEE+Aj5oTQk3K9VlWmA7KzlkeVIiFosBB9oCKWf82DsQDCEeAwMYAygAAQA6/7UDtANCAAsAAAEhESMRITUhETMRIQO0/mRG/mgBmEYBnAGK/isB1UQBdP6MAAAAAAUAQ/+0A68DQQAVABsAIQAyADgAAAE2NyE1ITUhNSE1MxUhFSEVITcXBgcFJic3FhcFFhcHJicFBgUmJyQ3ITUhNjczBgchFQUWFwcmJwL5ICb9FwF+/r8BQUQBSv62AUkLLj4w/n9JdSN7Rf7bc0wjQnoBk1j+ogsXATtT/m8BqhoIRAoXAXb+lOCTJpfUAY4qSDthO2pqO2EDE4A6CjcjKSUyCB4zLTAlps07HxkynjxQnp5QPDxGTjZTRgAAAAIAKv+9A8MC/QAEABkAABMSFzYTNwIHFhcGByYnBgcmJzY3JgMjNSE39lepu1FRUtus8RYW+auu8g4b8qiwYFACtw0Ct/7zr7IBCjH+vNaaOxMoQ5+UTyUWSoy5ATBCBAAAAAADACT/sQO/A0cABQAKADoAAAEmJzcWFwEWFzY/AQYHFhcGByYnBgcmJzY3JicGByYnJBMjIgcmJzY3NjcXBgczNjcXBgchByEGByE3AyIeYjJaKP5PO2trNFk8h4m2FhPBiYOzDBeihF4+bLwUHQECZo1cDRIFERIqGEggKrwdDUoSFwG1Af46EhMBWAwCfyprH1o1/syAWl58LbV6XyMUJy1mYDIdGyhdV3fFdR8TnwFKEDYKBCNGaw1nU256DHxgQT8vAwAAAAYAOf+2A68DRgAGAAwAEgAgACUAOwAAAQQFJickNwEmJzcWFyUWFwcmJwMjNSE2NxcGBzMVIzUhFxYXNj8BBgcWFwYHJicGByYnNjcmJzcjNSE3A2D++f4OAQ8B6vD+tAopOyoN/r42EzsUMx0/Als9JEIrNbFB/TGhR4ODRGNJoaHXFxLpp6jvDxfdoINOBSkCKA0DETkVESgVNf7nQ1MNTkaCTDoUP0v+rclcUhVPSsmOtmlNS2sll2dMGhsjIl1XKCIZHkxXfwI+AwAAAAACADX/tQNNA0YAAwAnAAAlNSEVBSM1IRUjEQYHJic2NyYnNxYXNjchBgcmJzY3FwYHITcXBgUhAwr+OAILQ/44QltOCRnKrkVZMl9JpVj+hWeJExvhbkofIwFsDCx3/uEBmyjr63M2NgFOIBIgHSpfQT0mQEFlg2RIHRVtsQ8wKAQc45QAAAAAAwBR/7YDswM+AAMACQAdAAATETMREyMVIxEhASMRIxEjAgcmJzYZATY3FwYHFSGQjEHNPwEMAlaFQ80EfxUjd/p2On/nAZUCp/5BAb/+AEwCjf7X/fcCCf6kqxgToAFTAQUvNDQxLK0AAAAAAwAe/7cDggM6AB8AIwArAAABMxUjFRYXByYnESMRBgcmJzY3IzUzNQYHJickNxcGBwERIxEBESM1IxUjEQE/s7NsPSknWUNUZQkcgE62xkpfBQ0BC28uRWUCAOkBLEPpQQIePht1UTZAb/4/AcXGbRQpgtg+rAwMGB0kLzQZFv2cAjT9zAJ0/QBMUwMHAAAABgBY/7QDmAMZAAMABwALABMAFwAfAAABIRUhFyERIQEVMzUlIREjNSMVIyU1IxUBESM1IxUjEQLB/moBlkP95gIa/ZPc/uUBXULcPwL+8AEyQvBAAtnHQAFH/gz6+kD+WS03d/r6ATr+VjA3AbEAAAUAPP+0A68DEAADAAkAIgAmACoAADcVITUFFSMRIRUBIxEUBwYjJicWNzI1ESE1IREhNSEVIxEzJSEVITcVITX6ASr+1kEBrQFJeicefAYTZRwU/UwCqv1sA0lxhf6G/sUBOz7+TMttbaIsAQPXASj+sjYOCxsjAgISAU07AUo6Ov622WWWx8cAAAAACQBR/7gDywNHAAMACQANABEAIgAmACoANwBHAAATETMREyMVIxEzATUjFTUVMzUTFAcGIyYnFjMyPQEjFSMRITchNSEDIxEzNzMRFAcGIyYnFjcyNQMGDwEWFwYHJicGByYnNjeIbDaiN9kBEI+POhoVRwQOHyMMjzsBBMX+iAF4Rzc3WTgeGl4DEU4UEJAECA1rvh8Ls296qg4c4nICwf4qAdb98mYCrP3BWFjgVFT+aC0OCyEaAQyEzgIYRjf+DAFmJf4fMA0LGSACAg8DKwQMEW1LHRdScoJLGBhapQACAF3/1gOJAuwAHwAnAAAlESMRFDsBMjcWFwYrASInJjURIwYHBgcmJzY3NjcjEQERIzUhFSMRA0TNGmcoEAIDDi1xLxIQkwQjLHsLHW4mHgPFAupF/VtCYgJK/r4sBR8aBRgVOQFB4mN7OhkbM21W0P22Aor88UVMAxYAAgAs/7gDpwNDABUAJQAAAQYHESMRBgcmJzY3IzUhNjcXBgchFREVITUhESM1MzUzFTMVIxEBgjNFQzhBCxehbPYBEiEWRBsXAgn9pgEL5ORC5uYCZnBc/h4Bkj4tHB5z2kBKUxFTOUD9pD4+ASQ+xcU+/twAAAAAAQAr/7IDxgNCAB4AAAESBQYHJAMGBzcWFwcmJwYHJickEyE1ITY3MwYHIRUCM3MBIBwW/uF7I1sahUM4PYBlqBUcAUtF/oYBhAoCRwILAaAB9P51ehgliAGVsoESaVctU26DSyEWigF/RE68q19EAAQAOf+0A7IDRAAZAB0AIwA0AAABJicGBSYnNjc2NyE1ITY3MwYHIRUhBgcWFwEVITUFFSMRIRUBIxEUBwYjJicWMzY1ESE1IQNCldVW/vYIFp5TTiL+sAFjCQdFBgkBb/6ACATaof1vAQj++EABiAGJjC0olwYTNHQZ/VcDeQHFSk11JRcdFSspSzskOzQrOxQITE3++5CQx0IBQP4BUv6NOg8LHCQCAxQBcj0AAAAAAgAy/7UDrQNPAAYAIgAAAQYHFhc2NzMGBxYXByYnBgUmJyQ3Jic2NyM1ITY3FwYHIRUBgTgtem9sL0szb8KJN4XDmv7cDRgBD42Miz8/9QESPRpHIDICDwIMhVkwM3PO5H5cXzpiX4UyJxsocEE1a5JGm2ILcYFGAAAAAAYALv+2A7YDQwAFAAkAEAAXADMAOgAAASYnNxYXByMRMwcGByYnNjcFBgcWFzY/AQIHFhcHJicGByYnNjcmJzY3IzUzNjcXBgczNwECBSYnJBMDeR1UN1Mk90BAih82GR8zHf7WJRwQXDcSQhRFSSAsJDVGcw8ZakY+WSQmYm8XCj8NFncLAihv/ngMGQF0agGDfJMUiYW8Ame1y3MPDGjGYaReC0WMxjj+76I9ITIoLYVHHxY6hzVBZrA+gksEW24C/tL+zmIgG08BHQAAAAAEACL/uwO5Az8ADwAWADIAQgAAASE1MzUjNTM1MxUzFSMVMyUGBxYXNjcTJicGByYnNjcmJzY3IzUzNjcXBgczNxcCBxYXBRUhNSE1IzUzNTMVMxUjFQOo/dvqxcVC1NT5/RIUJD0mLBE1ITtCbxIWaT9GRx4kU14WBzsLE20MJRE7SiYCM/2VAR/X10Lk5AGbP6A+hoY+oF9jliofgsD97iw5iUgeFj2LPi9gtT2DRgNjYwIG/vqeQDQ/QECvP3NzP68AAQA1/7QDtQMCABwAAAEhERQHBiMmJxY3NjURITUhNTY3ITUhNxcGBxUhA7X+ZDAnnAgWfDYb/mABoI15/b4Cig4yh8MBnAFF/so/Dw0hJAQCAxYBNUKSP2VBBCaDY28AAgA3/8MDqwNNAA0ANAAAEyM1ISYnNxYXIRUjNSEBMjc2NxYXBgcGKwEiJyY9AQUnJTUGByYnJDcXBgcVJRcFFRQXFjOXQwGKGxdBKRYBa0X9RQJ9Kg0NBRkpCBkbTOVUHh7+nQgBa2mVBRABjag3bqUBugn+PQ8OMAIKzjwlFEMyzo/9axwbYhMKciQnFxhEuipAKaYUFBofNkg0KyKsMjw1wh8JCgAAAwA+/7oDqwNHAA0AEwAoAAATIzUhJic3FhchFSM1IRMWFwcmJyUhERQHBicmJxY3MjURITUhNTMVIZlCAZESIz8tEQFfRv1QVXQzNzRwAvH+/i4mlQQUZT4a/dkCJ0QBAgIGxC89EUc2xIT+vW5iJmduWf6VPg8NAhcrBAMYAWpBkZEAAgAo/7QDwgNFAA0AJQAAEyM1ISYnNxYXIRUjNSEBFhcGByYnESMRBgcmJzY3ITUhNTMVIRWZQwGNEh1BJhUBZEX9SgGykeYfEuWWRJPoFRrgj/64AYNEAYICAc0wNRI+Oc2O/ufjcBsff/P+WQGs/IMgF3LsQKSkQAAAAAQAUP+1A5gDSAADAAcAEwAhAAAlFSE1ARUhNQEhESM1IRUjESEVIQEVIzUhFSM1ISYnNxYXAREB5/4ZAcT+PAIrRP4ZQwJJ/foCh0X9P0IBmA4WQhoSrY+PAWCEhP7b/tIoLQKT+gGTrm9vri0rDzA3AAAAAwBD/9IDpwNKAA0AIQAnAAATIzUhJic3FhchFSM1IQEVITUhNSE1ITUhNSEVIRUhFSEVNxYXByYnmUEBlB0dQC0YAVhD/U0DDvycAYz+7AEU/tQCov7QARz+5IBsODA+ZAH3zT83EE05zY79iz4+0j6mPj6mPtK/UjcoP1EAAAADACH/tAPHAzQADAASABkAAAERFAcGIyYnFjM2NREFFhcHJiclAgcmJzYTAhswJ5QJEjJyHAEsmytFKZX+VUV5HB56NQM0/OJEEQ0kJAIBGwMe4PTBIMf0A/7YkBgQjQERAAAABABE/7IDoANEAAUAGAAcADQAAAEGByc2NwEjNTMmJzcWFwczNTMVIRUjNSEXNSEVBQYHJSYnNxYXByYnBAcmJzY3NjchNSEVA0E6OzY7LP2iQ7ggPjtEHj27RgF5Rf1UIAJh/pxjZgHwQjs5oUM+Fx79oyQLDBkvRVz+4wNcAxpTPBdETf6TxUBMGk08Hbm5xYqiPz+yh10gTDgflHIjJyYtDSkeBS87gUFBAAMAJP+2A6wDEwADAA4APQAAExUhNQUVEAcmJzYZASEVAzI3NjcWFwYHBisBIicmPQEFJyU1Byc3NQYHJickNxcGBxUlFwUVJRcFFRQXFjPNAmD9oG8aIGcC5TshCwoEFyYIFRc/0UsaG/76CgEQ4wvuS4oFDgFFkjlbjAEfCv7XAWYK/pAMDSkC2Hd3sjb+f7kWDKsBbAEk7f3aFRVHEApZHB8VFj5SKTgqYiM2JlsOEhcaKjgsHxxeLDYuYjg3OlscCAkAAAAABAAn/7MDsgNDAAMABwALADkAACUhNSEBIRUhFSEVIQUhFSMRBgcmJzY3IzUzFSE1MxUhNTMVIRcGBzMmJzcWFyEVIRUzFSMVMxUjFSEBCQEU/uwBFP7sART+7AEUAZX9V0IwPxgZoViwQwEeRAEcRf2xOhgc/w0ePCURAR3+z/z8/f0BUx5kAS5hNmHSMwGxNjEgFHC0x4uysovHEjEpIDYQMjQ5YTZhNmQAAAIAJf+/A7sDBgANACgAACUXBgcnNjcRIzUhFSMRAQYHIQYHAgcGBwYnJicWMzI3NhMhNjcjNSEVAaIHiewPPWWZAWiMAWwjGwFqAQEcNBo9O3gDF1pfJQwrGf6HKSiWAh/0PyE2RAsXAbtCQv5SAfOlbhcJ/oYzHQUDCCAjCAskAUCFzkJCAAADACz/tAO/A0wAEAAoAEsAABMQByYnNhkBISYnNxYXIRUhATUjNTM1BgcmJzY3FwYHFTMVIxUzFSE1JwYHFjMyNwYHIyInBgcmJzY3Jic3Fhc2Nyc2NyM1MwYHMze3VRMjSgGbDhk8GRcBW/0GAfmWlj9dBQz0ZyI3W5eXt/5QEhpIXtHlKhAI+ehpNk8SGFE2MCEyGigzF7U+QpLyP0BnCwHA/qCsFBKbAUsBJyspESc+Pf36rTqFCgkZGR0nMxQSjzqtOjrSsHNRARkjXEErHRApQj9rE1k0VXYBXHw4c2gCAAADAF//rgPHAzAABgAiAD0AAAEGByYnNjcBBwIHBgcGJyYnFjMWNzY3IzY3MzUjNSERIwYHJRIXBgcmAyMRNxQXBgcmJzY1ESM1MxEzESEVA5BiqCUOolr+HgIQJBYrL04EETREGAsaDsgRC6zFAQWzCwUCLkitHBK6TGedBOASCxItc3NBAY4DA7BzIgllpv49Hf7KJxgDBAUjGAQBCxr8dbGhPv7igycr/t9lFx57AUD+nzwhHF4QIxcULgFUQAFy/o5AAAAAAAsAPf+6A78DLgAGAA0AEQAVABkAIgApAC0APgBEAEsAAAEGByYnNjcTBgcmJzY3JSEVIRUhFSEXIREhEyE1Myc3FhczAQYHJic2PwEhNSEXFRQHBiMmJxY3Mj0BIzUhFQcWFwcmJyUGByYnNjcDiWegGxaeXF9uuxcYu2D+ff7HATn+xwE5Qv5GAboi/fLrGTwWDd3+iyZHGhVBIhcBKf7XtB4XXQQQRxAOsQGoTkAgMyA7Ahp35xEd4W4DFYhiHw9Yff7bkWYdEV6FzkAtQS8BC/57NzAPIh3+r1tIGA08UkpaiqwuCwoXIAICDau6uhhOQBxGTW/BbxkZZLEAAAAFADb/wwOwA0QABQAcACIAKAA4AAA3NjcXBgclMjc2NxYXBgcGKwEiJyY9ATMVFBcWMzcmJzcWFzcWFwcmJxMVIRUhFSE1ITUhNSE1MxU2PyY8LTgCESgNCwUYJQgXGUbqUxwcQQ4PL7xLky6VS5tgKEEsV8b+ZQFf/QcBVf5rAZVFBFSfFatSGhYWURAIYh8gExM63d0WBweTVVYpVlFCnmkafY4BxUCwQECwQJSUAAgAIv+2A7oDRAADAAkADwATABcAGwAfACMAABMRIxEHBgcnNj8BFhcHJiclFSE1ARUhNTchNSE1ITUhJREhEfdALAooNyYO4DcTMhUzAqP92QI4/aiSATb+ygE2/soBeP5HA0T8cgOOx59rE1yjIGtDG0pqfT4+/R4+PpeVOJM7/ioB1gAAAAAHACD/tgO5A0MABQAJAA8AEwAXACgAQAAAEzY3FwYHEzMRIxMWFwcmJwE1IRU1FSE1ExQHBicmJxY3Mj0BIRUjESE3FSE1ITUjNTM1ITUhNTMVIRUhFTMVIxUgIA8yCCRGPT14Jw8wDCcCRP6NAXM/IRxyBA9VGxP+jT8B8VD9dwEh7Oz+/AEEQQEL/vXy8gGGW6QHm28Bz/xzAvlPPBk4Wv3oUlLVUFD+qDENDAIUJQMCEU+cAdhxNDRLMkM0UFA0QzJLAAAAAAMAIf+uA7wDPAAFAB4AQgAAASYnNxYXASYnBgcmJzY3Jic3Fhc2NyE1ITcXBgcWFwEGBxYXFjcWFwYnJicGByYnNjcmJwcnNyYnMxYXJRcFFhc2NwNPLV4vYSz+ASFCU3oSHntXTGMwPWM2Gf7WAT0LKx9NTCsBxzxxNEsmDhUjGk9xRVZgFSByYSsWjweQDAZEBQsBJgj+2RAjXDMCjD5MI0c+/ZZAaZlaHxhSqnSHJU+MgZo8Aw/hq3BOAUWhho4HA6UVD9IFCaBaNRwVN2uGzxA8EXuPk28hPCKgf3eIAAAAAAIAKf+uA7oDQgAFAEQAAAEmJzcWFwcGBxYzMjcWFwYHBiMiJwYHJic2NyYDIRUhFQIHBgcGJyYnFjMyNzY3IxUQByYnNhkBISY1MxQXIRUhFhc2NwNUPnYncUUJQW48UCgIGh8JFxc3bUxeeBcZiGU4E/6bAQEHGREoLksCETA+FwgSBcBqGh1dAaQFRQQBRP7BDypUMwKcOT4pNzzXxY2huRoJfS4uqWVGIRVIdKUBBIce/tAeGAQEBSMbBAoU8hL+yJkeD4cBHgEWXU9jSUHRl3mdAAAAAAQAJf+zA4kDQwAdACEAJQAzAAABBxEUBwYnJicWNzY1EQcnNjc1IzUzNTMVMxUjFTcBNSEVERUhNTcRIzUhFSMRMzY3FwYHAXp+IxxqBRBTFBSCEk9FhoZDdXV2AdP+pQFbRET+pUGoHQ9MEiQBUCf+3TYPDgIfHwICARMBDidEExTeQcvLQcoi/p719QIk7+8//S0xOALaW1cJQGkAAAAFACT/swO3A0MAHwAjACcALwBMAAABBxEUBwYnJicWMzY1EQcnNjc1IzUzNTMVMxUjFTc2NxcVITURNSEVAyERIzUhFSMBMjc2NxYXBgcGKwEiJyY1ETMVNjcXBgcVFBcWMwGGhyIfYwMSLjcThhRFVY6OQXh4Py0SfQFR/q8/AdJC/q8/AXcqDAwFGyMIGBlI71MdHULhaDSC+w4OMQFXKv7YNBAOAhkkAQESARUpQRIZ3T/Lyz/KEw0GaWpq/u9wcAFL/lMqLgJGFhZTEwdjHyAUFD0BHJgwLjE0ME0ZCAcAAAADAC//swPBA0QABQAJADgAAAEWFzY3IwMjFTMBBgcWFwYHJicGByYnNjcmJwYHJicRIRUjETM1IzUzNTMVMxUjFTMnNhMXBgchFQJPJUpOINvZ4OAB9ylkXYIZFYBaYqkMG6xiRSolJgsZ/uE/jri4Qra2jRN3N0ITGgFVAkbKjIjT/vzhAeX9nYs6FiJBhXtMHB9FgX60TDIMEf6iSAGnuz/ExD+7DY8BIQpdUUAAAAIALP+zA7gDRAAoAD0AACUVIzUHJzY3NSMiByYnNjc2NyM1MzY3FwYHMxUjBgczNTMVMxUjFTcXASMRIxEjFRAHJic2GQE2NxcGBxUhAVZB2g+MXWo+DgcPExwXIn+PDwlECBHh8ictdkGJiY0EAdF/P513Fxlp4HErdsgBW5Lc0CdEFBCWDhkkBkw3dz85QA0oRD+Ha5OTPYsXOwEL/fwCBCn+wp8ZEY4BJQFMJC85LB+0AAYAL/+5A7oDRwAJAA8AFgA1ADsAUAAAASE1MyYnNxYXMwUmJzcWFwMGByYnNj8BERQHBiMmJxY3MjURIzUzNSM1ITY3FwYHMxUjFTMVBxYXByYnJSMRIxEjFRAHJic2GQE2NxcGBxUhAff+SskUGTsmEqf+tgchNSUHISVCFRo/ILAcFVEDEDkSDcvLzwEVIRg9IBmDyb5kPhYwFj0CUXFAomkYG1/TZTZpyAFTAqE5Ly4QQC3hR0wNTET+129PExBDZij++iwPChwdAgINAQU6bTlOVg5cOjltOiRhPxpAYtv+BAH8Jf7DlhwNhgEkAVMkKTApIMQABgBV/68DkwMYAAMABwANABMAFwAsAAATFTM1ETUjHQIjESERJTUhFRQHExUhNRMUBwYjJicWNzY9ASEGByYnNhkBIZOtrT4BKQHT/usHBwEVQikmhgQUWzgY/tsjjxYbsgGYAsjHx/4tz88+XgKs/bJ6uDJEQgGptLT9Nj0QDRcrBAMBGOTPdh0PkQFLAWEABAAp/7MDvQMZAAMABwALACwAAAEhFSEVIRUhFyERIQEWMxY3BgchIicmJwYHJic2NxcGBxYXESE1IRUhFSEVIQL5/fACEP3wAhBD/WwClP7hOUJpvBEH/vGkWWY5OWUYG5wpQgsONo3+ZANu/nEBTv6yAuZXMVgzAUb89QYDBB4iIiZld0wdEmblCjgtgSMBNTw8djwAAAACACr/twPAA0QAHAA1AAAlIRUhFRQHBiMmJxY3Nj0BITUhNTY3ITUhNxcGBxMWFwYHJicjFSM1BgcmJzY3ITUhNTMVIRUCEgGe/mIqIIIIF24lFv5qAZZWV/5rAeYPK2GVTZDRFxbskwFDj+wQG8+K/roBk0MBm9w9mzQOCxwhAwIBEZo9Nhw0OwQkSz0BoI5BFCJUseHhs1kdF0iQPnFxPgAAAAQAJ/+1A8cDSAAMABMALwBHAAATIzUhJzcWFyEVIzUhFwYHFhc2NxMmJwYFJic2NyYnNjcjNSE2NxcGByEVIwYHFhcFFhcGByYnFSM1BgcmJzY3ITUhNTMVIRWSPgGHJjckEQF5Qf055TMZf2FiMbp3y5j+2wkR5Ipngz0w7QEeJx88IBoCAMEwV8Jt/r+S5hcT95NCkPEUFeSP/p4BmUIBnwJpjj0UNB2OVaU1FhQULkX+/SwsPxUgFgwoFRM3NjgtLxMrHjhQNSsll4IzFiFCm+nklUEiEzOCOVVVOQAAAwAq/68DxANDABYAMABIAAATBgcmJzY3IzUzNTMVMxUjFhcHJicVIwUXAgUmJzY3Jic3Fhc2NyEGByYnNjcXBgchAxYXBgcmJxUjNQYHJic2NyM1MzUzFTMV8kpUEhhpSaG3PaagUkklH109Ah8spP3cChrroF1XM2ZbfUL+qW6DGhbybEEQJQE2CVF5HBBmVD5MWA4ebE+UqT7TAmN0OhsTPX46a2s6OkM1J1TTKx/+wl0iHCFMQCclLD1JZ042HBNcgBkSIwE4fEEWGkF82s9yORQbOn06a2s6AAMALf+xA74DQwAWAC4AVQAAAQYHJic2NyM1MzUzFTMVIxYXByYnFSMlBgcmJzY3IzUzNTMVMxUjFRYXByYnFSMBFjMgNwYHISInJicGByYnNjczBgcWFxEhNSE3FwYHJzY3IRUhFSECpEtcEhluS5GqQLWxUnQmMHRA/lhHWhQXZ02Xr0GOjmklJRpPQQEWMzwBDTAUBf7anFJdNDV0DhydIUUJCzCD/oEDFQswKSU7GBb+zQEf/uECfnE8HBM5czpdXTpAaDI5bcLDbDwcEjd2OlxcOgFHJTEiR8T+UgYBHCMiJmR+Ph8TUO43KosjAUA9Aw1jOQ8nM388AAYAJf+2A7YDRAAFAAsAIwA7AEIAXQAAAQYHJzY3BSYnNxYfAQYHJic2NyM1MzUzFTMVIxYXBgcmJxUjBSYnESMRBgcmJzY3IzUzNTMVMxUjFRYfAQYHFhc2NycHIRUjBgcWFwcmJwYHJic2NyYnNjcjNTM2NwN9Qx4vNCH+qyAsMzMcSGN8Dhx8YsXwPvXLaXobEXhpPv7RDDs+MzwNFl4vdns+Y2MNY90gHGAvRxxyIwFJcRtMd1EvS4NrwAkTpVxgTyIwlrYOGwMYaicWSkmpRkIYTDl7bUEWGjhlOcXFOWUyGBo+batCHm797wHhtV4fIIj5P8HBPygSnoI5JiASOFmESjpkRi4pMCo1RB4gGBYvJBkrTzoaPQAAAgCK/78DugMzAAUAKwAAASYnBgcVBRYXFjcyNzY3FhcGBwYjIgMhESUUFwQHJic2NREkNxcGBxYXIRUCIQ8Dk40Bfh85PE4YCwoFGh8JGBc310n+xAEfBf6rFwoTIwG8zCJnngIQAUsBwHWGEgveQrJjaQEiIVYYCWwnJwG//q9QJRdmEB8bFCwCkSI7Ox4Vj3ZCAAgAL/+2A5QDQgAFAAsAEQAVABkAHQAhAC0AABMmJzcWFwM2NxcGBwMWFwcmJwE1IxUjMzUjERUzNTMVMzU3ESM1IRUjETM1MxXpRHYkdkS9WEwyUksDdUwnPYIC8rTura2tQbRBQf5eP+xBAYk3NjEzM/4ugpgqo3gDczE6NzQ+/Srl5eUBHNzc3NxA/Us0OwK80NAAAAAABwAo/7YDsQNDAAUACwARABUAGQAqAEIAABMmJzcWFwMmJzcWFwM2NxcGByU1IRU1FSE1ExQHBicmJxY3Mj0BIRUjESE3FSE1ITUjNTM1ITUhNTMVIRUhFTMVIxX0NmcnaDhTN2wmazuuUkw1PVoCmf6NAXM/IRxyBQ9WGxP+jT4B8Ff9aAEo6+v+/gECQgEL/vXy8gKZMzouNzD+wDU7Ljc0/iiOuSiXr8RTU9VQUP6oMQ0MAhghAwIRT5wB2HE0NEsyQzRQUDRDMksACgAo/8MDtwNDAAUACQANABEAFQAmACwAMgA4ADwAAAEGBzM2NxcjFTMVIxUzJzUjHQIzNScHJic2NxcGBzM3FwYHMxEhAyYnNxYXAyYnNxYfAQYHJzY3ARUhNQHqJTTRJCyFsrKysvGurusqHhWZV0AOFMoOKyc9yv3mT0NrJXM8WkZqJm5CHEJZOlROAtD9VgK0PEAsULOCNYO4goI1g4OyKCAQe8QTHiQEH0xP/lcCBjw4Lzg1/sc7MDEvN8KepSeLuP73Pz8AAAAABwAq/7UDwANCABMAGwAfACUAKwAxAG0AAAEjNTM1MxUzNTMVMxUjFSM1IxUjBTUhFSM1IRUlNSEVJSYnNxYXAyYnNxYfAQYHJzY3BQYHFhcGByYnBgcWBwYHBgciJyYnFjMyNzYnBgcmJzY3JicGByYnNjcmJwYHJic2NyM1IRUhBgcWFzY3AdWurjyzPLKyPLM8AZL+DzsCaf4KAX/9yC9nH109UDpkHmQ8KFVIL1lJAp4tRzV7GBB+ORgiIQcGKCM2FDgEDCkoKBM2H43EDRPbhQ0TcaMLEqprExtiXwwUomrnAkz+6x8tOSFtWgLCNExMTEw0QkJCt3BwoKACLS3OMD0wMDf+xDUwMi0zw7+ALZmmHB8jnjURID+vDQ5BPDscGgICIRQEDSFeZzQZEi5uFhlNKhkTIUgTEysZFhYkODMzFhcqMDE+AAAEAC//tgOpA0QAEAAWABwALQAAAQIHJic2EyM1MzY3FwYHIRUDNjcXBgclNjcXBgcTBgcSFwYHJicGByYnNjc2NwFbO7oXILE2zNQIBEYHBgIu0DoqOTYz/mgnGzgjHfIHEV3bFxW5akbmExbCRi4KAoX+VL0bGacBjkA+QQRPLED+oFdlHG5NBUOGFJc3AV2aYf74YRIiXd/mWyAUSbBz/QAAAAYAL/+0A7IDRAADAA8AFQAbACEAJwAAASEVIRchESERMxUhFSEVIQE2NxcGByUWFQc0JyUWFwcmJyUWFwcmJwL8/e0CE0P9awEhQgF9/oMBMvzwUDk/PU8BLRlDFgELOBJAFTEBBWAmPyVcAdS8PgE4ATJuP4X9v0aDEItL0nBPCV5lDW9QD1tlH3VTGlh0AAoAO/+zA7MDSgAcACIAKAAsADAAQQBVAFsAeAB+AAABIicmPQEzFTY3FwYHFRQXFjsBMjc2NxYXBgcGIwE2NxcGByUWFQc0Jzc1IxU1FTM1ExQHBiMmJxY3Nj0BIxUjESEnFhcHJicEByYnNjc2NxcGBzcmJwEWFwcmJyUyNzY3FhcGBwYrASInJj0BMxU2NxcGBxUUFxYzFxYXByYnAp1CFxdAiFcta6EKCSKhGwgJAhMmBhMUM/zxSSo9MEQBHRZAEzXX1z4gG28EEEokEtc8AVFLYSw4DRP+vh4KChcaRTU9P0bqKhgBGysOQBAnASIcCAkCGCIGFBQ1sUQXF0CXTCxnqAoKI41UK0AiWQH4EhE08XUjJi0sI0kUBQYQEDsOCEoaGf3WP2oQdT+uVkkITlT6RES0Q0P+2S4MChMhAwMBEEWSAaXWWk4dFhsaDScTBRs+WxRYQBIyFv1vXkAOSFd6EBA8EQZLGRoSEjT2ciYoLjAkUBQFBmBYUBlIYgAAAAAEACf/swO+A0EAKQAtADEASgAAAQYHFhUQBwYHBicmJxY3Njc2NTQnBgcmJzY3JicGByYnNjcmJzcWFzY3ATUjFTcVMzUTJicEByc2NzUjETM1MxUzESMVNyYnNxYXAWkpRT8zFCQqSAISSSQVDCMBSlsWF3pRDBo0PxAdPkYtRi5EKzgdATWd35o9CBb+5uUOTMbe3kLe3p8mGjxYJQMWSE+C1P72RRkGCAQgIAUFAw4u9R0Pb0gjEE+ZVT02MBUVLEpLPiQ6QkM4/hr19fX19f13GzsiGEQGFd8BasTE/pbYEVU0E6ZwAAAAAAIAOP/dA7IDAQATABkAACUVITUhESE1IREhNSEVIREhFSERExYXByYnA7L8hgGU/scBOf6eAxf+kQFJ/rePhDgyP3seQUEBR0ABGkJC/uZA/rkBEXg+LExxAAAABQAu/7QDzQNFABUAHAAjACoAOQAANzY3FwUnNjcRIzUzNSM1IRUjFTMVIwUGBSYnJDcDBgcmJzY3FwYHJic2NwMGBxYXBgcmJwYHJic2N/F5Egj+uA4uVnh4gAFAgWtrAqmD/p4PGQFYepNapRYWn1eTcNoWFddnNQwHcbEdE5x2aagWGNtYlyYFPWRACxoBGj7hPz/hPqnnXB0dTNYBBnNUHBFFa6SkXx4TVZUBkhoLolYXIFmgnmIcEnnHAAAAAgAv/7UDzgNDABMAOwAAJQUnNxEjNTM1IzUhFSMVMxUjETclFhcGByYnESMRBgcmJzY3IzUzNSMGByYnNjcXBgczNTMVMxUjFSEVAYL+uw6EeXmBAUqKd3eHAV9jkxgYhGFAa6AQHaxr3v+IHCYXIEodPgoRd0DR0QEDhGNAJQEaPuE/P+E+/vkolNBkEyBsxf6WAWfPahgbZNs9t1k+Ew5t1gtEQb29Pbc9AAQAK/+wA8ADFgATAB0AIwBGAAABITUzNSM1MzUjNSEVIxUzFSMVMwEXBgcnNjchNSEnJic3FhcnFgUGByYnBgUmJyQ3FzUzNSM1MzUjNSEVIxUzFSMVMxUhFwHO/nSuj4+pAYCYhYWfASwwXpE6Wlv9/gI70CpGLk0mOaABCRgU+LCV/v8SGQE9gy2jk5OxAZWjkpKv/nMHAc42VTRTNjZTNFX+yRptlh1cZTsBPDceNzfOeD0XI0GIe1UeF1+LFDNZNFA2NlA0WTYDAAUAJf+vA3IC/AADAAkADQARACoAAAE1IRUjNSMVFAcTFTM1KQEVIRMUBwYnJicWNzY9ASERIxEhBgcmJzYZASEDMP7pQvgEBPgBWf7pARdCLCOWAxRiPhr+6UL+/htjEx95AtQBJ6+vr0I6MwGWqamp/f8+EA0CHSMEAwEZ1f7VASvLbhsRiAExAWgABQBc/8UDmwNIAAMABwATAC0AMwAAASMVMxE1IxUTBgczESEVIxEzNjcFAgcGBwYnJicWMzI3NhMhBgcmJzY3FwYHIQMmJzcWFwF029vbpCAVqf7oPW8dDgKlFTEZMylqBBJBUh4MLBL++i0xDyllNEAXFQEv1TBrM3AwAmja/sz4+ALeYTP9elAC1lFRw/2nOyEFBAYmGwYPLwIkbEYMGYTpDlk7/hteih6JWgAAAAAEAKP/uQNAAwQAAwAHAAsAEwAAJTUhFREVITUlFSE1NxEjNSEVIxEC+/3rAhX96wIVRUX960M/rq4Bmq2t6qurQfy1RUUDSwAFACL/sAO/Ax4AAwAWABoAHgBYAAABIxEzBxUjEQYHJic2EyM1IRUjBgczESUzNSMDFSE1EwYHFhcGByYnIxU3BhcGByYnNj0BIwYHJic2GQEhFSEVFAczNSM1MzUzFTM1MxUzFSMVMxUjFhc2NwEqeXl5OBkeDxFhMoMBU5MWKbEBLHl5ngFmVjxAO1IRFqY7VI8BBNASCxAySRxTEiF4Ad7+XQpvXl45eTpTU3fPEB9EJQGj/tA8UQFzLycsF4IBDD09fnf+WOl4AU1sbP3NNChLHg4jSOTeKRkdQA0eFBUtxLlyERCkAWEBO91ebVZ4OWJiYmI5eDg5MzMlAAAABAAh/7MDpQNCAAUAGgAeAEkAABMmJzcWHwEGBxYXByYnESMRBgcmJzY3IzUhNxchNSEBFAcGIyYnFjM2NREjBgcWFwcmJwYHJic2NyMRIxEzNj0BIzUhFSMVFAcz1Rw4MzUiZiVIPT4rGEQ/PTsJF6Nd7QENDaQBP/7BAbMjHXMDETY/E7QDBnUvLCRjK2cYGIQapj/rAckBv7sB7gKiP0IfN0VFa2dCTDYkWP5OAZpGLSQbc8w9A0uS/SIyDQobHgEBEQFuGhppXyVMZ3NPHA1ipf5BAfsQHj3+/j4dEAAGACr/swO5A0QAFwAbACIAKAA5AFEAABMGByYnNjcjNTM1MxUzFSMVFhcHJicVIwchFSEXBgcmJzY3JRYXByYnJSEVIRUUBwYjJicWNzY9ASEBFhcGByYnFSM1BgcmJzY3IzUzNTMVMxX4S1oSF21LlKo+jIxNTiQrTD5AAof9eYZLgRcefEcByYRMNkGM/a8DYf5zKB+BBRJkJBT+bwK0VGweDFpQP1NjFBZ0U5qzP7ECZXg/HRFDhThoaDgLMT4uKTq6JDjNalAVFERhAVpRI0pkgjq8Mw0KFyQDAgEQuwHrgEEYFkB1xcp8PhwRPYU4aGg4AAAAAAgAH/+0A78DQwAfACYALAAwADQAOAA8AFMAACUmJxEjEQYHJic2NyM1MzUGByYnNjcXBgcVMxUjFRYfAQYHJic2NxcWFwcmLwEhNSERFSE1FSEVIQUhNSEFFSE1MxEzNjcjNTM2NxcHIRUhBgczEQFVGj09PUAJHFo5fo1CNQUOxFIsLE+BgVEv312BEBmHRtB5RyxIdtgBOf7HATn+xwE5/scBOf7HAc79oVaVBwnY4woDRxIBA/7vCgng+TNZ/i8BwLZZGCh6yD+pDwgaGiYpNhMVtz8YV0jpUEEYFkFHAkVBLkRIaUcBRUREbj9tQrQ7OwG8Gy04OSMFVzgtG/5EAAAABgAx/7UDpwNFABEAFQAZACUAMwBFAAATBgcmJzY3FwYHIRUjFhcHJicTFSE1ARUhNQUhFSM1IRUjESEVIRMWFyEVIzUhFSM1ISYnJRUjFhcHJicjBgcmJzY3FwYHuiYrJRNSJ0EODQESnR8NOQsoFgHr/hUBuP5IAi1C/hVDAjz+B90VEgFvQ/1iQAFvCxUB67gnETcTM00hGRMjRRtADA0CvUsvFglXjAwpIDM0JxMnR/22Z2cBDltb2fEgIgIAwwGGHTCibW2iHiODMzMlGTI/OxsQD0t0CysfAAcAJf+1A6UDRwARABUAGQAdADYAOgBeAAATBgcmJzY3FwYHIRUjFhcHJicBNSMVIzUjFSM1IxUFFAcGIyYnFjcyPQEjFSM1IxUjNSMVIxEhJyEVIRMVIxYXByYnIwYHFhchFSECByYnNhE1MxUhJic3JiM2NxcGB70pOBkeYjM+CxMBBJ8eCjsNIwJDjjmMOYkCVB8YZQMQTRQPjjmMOYk8ApBZ/cICPoDCIhQ7FDFcGxohGQEi/YIIfBYeej8BEBAZDigBYSs/ChYCvUY8FQ9cjBAdJzY0IRUpQf3QU1NTU1NTmCsMCRAiAgIOZY2NjY2hAVvgZwFmNiopGC0+JRsnLdH+9pkaEJQBI5QBHCIGFk52Dx4nAAAFACT/tQOqA0QAGwAgACQALAA8AAABFBcEByYnNjc2NwYHJic2NzY3FwYHNzY3FwYPATYlFwUBFSE1JSERIzUhFSMTFTMVITUzNSM1MzUzFTMVAY0E/swbCwwdMSZJlxYLDBYiUTdCS1aNKRY9bXp+LgE4Bf6gAdgBMv6NAbZD/s5B+tX+GM/p6UTlAT0eHDgPJRwHOiRlEQonHAU2dZ0crHwMQSolsITjCD8+TQED1tY9/oomKgLHo0BAo0CIiEAAAAAAAgA7/7YDrgNEABIAJgAAJRQHBiMmJxY3MjURIREjESE1ITcVIxUjNSEVIzUjNTM1MxUhNTMVA0ssJJoFEXwoF/6uRf72AuZj7UX+70Ts7EQBEUWWPg4MISUFBBQBDv4RAe9A60B1dXV1QHR0dHQAAAMAOf+1A7sDRAATAB8AQwAAASM1MzUzFSE1MxUzFSMVIzUhFSMXBgcRIxEGByYnNjcBMjc2NxYXBgcGKwEiJyY9AQYHJic2NxEzFTY3FwYHFRQXFjMBMvLyQwECQ+7uQ/7+Q0UoL0Q0OBodoVwCCSMLCgUYJwgWGEK+SBoaPUEKEEBYQ6ZhMXPFCwwmAqI/Y2NjYz9eXlgsTUD+JAGIOi0aFHK8/dIdG2QTCnIlKBcYQ6QdGxsXGysBFvVXTjVUXsQeCQoAAAAAAgA7/7QDrgNDABMAOwAAASM1MzUzFSE1MxUzFSMVIzUhFSMTFSEVIRUjNSE1ITUhNSEmJzcWFwchNjchNSEmJzcWFyEVIxcGByEVASXj40EBFUHs7EH+60HvAVn+p0T+qgFW/msBCRMpOTEPLQEFLxf95wFPEhc/JRABRL07Kh4BFAKqPF1dXV08Tk5O/rd4PaqqPXg+QEwQUD0PWkI8KycTPic8ElkxPgAAAAUAQf+6A68DQgADAC4ANAA8AFAAACUhNSE3BwYHBgcGJyYnFjMyNzY3IREzNjcXBgchFAcGBwYHBicmJxYzMjc2NyEVJSYnNxYXASEVIzUhFSMBFSMVIzUhFSM1IzUzNTMVITUzFQLb/WYCmroCDyAVLC9ZAhI6Sh0JFg79etQeED0KHgE3AQkWEyApNAIMJS8VBgwH/ioBFEVrH3BA/hwDO0D9Qz4DVfNB/u9C5+dCARFBMDaMHN8iFQMDBh0bBgkWqgEqLSITECwQCYwXEAMCBBkYBAcOVLwoMDAjLS0BK695eQE2OT8/Pz85TU1NTQAAAAAGACr/tQOtA0MACQAPACkALwBEAFgAABMzESMRBgcnNjcDFhcHJicFBgUmJzY3Jic3Fhc2NyEGByYnNjcXBgczNwEWFwcmJyUzFSMVFAcGIyYnFjcyPQEhNSE1MxMVIxUjNSEVIzUjNTM1MxUhNTMV6D4+KnQgOYV0RBw3GEUDMX3+cgwTfWYhKio2IHQ9/v5KShIYqVE/GCDuC/6xUiQzIVIBXIODIh5uBw9LJxL+awGVQIb1Qv74QfDwQQEIQgJ3/T4BMSJWOSRhAQxgWBhRaQXJQh0UEiMmHx0mKDFANB4VE0NrFB4dA/6FQkElQkRsOMozDgsfHgMDEMk4ZQGRO0JCQUE7SUlJSQAABQAg/7IDtQM7AAYADQATAC8ANgAAAQYHJic2NxMGByYnNjclJic3FhcTJicRIxEGByYnNjchNSE3FwYHFhc2NxcGBxYXJQYFJickNwNhguETG+Fwboj5Dx/0e/24IEQwRCNKIldBO0gPGL1q/vgBKQ0lL1sZETEfLTQqNh0CCZn+qxUWAUqOAxmXYBwWWIn+36xqGhtbomk9QiM/Pf31L2P+bgGCRDojFY3WPQMZdnoZEDUtJDkmNyId6WkjFVzXAAAAAAQAKf+1A8MDEgAHACAAKwBAAAABIxEhESMRIQMmJwYHJic2NyYnNxYXNjchNSE3FwYHFhcBEAUmJzY3Nj0BMxMyNzY3FhcGBwYrASInJj0BMxUUMwIPPwGuQf7StxQ0TGoZGG1SUFozSEw1F/7nASkMKxxMSRgBLf7RDxqoQi8/oRoICAMWIQYQEzxYMRMVPiQBAgIQ/fAB1f1rPmWjYiASYL2LeSFde5iiPwMM+cCASQFN/pudHhJWimKRxf1+Hx5uEQp6IicQEi389iIAAAAFADr/tQOzA0QAAwALAA8AEwAeAAAlFSE1JSERIzUhFSMTIRUhJSE1ITcVITUhJic3FhcHAQQB4f3eAmZE/h9BCQJS/a4CUv2uAlKV/IcBxiA/PkgeLLKYmDr+zCgrAdE3lDiQOjo9SBRKPxAAAAAACgAn/7UDvANEAAoADgA7AD8ARwBLAE8AWQBeAHoAABMGBzMVFjMyNzY3ByMVMycGByYnNjcXNSM1MzUzFTM1MxUzFSMVIzUjFSMXBgchFAcGBwYHBicmJyMVIxMVITUlIRUjNSEVIxMhFSElITUhJRYXIRUhNSEmJxMWFzY3MwYHFhcGByYnBgcmJzY3JicGByYnNjcXBgchFawJEMsNEA4IDwh8gYGzGhASFlMiFnl5OXY5dnY5diULAwoBHwELFhEcGSwCB5syhAHw/dECcEH+ED8HAmD9oAJg/aACYP7UFhIBfPyrAZQHF8MhOjccPB9FTWgXD2lTRGYIGmNBNCApGyANZS02Dw8BGgJ6DxSGAQkTjko/ShoLFg06VwMhLi0tLCwuJSUkAgoUEAi9GRMBAgIVFBv+kkZGKrYcHQEPKVYppB0qLy8SJgEPRjcyS1xFOBoWHR9CMiMQHx8sNT4zFhoIUYkMKx0yAAQAMP+0A7oDPAAFABMAFwAzAAATJic3FhcTFhcGByYnNjURIzUzESUhFSEDFTMRIzUhFSMRMzUjNTM1BgcmJyQ3FwYHFSEV9yxiK2MtQwgSvxESFTSOzQI9/qoBVorORP6qQsz+/mOKBBABRaMuToUBCgJsPFcoUjr+FhgfkhciEyg3AWVA/liGzgG3rP6TJSkBcaw/uxANFSEiNjUZGMY/AAAABQAx/7MDugNDAAUACwAZAB0ASQAAASYnNxYXBSYnNxYXExYXBgcmJzY1ESM1MxETITUhATI3NjcWFwYHBisBIicmNREjBgcGByYnNjc2NyMRITY3FwYHMxEjERQXFjMCBxhBN0Qb/sozZCxtLEEKDdAQDRk4ldi5AV7+ogGcEwYGARkjBRERLmk1EhFeDS04gA0bdDEoCoEBMDcgRDIiaX0FBhQCfU9dF1pPM0daKF86/jIhGZcVIhkmMwFVQf5rAQu//cIVFlARCV8gIBMSNgEmoFRoNR4VLFxKjAE3aV8Wcz/+yf7aEwUFAAAIADL/tAPHA0MABQALABsAIQAnAC0AOwBMAAABBgcnNjcFBgcnNjcBJicGByYnNjc2NzMGBxYXAzY3FwYHJTY3FwYHAyYnNxYXExYXBgcmJzY1ESM1MxEBBgcWFwYHJicGByYnNjc2NwOLTyYyOiz+sSI8Nz0fAcddtTy6EBegNiwHQgYVxWTSQzNDSjv+Tj8cPB9AjTNbLGYqFAkNlQ0NFy6c2wGYAwk98RgQzVA78QwcvD8xCQLreCwWS1wWeEAYPm/+eFJohjYfFipiTsOOUGxT/vVSahh2RBVCeAuCSQHtRE0jVDf97iEWcRIaFyA9AXRA/kkBVFJC/CcZIS3DskAfGixoUtQAAAAABQAx/7IDrgNKAAkADwAdAEMAVwAAASE1MyYnNxYXMwUmJzcWFxMWFwYHJic2NREjNTcRARYXMxUhBgchBwYHBgcGJyYnFjMyNzY3IwYHJic2NzY3IzUzJiclFSM1IRUjNTMmJzcWFwczNjcXBwOc/dr9ChA/Ewvm/VsrbCtpMFcJC8MQERMxmNgBjxUL5f65BQcBIQMQIRQoMkICEC48GQkUDucsnQwcay4lC538ChABVUH+PECYCxg8HwkquSQPRDUCrTgwLQg1MIc6YChWPf4OIBeLFCQTHzkBdj8B/kQBgDcvOTcrHMQiFAMCBB8aBQkUjaBBFhoqVkaGOS4tZJxlZZw8OQtKLApLOQ13AAAJADH/tQO7AyMABQAJAA0AKwAvADMANwA7AEcAABMmJzcWFxMhNSE1ITUhEyEVIRUjNSE1BgcmJzY1ESM1MxE3FhchNSMRIREjEyMVMxcVMzUFMzUjBzM1IyUVIxUzFSE1MzUjNfcyYitoLqUBdv6KAXb+itsBD/7xP/73nw4RFzmPzlQDCAEH2AHw2RFqajhq/vRqap1mZgINzqj93qHEAmFEVSlXPP5FPyw9/uc0e3sVcRQdEig7AXhA/kE5ChZDAQT+/AI+QTBkZGRkZGSmNUHExEE1AAAJADD/tAO9A0UABQATABcAGwAjACcAQABGAEwAABMmJzcWFxMWFwYHJic2NREjNTMRNxUhNRU1IRUDIREjNSEVIxMzNSMFFSE1MzUjNTMmJzcWFwczNjcXBgczFSMVJRYXByYnBTY3FwYH6ShhLV0vQgkNsw4NFC6NzNMBTv6yPAHIPv6yPKVubgGF/W7RrKUZKjE1FxygJhs5GCituP6cPhcvGjkBtysnNC8sAl8/YSZWQv4IHxmAESEXGjQBej7+SrdWVulgYAEf/nc3OwIJz885Oc85NDQXPTIQRDwWKkA5z7hHMx06RGw1TxpOMwAIAD7/swOqAx4ADAAUABoAHwAkACgALAA4AAAlFAcGByYnNjc2PQEzFxEhESMRIRElFhcHJicTNyMGByEzNjcjNwczNyEjBzM3FSMHITcjNTM3IQcCFEVi/g8Z8ls8RNb+H0ICaP8A5pAlld7QCs8GCv7w0AkIzxkQzwwBCMoMzb1/EP2TGYmUGQJUDuBfP1o1HBksTDJPWdcBBf72AUD+xRRCSThRQQHGWCUzJDSEVFRUBDiKijiGhgAAAAQAK//OA78DQQAUABoAIAA6AAABITUhNTMVMxUjERQHBiMmJxY3NjUBFhcHJi8BJic3FhcDFhcWFxYzMjcGBwYjIicmIyIHJzY3ESM1MwLQ/n0Bg0SNjS8klgUTdywa/uVmKDcqYZczYjNnMRwKFxsRTra7rxMBsae9VVoEKGMtWz2NzgJQP7KyP/5pPhAMHyQDAgEXAUF7SSFSd4BRWSFaS/38BhEVCzASKh0KNz2APWMWAQs+AAAEACr/sQPBAwoAAwAeACQAPgAAASE1IQEGFSYnNjc2NyM1IRUhBgclJic3FhcHJicEBwMmJzcWFwMWFxYXFjMyNwYHBiMiJyYjIgcnNjcRIzUzA2/+DQHz/gkCAxMTI0IxzgJ8/qJEUwFYJEY2eD47DRv+XB1+OncsiigtDBgiEE63trYTAYbTuVtaCCdfLlQ7i8wCxD79fQQCFi4ENmeBPz+edhlAcBm4dx8dLyUNAeMxUypcIv3bBhAYCjESLBwKNzp+PF4ZAUQ+AAAHACz/wAPEAyIAAwAHAAsADwA1ADsAVAAAARUzNRU1IxUjNSMVNRUzNScWFzY3ITUhNxcGBxYXMxEUBwYjJicWMzY9ASMVIzUjFSMRISYnByYnNxYXAxYXFhcWMzI3BgcGIyIvASIHJzY3ESM1MwKZuLg8sbFsT0RSRP5SAe4NKVJ+NhiCHx1rBA4ZTxK4PLE/ASVvXdc3ci53NSILFx0RULa6thEBiNe6WmEoYCpZOY7OAhVdXfFhYWFh8V1dtR4dJDU2BB9QQRkP/kIwDQsYIAEBEGSmpqoCBDciWEhjJWFE/fYFERULMRIoGQo3On02YRcBIz4AAAQAUv+2A5oDQwADAAcAIgA/AAATFTM1ETUjFRcWFwcmJwQHJic2NREzJic3FhcHMxEhFTcmJwEGBxYVFgcGBwYnJicWNzY3NjUmJzY3IxEjESE3tPT0v2gpORAl/vscCxghtRYrNDMaHp3+zcUdHQJWMVSIAjYbJS45AhQ+Jx4PIQGKNDq1QAEVCgKMaGj+6XR0ZpJpHi1CbxcaGxg1AmUsOBk6NA/+dfFQMisB8nKrj2xjIhEDBQUhHQYDAgkUQV6Sc4388wNLAwAAAAoAMf+4A8ADGwADAAcACwATABcAHAAgAC8APwBfAAABIRUhFSEVIRchESEFIxUUOwEyNxE1IRURFTY9ATczNSMTIicmPQEjFRQHJicVITUDMxEjNSEVIxEzNSM1IRUjARUhNTM1IzUzNSMGByYnNjcXBgczNTMVMxUjFTMVIxUDUP7yAQ7+8gEOPf56AYb9/0YPKA4B/uxDJz09bx4KCztRCBIBFDpwNv7sNW1/AaB/Am7+I86dnYIfHRYZRic3EA9oPLa2pqYC5VsyXTYBVvq+DwP+4m1tAejvOmlMOYX+TAoLIr9NfEULDFFSAS/9bDxKAqKFOjr9KDg4eTZnOiARDU2GCzMiXl43ZzZ5AAAABQA4/9UDsQM9AAMABwALAA8ANwAAATUjFTUzNSMhFTM1FSMVMxMVITUhNSE1ITUhESE1ITUhNQYHJickNxcGBxUhFSEVIREhFSEVIRUB0O3t7QEv+Pj4p/yHAZj+swFN/tIBLv5uAZKokQENAcbXJXbDAZr+ZgE7/sUBYP6gARlSUoBRUVF/Uv7zNzdcNkoBM0E3TQsDGB0OKDQWD1E3Qf7NSjZcAAAABwAr/7cDugNEAAsAIwAnACsAMwA3AEsAABMGByYnNjcXBgczFQMzFSMVNxYXBgcmJzY9ASM1MzUjNSEVIwUVITURNSEVAyERIzUhFSMTMzUjBRUhNTM1IzUzNTMVMzUzFTMVIxWlKywLGFwwORIXyoOKinUECL0QCRcujo5jARV0AQ4BGv7mPQGWP/7mPX6RkQFd/ex7Y2M8kT54eAKKRy4fHFyUEDcwP/7KPN09IxZrER0bGzTOPI49PbRsbP7rcXEBTv5UJioCQomJPT2JPIaGhoY8iQAABABd/7MDiQM5AAUACQAtADwAABMmJzcWFwczESMlFAcGIyYnFjMyPQEjESMRIxEjETM1IzUhJic3FhcHIRUjFTMTFAcGJyYnFjc2NREhNSH+IlszVynXQEACeBkTTQQOISQMiTyKOcPyAQgUKjYxETIBE/XDtCcjggYOZSQX/h4CIgKAQVoeUkQy/ULUKAoJER8BDMb+ogFe/vUBQ1w3ODwYQTQXN1z+jTsPDAIiHAMCARUCuj4AAAkAOP+3A6ADJwATABcAGwAfACMAJwArAC8AUQAAEyM1ITUhNSEVIRUhFSM1IRUjNSEFIzUzBzMVIycjNTMHMxUjEzM1IzcjFTMVIxUzBSEVIxEGByYnNjcXBgczJic3FhcHIRUhFSEVIRUhFSEVIY08AX7+tQLc/rABhD7+ukH+vgKY3d3d3d2z1tbW1tZM8PDw8PDw8AGl/WtBMTIWGZBKPRUZ4wsYOyIKBQE7/r4BCP74AQ3+8wFkAfnAPTExPcGRz89fKmEqYSphKf5DP9g7Lz6jIgExNicaFGmTFCUmHykTLisCMjsvPjA/AAAAAAoALv+9A8IDSAALAB8AJQArADAANgA8AEEAUgBpAAABETMRNxcHFSM1BycHBgc3Jic3FhcHJicGByYnNjc2NwEmJzcWFwcmJzcWFwU2NyMVNTM2PQEjISMVFAczFSMGBzMHBgcmJzY3IxEzNjcXBgczEQEyNzY3FhcGBwYjISInJj0BMxUUFxYzAxE9VwphPeoKJxkoYRIOJjMVKQYNlREKBgwRKA8BADBTKFgsSDBcJ14v/icKA36AAYEBOoABgYMDCY+ZMJwSGo0ypKAYCUIeBtQBKTsREQYSKAkcHln+tmcjJDwVFUYBaQHM/j8SOBPu4i85BVtKECEYEUlBFhQdHwojDQEhT1MBIjU4Jzgw9jc4KTczPTc+dacVJTs7JRUyNz4496IZFI/dAYw/JwtNDv50/rEZGVoNCWwhIhQUPvf3HAgJAAAHAC3/sgO7A0UAAwAbACAAJQAqAC8AbgAAASE1IQMmJwYHJic2NzY3IzUhFSMGBzcmJzcWFxM2NyMVNTM2NyMhIwYHMxUjBgczExYXBgcGKwEiJyY9AQYHJic2NyMRMzY3FwYHMxEjBgczERQXFjsBMjc2NwcmJwYHJic2NzY3FwYHNyYnNxYXAYD+0QEvDgYQ/xUMCREaMSCCAWyqJj++EyU0Rh7GCgV/gwMCiAFGgAEEhYoFCplDFh4FEREriTgTE0ecFBq1PaKSGA9KGRTt5AEHJAcHG34UBwYCDQoBgxIMBAwQJw8yGShUEw4mLw0CqDv9eRgvMA4oFAU4ZYQ8PJB/IDROEYR3ARA7PnmuKFEnUjU+O/7HDAhBFhYQDzDGyGEeEGr+AZcyNAo2Jv5pBx7+8xIFBQ0OMQQnARkJKAgCHkVUEFNJDTEbDFk/AAAGACz/tgPAA0IACwAQABUAUQBXAFsAAAEmJyMGBzM2NxcGByczNjcjISMGByEHFhcGByYnBwYHBgciJyYnFjMyNzY3IRUhBwYHBgcGJyYnFjMyNzY3IREGByYnNjchNTM1ITUzFSEVMxUBJic3Fh8BITUhAvCES1hJk7QcGzkdEv3HIwfxAhrsBRoBC5By3xgMSkABChQRJDcnAgwmMRMHDAf+NwKDAQ0fFisrYAQOOkwcCRQL/X8qUg8X3Wn+wnYBLj0BJ3f+XjlxImZEn/1nApkBsS5MRzMlLxMqF64pNjMsNFUbGBsLEw6GFBADAh8RBAcOT6wbyB8VAQMFIBUFCBSTAQ0OFRwVMEY0kVJSkTT+vCw/JDE0+TcAAAUANP+5A7sDRwAZAB0ASABOAHIAABMGByYnNjcXBgczNxcGBSYnNjcmJzcWFzY3ASE1ITcHBgcGBwYnJicWMzI3NjchETM2NxcGByEUBwYHBgcGJyYnFjMyNzY3IRU3Jic3FhcBMjc2NxYXBgcGKwEiJyY9ASEVFAcGIyYnFjcyPQEjFRQXFjPyOl8MGZE4PAkWpQwjUf67CxF9Wx86KDsjQCEBM/1nApm7AQ8hFC4zWwIPO0weCBcM/YDFGhs9DSQBRAELFRIjKzUCDCUxFQUMCP4z/T1sIXc0ASgdCQkDEyMGExQ1xUYXGQE8HRZnAg1HFw/DCwwmAthANRkRSHILESIDDP9MIxEYOhkmHyMaNUf9UjWFGtkgFAICBRoVBQgYpQEdJS8SEy8QCYYUEAICBBcSAwYNVbATMDskPicBEg8PNgwIRBYXDxAxyXMnCQcQGwMCDUKYEwYGAAIAKP/EA7wDQwAFAD4AAAEmJzcWFxMyNzY3FhcGBwYrASInJj0BBgcmJzY3ESMGBwYHJic2NzY3ITUhNjcXBgchFSERNjcXBgcVFBcWMwMMQnMqdkESHgoJBBojBhYWPMVHGRpUWRoUd2RzG0ZNlBAijUlCGP7iASUJBUUECwII/qeJTjxjsAsLJgJzRFAkTz/9cxYVSRQHWB8gFhc/DjspJA80TAF524aTXBsdTYd6yj9ekgJ/bz/+vniRGbWPPx0JCQAAACUBwgABAAAAAAAAAEAAAAABAAAAAAABABkAbgABAAAAAAACAAcAQAABAAAAAAADACcARwABAAAAAAAEABkAbgABAAAAAAAFADYAhwABAAAAAAAGABYAUgABAAAAAAAHAGAAvQABAAAAAAAIABoCigABAAAAAAAJAMMBHQABAAAAAAAKAIAB4AABAAAAAAALABoCYAABAAAAAAANAjkCegABAAAAAAAOAC8DTwABAAAAAAAQABIAbgABAAAAAAARAAYAYgADAAEECQAAAIIEswADAAEECQABADIFNQADAAEECQACAA4OTQADAAEECQADAE4FZwADAAEECQAEADIFNQADAAEECQAFAGwFtQADAAEECQAGACwFfQADAAEECQAHAMAGIQADAAEECQAIADQJ+wADAAEECQAJAboG4QADAAEECQAKAQoImwADAAEECQALADQJpQADAAEECQANBHQJ2QADAAEECQAOAF4LhQADAAEECQAQACQFNQADAAEECQARAAwFnQADAAEIBAABAAgOWwADAAEIBAACAA4OTQADAAEIBAAEABwOWwADAAEIBAAQAA4OWwADAAEIBAARAAwFnUNvcHlyaWdodCA/MjAxNCBBZG9iZSBTeXN0ZW1zIEluY29ycG9yYXRlZC4gQWxsIFJpZ2h0cyBSZXNlcnZlZC5SZWd1bGFyMS4wMDA7QURCRTtTb3VyY2VIYW5TYW5zQ04tTm9ybWFsO0FET0JFU291cmNlIEhhbiBTYW5zIENOIE5vcm1hbFZlcnNpb24gMS4wMDA7UFMgMTtob3Rjb252IDEuMC43ODttYWtlb3RmLmxpYjIuNS42MTkzMFNvdXJjZSBpcyBhIHRyYWRlbWFyayBvZiBBZG9iZSBTeXN0ZW1zIEluY29ycG9yYXRlZCBpbiB0aGUgVW5pdGVkIFN0YXRlcyBhbmQvb3Igb3RoZXIgY291bnRyaWVzLlJ5b2tvIE5JU0hJWlVLQSAoa2FuYSAmIGlkZW9ncmFwaHMpOyBQYXVsIEQuIEh1bnQgKExhdGluLCBHcmVlayAmIEN5cmlsbGljKTsgV2VubG9uZyBaSEFORyAoYm9wb21vZm8pOyBTYW5kb2xsIENvbW11bmljYXRpb24sIFNvby15b3VuZyBKQU5HICYgSm9vLXllb24gS0FORyAoaGFuZ3VsIGVsZW1lbnRzLCBsZXR0ZXJzICYgc3lsbGFibGVzKURyLiBLZW4gTHVuZGUgKHByb2plY3QgYXJjaGl0ZWN0LCBnbHlwaCBzZXQgZGVmaW5pdGlvbiAmIG92ZXJhbGwgcHJvZHVjdGlvbik7IE1hc2F0YWthIEhBVFRPUkkgKHByb2R1Y3Rpb24gJiBpZGVvZ3JhcGggZWxlbWVudHMpaHR0cDovL3d3dy5hZG9iZS5jb20vdHlwZS9Db3B5cmlnaHQgPzIwMTQgQWRvYmUgU3lzdGVtcyBJbmNvcnBvcmF0ZWQgIExpY2Vuc2VkIHVuZGVyIHRoZSBBcGFjaGUgTGljZW5zZSwgVmVyc2lvbiAyLjAgKHRoZSAiTGljZW5zZSIpOyB5b3UgbWF5IG5vdCB1c2UgdGhpcyBmaWxlIGV4Y2VwdCBpbiBjb21wbGlhbmNlIHdpdGggdGhlIExpY2Vuc2UuIFlvdSBtYXkgb2J0YWluIGEgY29weSBvZiB0aGUgTGljZW5zZSBhdCBodHRwOi8vd3d3LmFwYWNoZS5vcmcvbGljZW5zZXMvTElDRU5TRS0yLjAuaHRtbCAgVW5sZXNzIHJlcXVpcmVkIGJ5IGFwcGxpY2FibGUgbGF3IG9yIGFncmVlZCB0byBpbiB3cml0aW5nLCBzb2Z0d2FyZSBkaXN0cmlidXRlZCB1bmRlciB0aGUgTGljZW5zZSBpcyBkaXN0cmlidXRlZCBvbiBhbiAiQVMgSVMiIEJBU0lTLCBXSVRIT1VUIFdBUlJBTlRJRVMgT1IgQ09ORElUSU9OUyBPRiBBTlkgS0lORCwgZWl0aGVyIGV4cHJlc3Mgb3IgaW1wbGllZC4gU2VlIHRoZSBMaWNlbnNlIGZvciB0aGUgc3BlY2lmaWMgbGFuZ3VhZ2UgZ292ZXJuaW5nIHBlcm1pc3Npb25zIGFuZCBsaW1pdGF0aW9ucyB1bmRlciB0aGUgTGljZW5zZS4gIABDAG8AcAB5AHIAaQBnAGgAdAAgAKkAIAAyADAAMQA0ACAAQQBkAG8AYgBlACAAUwB5AHMAdABlAG0AcwAgAEkAbgBjAG8AcgBwAG8AcgBhAHQAZQBkAC4AIABBAGwAbAAgAFIAaQBnAGgAdABzACAAUgBlAHMAZQByAHYAZQBkAC4AUwBvAHUAcgBjAGUAIABIAGEAbgAgAFMAYQBuAHMAIABDAE4AIABOAG8AcgBtAGEAbAAxAC4AMAAwADAAOwBBAEQAQgBFADsAUwBvAHUAcgBjAGUASABhAG4AUwBhAG4AcwBDAE4ALQBOAG8AcgBtAGEAbAA7AEEARABPAEIARQBWAGUAcgBzAGkAbwBuACAAMQAuADAAMAAwADsAUABTACAAMQA7AGgAbwB0AGMAbwBuAHYAIAAxAC4AMAAuADcAOAA7AG0AYQBrAGUAbwB0AGYALgBsAGkAYgAyAC4ANQAuADYAMQA5ADMAMABTAG8AdQByAGMAZQAgAGkAcwAgAGEAIAB0AHIAYQBkAGUAbQBhAHIAawAgAG8AZgAgAEEAZABvAGIAZQAgAFMAeQBzAHQAZQBtAHMAIABJAG4AYwBvAHIAcABvAHIAYQB0AGUAZAAgAGkAbgAgAHQAaABlACAAVQBuAGkAdABlAGQAIABTAHQAYQB0AGUAcwAgAGEAbgBkAC8AbwByACAAbwB0AGgAZQByACAAYwBvAHUAbgB0AHIAaQBlAHMALgBSAHkAbwBrAG8AIABOAEkAUwBIAEkAWgBVAEsAQQAgiX9YWm28W1AAIAAoAGsAYQBuAGEAIAAmACAAaQBkAGUAbwBnAHIAYQBwAGgAcwApADsAIABQAGEAdQBsACAARAAuACAASAB1AG4AdAAgACgATABhAHQAaQBuACwAIABHAHIAZQBlAGsAIAAmACAAQwB5AHIAaQBsAGwAaQBjACkAOwAgAFcAZQBuAGwAbwBuAGcAIABaAEgAQQBOAEcAIF8gZYefmQAgACgAYgBvAHAAbwBtAG8AZgBvACkAOwAgAFMAYQBuAGQAbwBsAGwAIABDAG8AbQBtAHUAbgBpAGMAYQB0AGkAbwBuACDAsLPMzuS7pLLIzwDHdMFYACwAIABTAG8AbwAtAHkAbwB1AG4AZwAgAEoAQQBOAEcAIMelwhjGAQAgACYAIABKAG8AbwAtAHkAZQBvAG4AIABLAEEATgBHACCsFcj8xfAAIAAoAGgAYQBuAGcAdQBsACAAZQBsAGUAbQBlAG4AdABzACwAIABsAGUAdAB0AGUAcgBzACAAJgAgAHMAeQBsAGwAYQBiAGwAZQBzACkARAByAC4AIABLAGUAbgAgAEwAdQBuAGQAZQAgACgAcAByAG8AagBlAGMAdAAgAGEAcgBjAGgAaQB0AGUAYwB0ACwAIABnAGwAeQBwAGgAIABzAGUAdAAgAGQAZQBmAGkAbgBpAHQAaQBvAG4AIAAmACAAbwB2AGUAcgBhAGwAbAAgAHAAcgBvAGQAdQBjAHQAaQBvAG4AKQA7ACAATQBhAHMAYQB0AGEAawBhACAASABBAFQAVABPAFIASQAgZw2Q6GtjjLQAIAAoAHAAcgBvAGQAdQBjAHQAaQBvAG4AIAAmACAAaQBkAGUAbwBnAHIAYQBwAGgAIABlAGwAZQBtAGUAbgB0AHMAKQBoAHQAdABwADoALwAvAHcAdwB3AC4AYQBkAG8AYgBlAC4AYwBvAG0ALwB0AHkAcABlAC8AQwBvAHAAeQByAGkAZwBoAHQAIACpACAAMgAwADEANAAgAEEAZABvAGIAZQAgAFMAeQBzAHQAZQBtAHMAIABJAG4AYwBvAHIAcABvAHIAYQB0AGUAZAANAAoATABpAGMAZQBuAHMAZQBkACAAdQBuAGQAZQByACAAdABoAGUAIABBAHAAYQBjAGgAZQAgAEwAaQBjAGUAbgBzAGUALAAgAFYAZQByAHMAaQBvAG4AIAAyAC4AMAAgACgAdABoAGUAIAAiAEwAaQBjAGUAbgBzAGUAIgApADsAIAB5AG8AdQAgAG0AYQB5ACAAbgBvAHQAIAB1AHMAZQAgAHQAaABpAHMAIABmAGkAbABlACAAZQB4AGMAZQBwAHQAIABpAG4AIABjAG8AbQBwAGwAaQBhAG4AYwBlACAAdwBpAHQAaAAgAHQAaABlACAATABpAGMAZQBuAHMAZQAuACAAWQBvAHUAIABtAGEAeQAgAG8AYgB0AGEAaQBuACAAYQAgAGMAbwBwAHkAIABvAGYAIAB0AGgAZQAgAEwAaQBjAGUAbgBzAGUAIABhAHQAIABoAHQAdABwADoALwAvAHcAdwB3AC4AYQBwAGEAYwBoAGUALgBvAHIAZwAvAGwAaQBjAGUAbgBzAGUAcwAvAEwASQBDAEUATgBTAEUALQAyAC4AMAAuAGgAdABtAGwADQAKAFUAbgBsAGUAcwBzACAAcgBlAHEAdQBpAHIAZQBkACAAYgB5ACAAYQBwAHAAbABpAGMAYQBiAGwAZQAgAGwAYQB3ACAAbwByACAAYQBnAHIAZQBlAGQAIAB0AG8AIABpAG4AIAB3AHIAaQB0AGkAbgBnACwAIABzAG8AZgB0AHcAYQByAGUAIABkAGkAcwB0AHIAaQBiAHUAdABlAGQAIAB1AG4AZABlAHIAIAB0AGgAZQAgAEwAaQBjAGUAbgBzAGUAIABpAHMAIABkAGkAcwB0AHIAaQBiAHUAdABlAGQAIABvAG4AIABhAG4AIAAiAEEAUwAgAEkAUwAiACAAQgBBAFMASQBTACwAIABXAEkAVABIAE8AVQBUACAAVwBBAFIAUgBBAE4AVABJAEUAUwAgAE8AUgAgAEMATwBOAEQASQBUAEkATwBOAFMAIABPAEYAIABBAE4AWQAgAEsASQBOAEQALAAgAGUAaQB0AGgAZQByACAAZQB4AHAAcgBlAHMAcwAgAG8AcgAgAGkAbQBwAGwAaQBlAGQALgAgAFMAZQBlACAAdABoAGUAIABMAGkAYwBlAG4AcwBlACAAZgBvAHIAIAB0AGgAZQAgAHMAcABlAGMAaQBmAGkAYwAgAGwAYQBuAGcAdQBhAGcAZQAgAGcAbwB2AGUAcgBuAGkAbgBnACAAcABlAHIAbQBpAHMAcwBpAG8AbgBzACAAYQBuAGQAIABsAGkAbQBpAHQAYQB0AGkAbwBuAHMAIAB1AG4AZABlAHIAIAB0AGgAZQAgAEwAaQBjAGUAbgBzAGUALgANAAoAUgBlAGcAdQBsAGEAcmAdbpCe0U9TACAAQwBOACAATgBvAHIAbQBhAGwAAAAAAwAAAAAAAP+DADIAAAAAAAAAAAAAAAAAAAAAAAAAAAABAAAACABEAAQAFgAEaWNmYmljZnRpZGVvcm9tbgAGREZMVABiY3lybABoZ3JlawBoaGFuaQBia2FuYQBibGF0bgBoAAQAFgAEaWNmYmljZnRpZGVvcm9tbgAGREZMVAAyY3lybAA4Z3JlawA4aGFuaQAya2FuYQAybGF0bgA4ABgAAAAAAB4AAAAAACQAAAAAACoAAAAAAAIABAAwADQAOAA8AAMABAAkACgALAAwAAIABAAoACwAJAAwAAMABAAcACAAGAAkAAH/uAABA0AAAf+IAAEAAAABADAAAQO4AAEAeAABAAADcADbAdoDYgHqA2IB6wNpAewDYgHuAosB7wOBAfIDYQH0A2gB9QNaAfYD0gH5A2IB+gNhAfsDYQH8A2EB/QNhAf4DYQH/A2ECAANhAgEDYQICA2ECAwNhAgQDYQIFA2ECCgMBAg8DAQK1A1ECtgNYArcDWAK4A1ECuQNRAroDWAK7A1ECvANYAr0DWAK+A1gCvwNRAsADWALBA1gCwgNRAsMDUQLEA1gCxQNRAsYDWALHA1gCyANYBJwFZASdBWQHGALoBxkCjgcaA1wHGwNiB70DXAe/A1wHwAKeB8IDoQfDA6EHxANcB8oC+AfLA2IHzAL6B80DYgfPA2IH0ANiB9EDYgfUAvgH1QNiB9YC+gfXAo4H2AKOB9kC+QfaA2IH3ANiB90DYgfeA2IH3wMhB+ADggfhA4IH4gOCB+MDegfkAwgH5QKgB+YDCAfnAwIH6QOoB+oDoQfrA6gH7AOoB+0DqAfuA6EH7wOoB/ADqAfxAyYH8gNOB/MDXAf1A1wH9gNiB/gDBgf5AwYH+gKeB/sDAgf8AqEH/QMCB/4C+Af/A2IIAAL6CAEDYggDA2IIBAL4CAUDYggGAvoIBwNiCAkDYggLA2gIDAMCCA0C+AgOAwIIEAMGCBEDYggTAvwIFQNiCBYDdQgXA2IIGANiCBwC+QghAvgIIgKeCCMDYggkA2IIJQMCCCYDYggoAyYIKQMmCEkC+XQrA1p0LQNidDcDYnQ4A2J0OQNodDoDYnQ7A2J0PANcdD0DYnQ+A2J0PwNidEADYnRIA2J0SQNidEoDYnRLA2J0TANidE0DYnROA2J0TwNidFADYnRRA1x0UgNidFMDYnRUA2J0VQNidFYDYnRXA2J0WAMOdFkDYnRaA2J0WwNidFwDXHRdA2J0XgNidF8DYnRgA2J0YQNidGgDAnRpA3x0agMCdGsDfHRsAwJ0bQOIdG4Ci3RvA4J0cAN8dHEDAXRyA4J0cwN8dHQDCXR1Awl0dgMCdHcClXR4ApV0eQMIdHoDAnR7A0l0fAL8dH0DAnR+AwJ0fwMCdIACjHSBAwJ0+QNfdPoDYXT+A1t0/wNbdQYDWHUHAwF1CAL6dQkDAXUKAwF1CwL6dQwC+nUNAwF1DgL6dQ8DAXUQAwF1jANcd1sFZHdcB1h3ZP+Id2X/iHdn/4h3aP+I根据【本文末 - 引用1】的分析,得知页面的字体文件与原版的区别在于 修改了每个图元数据的unicode因为图元数据是和原版一致的,所以大概思路为根据加密后的图元数据 去 原版字体中查询,将查询到的unicode替换掉混淆的unicode即可3.解决思路梳理3.1 原版字体建立Map解决思路就是根据原版字体文件 建立 map,后进行k,v翻转// 将原生字体key => value 反向映射 var swappedDict = new Dictionary<string, string>(); foreach (var swappedTempDict in Context.OriginFontsDictionary) { swappedDict[swappedTempDict.Value] = swappedTempDict.Key; }3.2 修改版字体建立Map将页面上的base64编码的ttf文件读取并建立 Mapvar keyHex = "uni" + kvp.Key.ToString("X").ToUpper(); var fontGlyph = font.GetGlyph(kvp.Value); var sb = new StringBuilder(); foreach (var fontGlyphGlyphPoint in fontGlyph.GlyphPoints) { sb.Append( $"{fontGlyphGlyphPoint.X}{fontGlyphGlyphPoint.Y}{(fontGlyphGlyphPoint.onCurve ? "1" : "0")}"); } unicodeAndContourPair[keyHex] = CommonUtil.GetMd5(sb.ToString()); /** * 数据类型如下: * Key = uniXXXX * Value = 每个 pt 标签的x,y,on属性拼接进行求Md5 * */3.3 建立正确的映射关系根据 修改版字体建立的Map 进行遍历// 遍历 unicodeAndContourPair 获取所有的 values 也就是 contour 下 pt标签的x,y,on属性加密后的md5 // 还记得吗? unicodeAndContourPaire的 values 都可以在 原版Map 也就是 swappedDict 的 Keys中找到 // swappedDict 中 values 就是真正字体的 unicode 值! // 遍历加密的 pair var keysList = new Dictionary<string, string>(); foreach (var keyValue in unicodeAndContourPair) { keysList[keyValue.Key] = swappedDict[keyValue.Value].Replace("uni", "\\u"); keysList[keyValue.Key] = Regex.Unescape(keysList[keyValue.Key]); } // 此时得到的 keysList 中 keys 为 加密的每个字的unicode, values为真正的字3.4 题目处理var questionTitle = questionNodes[0].SelectSingleNode("div[@class='Zy_TItle clearfix']/div").InnerText.Trim(); foreach (var c in questionTitle.ToCharArray()) { var temp = Convert.ToString(Convert.ToUInt32(c), 16).Replace("0x", "").ToUpper(); // 拿到当前字符的 unicode 编码 if (keysList.ContainsKey($"uni{temp}")) questionTitle = questionTitle.Replace(c + "", keysList[$"uni{temp}"]); }此时题目还是不可以直接用,结合易姐博客的文章经过查阅资料,我发现这种和普通汉字字形相同,但是 unicode 内码不同的字叫做康熙部首,它位于 unicode 的 2F00—2FDF 区段,当然它们和普通的汉字一一对应,出现此误码的原因可能是一些字体厂家没有把这两种编码的字形做区分那么再次对题目进行清洗,将康熙部首替换为正常汉字即可# 康熙部首替换表 KX_RADICALS_TAB = str.maketrans( # 康熙部首 "⼀⼁⼂⼃⼄⼅⼆⼇⼈⼉⼊⼋⼌⼍⼎⼏⼐⼑⼒⼓⼔⼕⼖⼗⼘⼙⼚⼛⼜⼝⼞⼟⼠⼡⼢⼣⼤⼥⼦⼧⼨⼩⼪⼫⼬⼭⼮⼯⼰⼱⼲⼳⼴⼵⼶⼷⼸⼹⼺⼻⼼⼽⼾⼿⽀⽁⽂⽃⽄⽅⽆⽇⽈⽉⽊⽋⽌⽍⽎⽏⽐⽑⽒⽓⽔⽕⽖⽗⽘⽙⽚⽛⽜⽝⽞⽟⽠⽡⽢⽣⽤⽥⽦⽧⽨⽩⽪⽫⽬⽭⽮⽯⽰⽱⽲⽳⽴⽵⽶⽷⽸⽹⽺⽻⽼⽽⽾⽿⾀⾁⾂⾃⾄⾅⾆⾇⾈⾉⾊⾋⾌⾍⾎⾏⾐⾑⾒⾓⾔⾕⾖⾗⾘⾙⾚⾛⾜⾝⾞⾟⾠⾡⾢⾣⾤⾥⾦⾧⾨⾩⾪⾫⾬⾭⾮⾯⾰⾱⾲⾳⾴⾵⾶⾷⾸⾹⾺⾻⾼髙⾽⾾⾿⿀⿁⿂⿃⿄⿅⿆⿇⿈⿉⿊⿋⿌⿍⿎⿏⿐⿑⿒⿓⿔⿕⺠⻬⻩⻢⻜⻅⺟⻓", # 对应汉字 "一丨丶丿乙亅二亠人儿入八冂冖冫几凵刀力勹匕匚匸十卜卩厂厶又口囗土士夂夊夕大女子宀寸小尢尸屮山巛工己巾干幺广廴廾弋弓彐彡彳心戈戶手支攴文斗斤方无日曰月木欠止歹殳毋比毛氏气水火爪父爻爿片牙牛犬玄玉瓜瓦甘生用田疋疒癶白皮皿目矛矢石示禸禾穴立竹米糸缶网羊羽老而耒耳聿肉臣自至臼舌舛舟艮色艸虍虫血行衣襾見角言谷豆豕豸貝赤走足身車辛辰辵邑酉采里金長門阜隶隹雨青非面革韋韭音頁風飛食首香馬骨高高髟鬥鬯鬲鬼魚鳥鹵鹿麥麻黃黍黑黹黽鼎鼓鼠鼻齊齒龍龜龠民齐黄马飞见母长" )转为 c#:// 康熙部首 const string source = "⼀⼁⼂⼃⼄⼅⼆⼇⼈⼉⼊⼋⼌⼍⼎⼏⼐⼑⼒⼓⼔⼕⼖⼗⼘⼙⼚⼛⼜⼝⼞⼟⼠⼡⼢⼣⼤⼥⼦⼧⼨⼩⼪⼫⼬⼭⼮⼯⼰⼱⼲⼳⼴⼵⼶⼷⼸⼹⼺⼻⼼⼽⼾⼿⽀⽁⽂⽃⽄⽅⽆⽇⽈⽉⽊⽋⽌⽍⽎⽏⽐⽑⽒⽓⽔⽕⽖⽗⽘⽙⽚⽛⽜⽝⽞⽟⽠⽡⽢⽣⽤⽥⽦⽧⽨⽩⽪⽫⽬⽭⽮⽯⽰⽱⽲⽳⽴⽵⽶⽷⽸⽹⽺⽻⽼⽽⽾⽿⾀⾁⾂⾃⾄⾅⾆⾇⾈⾉⾊⾋⾌⾍⾎⾏⾐⾑⾒⾓⾔⾕⾖⾗⾘⾙⾚⾛⾜⾝⾞⾟⾠⾡⾢⾣⾤⾥⾦⾧⾨⾩⾪⾫⾬⾭⾮⾯⾰⾱⾲⾳⾴⾵⾶⾷⾸⾹⾺⾻⾼髙⾽⾾⾿⿀⿁⿂⿃⿄⿅⿆⿇⿈⿉⿊⿋⿌⿍⿎⿏⿐⿑⿒⿓⿔⿕⺠⻬⻩⻢⻜⻅⺟⻓"; // 对应汉字 const string target = "一丨丶丿乙亅二亠人儿入八冂冖冫几凵刀力勹匕匚匸十卜卩厂厶又口囗土士夂夊夕大女子宀寸小尢尸屮山巛工己巾干幺广廴廾弋弓彐彡彳心戈戶手支攴文斗斤方无日曰月木欠止歹殳毋比毛氏气水火爪父爻爿片牙牛犬玄玉瓜瓦甘生用田疋疒癶白皮皿目矛矢石示禸禾穴立竹米糸缶网羊羽老而耒耳聿肉臣自至臼舌舛舟艮色艸虍虫血行衣襾見角言谷豆豕豸貝赤走足身車辛辰辵邑酉采里金長門阜隶隹雨青非面革韋韭音頁風飛食首香馬骨高高髟鬥鬯鬲鬼魚鳥鹵鹿麥麻黃黍黑黹黽鼎鼓鼠鼻齊齒龍龜龠民齐黄马飞见母长"; for (int i = 0; i < questionTitle.Length; i++) { int index = source.IndexOf(questionTitle[i]); if (index >= 0) { questionTitle = questionTitle.Remove(i, 1).Insert(i, target[index].ToString()); } }3.5 总结项目引入了 PresentationCore.dll,Typography.OpenFonttry { // 8. 提取当前页面加密的base64代码 var matchBase64 = Regex.Match(workPageResponse, @"font-cxsecret';src:url\('(.*?)'\)"); var fontBytes = Convert.FromBase64String(matchBase64.Groups[1].Value.Split(',')[1]); // 将字节写到目录的cache文件夹下 var fontFilename = $"{Path.GetRandomFileName()}.ttf"; var fontPath = Path.Combine(AppDomain.CurrentDomain.BaseDirectory, "cache", fontFilename); if (!Directory.Exists(Path.Combine(AppDomain.CurrentDomain.BaseDirectory, "cache"))) { Directory.CreateDirectory(Path.Combine(AppDomain.CurrentDomain.BaseDirectory, "cache")); } File.WriteAllBytes(fontPath, fontBytes); var fontReader = new OpenFontReader(); var font = fontReader.Read(new MemoryStream(fontBytes)); var unicodeAndContourPair = new Dictionary<string, string>(); // 将原生字体key => value 反向映射 var swappedDict = new Dictionary<string, string>(); foreach (var swappedTempDict in Context.OriginFontsDictionary) { swappedDict[swappedTempDict.Value] = swappedTempDict.Key; } var families = Fonts.GetFontFamilies(fontPath); foreach (var family in families) { var typefaces = family.GetTypefaces(); foreach (var typeface in typefaces) { typeface.TryGetGlyphTypeface(out var glyph); var characterMap = glyph.CharacterToGlyphMap; foreach (var kvp in characterMap) { var keyHex = "uni" + kvp.Key.ToString("X").ToUpper(); var fontGlyph = font.GetGlyph(kvp.Value); var sb = new StringBuilder(); foreach (var fontGlyphGlyphPoint in fontGlyph.GlyphPoints) { sb.Append( $"{fontGlyphGlyphPoint.X}{fontGlyphGlyphPoint.Y}{(fontGlyphGlyphPoint.onCurve ? "1" : "0")}"); } unicodeAndContourPair[keyHex] = CommonUtil.GetMd5(sb.ToString()); } } } // 遍历加密的 pair var keysList = new Dictionary<string, string>(); foreach (var keyValue in unicodeAndContourPair) { keysList[keyValue.Key] = swappedDict[keyValue.Value].Replace("uni", "\\u"); keysList[keyValue.Key] = Regex.Unescape(keysList[keyValue.Key]); } var questionTitle = questionNodes[0].SelectSingleNode("div[@class='Zy_TItle clearfix']/div").InnerText.Trim(); foreach (var c in questionTitle.ToCharArray()) { var temp = Convert.ToString(Convert.ToUInt32(c), 16).Replace("0x", "").ToUpper(); if (keysList.ContainsKey($"uni{temp}")) questionTitle = questionTitle.Replace(c + "", keysList[$"uni{temp}"]); } // 康熙部首 const string source = "⼀⼁⼂⼃⼄⼅⼆⼇⼈⼉⼊⼋⼌⼍⼎⼏⼐⼑⼒⼓⼔⼕⼖⼗⼘⼙⼚⼛⼜⼝⼞⼟⼠⼡⼢⼣⼤⼥⼦⼧⼨⼩⼪⼫⼬⼭⼮⼯⼰⼱⼲⼳⼴⼵⼶⼷⼸⼹⼺⼻⼼⼽⼾⼿⽀⽁⽂⽃⽄⽅⽆⽇⽈⽉⽊⽋⽌⽍⽎⽏⽐⽑⽒⽓⽔⽕⽖⽗⽘⽙⽚⽛⽜⽝⽞⽟⽠⽡⽢⽣⽤⽥⽦⽧⽨⽩⽪⽫⽬⽭⽮⽯⽰⽱⽲⽳⽴⽵⽶⽷⽸⽹⽺⽻⽼⽽⽾⽿⾀⾁⾂⾃⾄⾅⾆⾇⾈⾉⾊⾋⾌⾍⾎⾏⾐⾑⾒⾓⾔⾕⾖⾗⾘⾙⾚⾛⾜⾝⾞⾟⾠⾡⾢⾣⾤⾥⾦⾧⾨⾩⾪⾫⾬⾭⾮⾯⾰⾱⾲⾳⾴⾵⾶⾷⾸⾹⾺⾻⾼髙⾽⾾⾿⿀⿁⿂⿃⿄⿅⿆⿇⿈⿉⿊⿋⿌⿍⿎⿏⿐⿑⿒⿓⿔⿕⺠⻬⻩⻢⻜⻅⺟⻓"; // 对应汉字 const string target = "一丨丶丿乙亅二亠人儿入八冂冖冫几凵刀力勹匕匚匸十卜卩厂厶又口囗土士夂夊夕大女子宀寸小尢尸屮山巛工己巾干幺广廴廾弋弓彐彡彳心戈戶手支攴文斗斤方无日曰月木欠止歹殳毋比毛氏气水火爪父爻爿片牙牛犬玄玉瓜瓦甘生用田疋疒癶白皮皿目矛矢石示禸禾穴立竹米糸缶网羊羽老而耒耳聿肉臣自至臼舌舛舟艮色艸虍虫血行衣襾見角言谷豆豕豸貝赤走足身車辛辰辵邑酉采里金長門阜隶隹雨青非面革韋韭音頁風飛食首香馬骨高高髟鬥鬯鬲鬼魚鳥鹵鹿麥麻黃黍黑黹黽鼎鼓鼠鼻齊齒龍龜龠民齐黄马飞见母长"; for (var i = 0; i < questionTitle.Length; i++) { var index = source.IndexOf(questionTitle[i]); if (index >= 0) { questionTitle = questionTitle.Remove(i, 1).Insert(i, target[index].ToString()); } } } catch (Exception e) { Console.WriteLine(e); throw; }4.引用关于超星学习通网页版字体加密分析 (出处: 吾爱破解论坛):https://www.52pojie.cn/thread-1631357-1-1.htmlLayoutFarm/Typography: C# Font Reader (TrueType / OpenType / OpenFont / CFF / woff / woff2) , Glyphs Layout and Rendering (github.com):https://github.com/LayoutFarm/Typography研究学习通答题字体加密的随笔 - 易姐的博客 (shakaianee.top):https://shakaianee.top/archives/558/presentationcore.dll free download | DLL‑files.com (dll-files.com): https://www.dll-files.com/presentationcore.dll.html
-
山西省成人高考成绩批量查询工具 目标站点:https://gkpt.sxkszx.cn/Ck-student-web/#一、步骤分析1.登录的时候有个验证码需要过2.成绩查询是html解析,正则匹配一下就取出来了二、工具及源码技术点:网络爬虫,dataGridView导出为excel适合初学者入门学习和二次开发github链接:https://github.com/lisongkun/shanxi-adult-education-batch-query-score引用1.SunnyUI Github:https://github.com/yhuse/SunnyUI2.C# Winform中DataGridView导出为Excel看这一篇就够了,详细!!!(完整快速版):https://blog.csdn.net/Houoy/article/details/1060278793.Fluent HTTP:https://flurl.dev/docs/fluent-http/
-
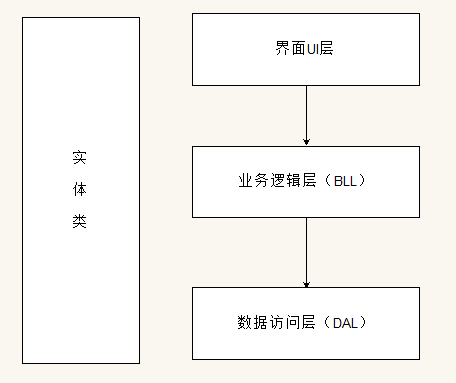
Winform的三层架构详细案例分析 写了几个Winform程序后发现一个类的行数直逼2000行...维护十分困难,想起来之前学过三层架构,转篇文章记录一下!三层架构将整个业务应用划分为:(1)界面UI层;(2)业务逻辑层;(3)数据访问层。对于复杂的系统分层可以让结构更加清晰,模块更加独立,便于维护。各层的任务:(1)数据访问层:负责数据库的操作。(2)业务逻辑层:实现功能模块的业务逻辑。(3)界面UI层:绘制界面,以及负责界面相关代码。(4)实体类:将数据库中的表转化为面向对象思想中的类。一、案例需求使用三层架构实现学生管理:(1)专业下拉框绑定专业表数据,网格控件绑定学生数据,并且点击"搜索"按钮可以多条件组合查询。(2)选中某一行,右键可以弹出"删除"菜单,点击"删除"菜单可以删除学生数据。(3)点击"新增"按钮,弹出新增窗体,在此窗体中完成学生的新增操作。(4)选中某一行,点击"编辑"按钮,弹出编辑窗体,在此窗体中完成数据的修改。备注:其中性别的单选框,以及爱好的多选框分别用两个Pannel容器包含。数据库准备:--专业 create table ProfessionInfo ( ProfessionID int primary key identity(1,1), --专业编号 ProfessionName varchar(50) not null unique --专业名称 ) --学生 create table StudentInfo ( StuID varchar(20) primary key, --学生学号 StuName varchar(50) not null, --学生姓名 StuAge int not null check(StuAge > 0 and StuAge < 130), --学生年龄 StuSex char(2) not null check(StuSex in('男','女')), --学生性别 StuHobby nvarchar(100), --爱好 ProfessionID int not null references ProfessionInfo(ProfessionID), --所属专业编号 ) --添加专业信息 insert into ProfessionInfo(ProfessionName) values('电子竞技') insert into ProfessionInfo(ProfessionName) values('软件开发') insert into ProfessionInfo(ProfessionName) values('医疗护理') --插入学生信息 insert into StudentInfo(StuID,StuName,StuAge,StuSex,StuHobby,ProfessionID) values('001','刘备',18,'男','',1) insert into StudentInfo(StuID,StuName,StuAge,StuSex,StuHobby,ProfessionID) values('002','关羽',20,'男','',2) insert into StudentInfo(StuID,StuName,StuAge,StuSex,StuHobby,ProfessionID) values('003','张飞',19,'男','',2) insert into StudentInfo(StuID,StuName,StuAge,StuSex,StuHobby,ProfessionID) values('004','孙尚香',17,'女','',3)二、项目结构(1)创建一个空白解决方案。(2)在解决方案中创建类库项目MyEntity代表"实体类"。(3)在解决方案中创建类库项目MyDAL代表"数据访问层"。(4)在解决方案中创建类库项目MyBLL代表"业务逻辑层"。(5)在解决方案中创建Windows窗体应用程序MyUI代表"界面UI层"。三、实体类编写在MyEntity项目中添加两个实体类,实体类代码如下:ProfessionInfoEntity: public class ProfessionInfoEntity { public ProfessionInfoEntity() { this.ProfessionID = 0; this.ProfessionName = ""; } public int ProfessionID { get; set; } //专业编号 public string ProfessionName { get; set; }//专业名称 }StudentInfoEntiy:public class StudentInfoEntiy { public StudentInfoEntiy() { this.StuID = ""; this.StuName = ""; this.StuAge = 0; this.StuSex = ""; this.StuHobby = ""; this.ProfessionID = 0; this.ProfessionName = ""; } public string StuID { get; set; } //学生学号 public string StuName { get; set; } //学生姓名 public int StuAge { get; set; } //学生年龄 public string StuSex { get; set; } //学生性别 public string StuHobby { get; set; } //学生爱好 public int ProfessionID { get; set; } //学生所属专业编号 public string ProfessionName { get; set; } //学生所属专业名称 }四、数据访问层编写(1)由于数据访问层需要使用实体类,所以需要添加实体类的引用。即在MyDAL项目上右键-->添加-->引用-->项目,在项目中勾选MyEntity项目。(2)将之前封装好的DBHelper文件复制到MyDAL项目中,并通过添加现有项,将DBHelper加入项目。(3)在MyDAL项目中添加两个类,类代码如下:ProfessionInfoDAL:public class ProfessionInfoDAL { #region 新增 public int Add(ProfessionInfoEntity entity) { string sql = "insert into ProfessionInfo(professionName) values(@professionName)"; DBHelper.PrepareSql(sql); DBHelper.SetParameter("ProfessionName",entity.ProfessionName); return DBHelper.ExecNonQuery(); } #endregion #region 删除 public int Delete(int id) { string sql = "delete from ProfessionInfo where ProfessionID=@ProfessionID"; DBHelper.PrepareSql(sql); DBHelper.SetParameter("ProfessionID", id); return DBHelper.ExecNonQuery(); } #endregion #region 修改 public int Update(ProfessionInfoEntity entity) { string sql = "update ProfessionInfo set professionName=@professionName where ProfessionID=@ProfessionID"; DBHelper.PrepareSql(sql); DBHelper.SetParameter("professionName", entity.ProfessionName); DBHelper.SetParameter("ProfessionID", entity.ProfessionID); return DBHelper.ExecNonQuery(); } #endregion #region 列表 public List<ProfessionInfoEntity> List() { string sql = "select * from ProfessionInfo"; DataTable dt = new DataTable(); DBHelper.PrepareSql(sql); dt = DBHelper.ExecQuery(); List<ProfessionInfoEntity> list = new List<ProfessionInfoEntity>(); foreach (DataRow item in dt.Rows) { ProfessionInfoEntity entity = new ProfessionInfoEntity(); entity.ProfessionID = int.Parse(item["ProfessionID"].ToString()); entity.ProfessionName = item["ProfessionName"].ToString(); list.Add(entity); } return list; } #endregion #region 详情 public ProfessionInfoEntity Detail(int id) { string sql = "select * from ProfessionInfo where ProfessionID=@ProfessionID"; DataTable dt = new DataTable(); DBHelper.PrepareSql(sql); DBHelper.SetParameter("ProfessionID", id); dt = DBHelper.ExecQuery(); if (dt.Rows.Count == 0) return null; ProfessionInfoEntity entity = new ProfessionInfoEntity(); entity.ProfessionID = int.Parse(dt.Rows[0]["ProfessionID"].ToString()); entity.ProfessionName = dt.Rows[0]["ProfessionName"].ToString(); return entity; } #endregion }StudentInfoDAL:public class StudentInfoDAL { #region 新增 public int Add(StudentInfoEntiy entity) { string sql = "insert into StudentInfo(StuID,StuName,StuAge,StuSex,StuHobby,ProfessionID) values(@StuID,@StuName,@StuAge,@StuSex,@StuHobby,@ProfessionID)"; DBHelper.PrepareSql(sql); DBHelper.SetParameter("StuID", entity.StuID); DBHelper.SetParameter("StuName", entity.StuName); DBHelper.SetParameter("StuAge", entity.StuAge); DBHelper.SetParameter("StuSex", entity.StuSex); DBHelper.SetParameter("StuHobby", entity.StuHobby); DBHelper.SetParameter("ProfessionID", entity.ProfessionID); return DBHelper.ExecNonQuery(); } #endregion #region 删除 public int Delete(string id) { string sql = "delete from StudentInfo where StuID=@StuID"; DBHelper.PrepareSql(sql); DBHelper.SetParameter("StuID", id); return DBHelper.ExecNonQuery(); } #endregion #region 修改 public int Update(StudentInfoEntiy entity) { string sql = "update StudentInfo set StuName=@StuName,StuAge=@StuAge,StuSex=@StuSex,StuHobby=@StuHobby,ProfessionID=@ProfessionID where StuID=@StuID"; DBHelper.PrepareSql(sql); DBHelper.SetParameter("StuName", entity.StuName); DBHelper.SetParameter("StuAge", entity.StuAge); DBHelper.SetParameter("StuSex", entity.StuSex); DBHelper.SetParameter("StuHobby", entity.StuHobby); DBHelper.SetParameter("ProfessionID", entity.ProfessionID); DBHelper.SetParameter("StuID", entity.StuID); return DBHelper.ExecNonQuery(); } #endregion #region 列表 public List<StudentInfoEntiy> List() { string sql = "select * from StudentInfo"; DataTable dt = new DataTable(); DBHelper.PrepareSql(sql); dt = DBHelper.ExecQuery(); List<StudentInfoEntiy> list = new List<StudentInfoEntiy>(); foreach (DataRow item in dt.Rows) { StudentInfoEntiy entity = new StudentInfoEntiy(); entity.StuID = item["StuID"].ToString(); entity.StuName = item["StuName"].ToString(); entity.StuAge = int.Parse(item["StuAge"].ToString()); entity.StuSex = item["StuSex"].ToString(); entity.StuHobby = item["StuHobby"].ToString(); entity.ProfessionID = int.Parse(item["ProfessionID"].ToString()); list.Add(entity); } return list; } #endregion #region 详情 public StudentInfoEntiy Detail(string id) { string sql = "select * from StudentInfo where StuID=@StuID"; DataTable dt = new DataTable(); DBHelper.PrepareSql(sql); DBHelper.SetParameter("StuID", id); dt = DBHelper.ExecQuery(); if (dt.Rows.Count == 0) return null; StudentInfoEntiy entity = new StudentInfoEntiy(); entity.StuID = dt.Rows[0]["StuID"].ToString(); entity.StuName = dt.Rows[0]["StuName"].ToString(); entity.StuAge = int.Parse(dt.Rows[0]["StuAge"].ToString()); entity.StuSex = dt.Rows[0]["StuSex"].ToString(); entity.StuHobby = dt.Rows[0]["StuHobby"].ToString(); entity.ProfessionID = int.Parse(dt.Rows[0]["ProfessionID"].ToString()); return entity; } #endregion }五、业务逻辑层编写(1)由于业务逻辑层需要使用实体类,所以需要添加实体类的引用。即在MyBLL项目上右键-->添加-->引用-->项目,在项目中勾选MyEntity项目。(2)由于业务逻辑层需要调用数据访问层,所以需要添加数据访问层的引用。即在MyBLL项目上右键-->添加-->引用-->项目,在项目中勾选MyDAL项目。(3)在MyBLL项目中添加两个类,类代码如下:ProfessionInfoBLL:public class ProfessionInfoBLL { ProfessionInfoDAL dal = new ProfessionInfoDAL(); #region 新增 public int Add(ProfessionInfoEntity entity) { return dal.Add(entity); } #endregion #region 删除 public int Delete(int id) { return dal.Delete(id); } #endregion #region 修改 public int Update(ProfessionInfoEntity entity) { return dal.Update(entity); } #endregion #region 列表 public List<ProfessionInfoEntity> List() { return dal.List(); } #endregion #region 详情 public ProfessionInfoEntity Detail(int id) { return dal.Detail(id); } #endregion }StudentInfoBLL:public class StudentInfoBLL { StudentInfoDAL dal = new StudentInfoDAL(); #region 新增 public int Add(StudentInfoEntiy entity) { return dal.Add(entity); } #endregion #region 删除 public int Delete(string id) { return dal.Delete(id); } #endregion #region 修改 public int Update(StudentInfoEntiy entity) { return dal.Update(entity); } #endregion #region 列表 public List<StudentInfoEntiy> List() { return dal.List(); } #endregion #region 详情 public StudentInfoEntiy Detail(string id) { return dal.Detail(id); } #endregion }六、界面UI层代码编写(1)由于界面UI层需要使用实体类,所以需要添加实体类的引用。即在MyUI项目上右键-->添加-->引用-->项目,在项目中勾选MyEntity项目。(2)由于界面UI层需要调用业务逻辑层,所以需要添加业务逻辑层的引用。即在MyUI项目上右键-->添加-->引用-->项目,在项目中勾选MyBLL项目。查询窗体界面及代码:(1)由于查询学生需要多条件组合查询,所以给数据访问层和业务逻辑层添加条件搜索的方法。给数据访问层MyDAL中StudentInfoDAL类添加方法:#region 条件查询 public List<StudentInfoEntiy> Search(StudentInfoEntiy searchObj) { string sql = "select * from StudentInfo inner join ProfessionInfo on StudentInfo.ProfessionID = ProfessionInfo.ProfessionID where 1 = 1"; if (searchObj.ProfessionID != 0) sql += " and StudentInfo.ProfessionID = " + searchObj.ProfessionID; if (!searchObj.StuName.Equals("")) sql += " and StuName like '%" + searchObj.StuName + "%'"; DataTable dt = new DataTable(); DBHelper.PrepareSql(sql); dt = DBHelper.ExecQuery(); List<StudentInfoEntiy> list = new List<StudentInfoEntiy>(); foreach (DataRow item in dt.Rows) { StudentInfoEntiy entity = new StudentInfoEntiy(); entity.StuID = item["StuID"].ToString(); entity.StuName = item["StuName"].ToString(); entity.StuAge = int.Parse(item["StuAge"].ToString()); entity.StuSex = item["StuSex"].ToString(); entity.StuHobby = item["StuHobby"].ToString(); entity.ProfessionID = int.Parse(item["ProfessionID"].ToString()); entity.ProfessionName = item["ProfessionName"].ToString(); list.Add(entity); } return list; } #endregion给业务逻辑层MyBLL中StudentInfoBLL类添加方法:#region 条件查询 public List<StudentInfoEntiy> Search(StudentInfoEntiy searchObj) { return dal.Search(searchObj); } #endregion(2)在此界面中多个功能需要调用业务逻辑层,定义两个业务逻辑层对象:ProfessionInfoBLL proBll = new ProfessionInfoBLL(); StudentInfoBLL stuBll = new StudentInfoBLL();(3)查询窗体绑定专业信息、绑定学生信息以及搜索功能代码:#region 绑定下拉框 private void BindPro() { List<ProfessionInfoEntity> list = new List<ProfessionInfoEntity>(); list = proBll.List(); list.Insert(0,new ProfessionInfoEntity { ProfessionID=0,ProfessionName="--请选择--"}); this.cmbPro.DataSource = list; this.cmbPro.DisplayMember = "ProfessionName"; this.cmbPro.ValueMember = "ProfessionID"; } #endregion #region 绑定学生数据 private void BindData() { StudentInfoEntiy searchObj = new StudentInfoEntiy(); searchObj.ProfessionID = int.Parse(this.cmbPro.SelectedValue.ToString()); searchObj.StuName = this.txtName.Text; this.dataGridView1.AutoGenerateColumns = false; this.dataGridView1.DataSource = stuBll.Search(searchObj); } #endregion #region 窗体加载 private void FrmSelect_Load(object sender, EventArgs e) { BindPro(); BindData(); } #endregion #region 搜索按钮 private void btSearch_Click(object sender, EventArgs e) { BindData(); } #endregion(4)删除菜单代码:private void 删除ToolStripMenuItem_Click(object sender, EventArgs e) { //添加是否确定删除的对话框 DialogResult result = MessageBox.Show("确定要删除数据吗,删除之后无法恢复!", "提示框", MessageBoxButtons.OKCancel, MessageBoxIcon.Question); if (result == DialogResult.Cancel) return; string stuid = this.dataGridView1.SelectedRows[0].Cells[0].Value.ToString(); if(stuBll.Delete(stuid) == 1) MessageBox.Show("删除成功!"); else MessageBox.Show("删除失败!"); BindData(); }新增窗体界面及代码:ProfessionInfoBLL proBll = new ProfessionInfoBLL(); StudentInfoBLL stuBll = new StudentInfoBLL(); #region 绑定下拉框 private void BindPro() { List<ProfessionInfoEntity> list = new List<ProfessionInfoEntity>(); list = proBll.List(); list.Insert(0, new ProfessionInfoEntity { ProfessionID = 0, ProfessionName = "--请选择--" }); this.cmbPro.DataSource = list; this.cmbPro.DisplayMember = "ProfessionName"; this.cmbPro.ValueMember = "ProfessionID"; } #endregion private void FrmAdd_Load(object sender, EventArgs e) { BindPro(); } private void btAdd_Click(object sender, EventArgs e) { //性别处理 string sex = ""; if (this.rbBoy.Checked == true) sex = this.rbBoy.Text; if (this.rbGirl.Checked == true) sex = this.rbGirl.Text; //爱好处理 string hobby = ""; foreach (CheckBox ck in this.panel2.Controls) { if (ck.Checked == true) { if (!hobby.Equals("")) hobby += ","; hobby += ck.Text; } } StudentInfoEntiy entity = new StudentInfoEntiy(); entity.StuID = this.txtId.Text; entity.StuName = this.txtName.Text; entity.StuAge = int.Parse(this.txtAge.Text); entity.StuSex = sex; entity.StuHobby = hobby; entity.ProfessionID = int.Parse(this.cmbPro.SelectedValue.ToString()); if (stuBll.Add(entity) == 1) MessageBox.Show("新增成功!"); else MessageBox.Show("新增失败!"); this.Close(); }编辑修改窗体界面及代码:public string StuID { get; set; } //学生编号 ProfessionInfoBLL proBll = new ProfessionInfoBLL(); StudentInfoBLL stuBll = new StudentInfoBLL(); #region 绑定下拉框 private void BindPro() { List<ProfessionInfoEntity> list = new List<ProfessionInfoEntity>(); list = proBll.List(); list.Insert(0, new ProfessionInfoEntity { ProfessionID = 0, ProfessionName = "--请选择--" }); this.cmbPro.DataSource = list; this.cmbPro.DisplayMember = "ProfessionName"; this.cmbPro.ValueMember = "ProfessionID"; } #endregion #region 绑定详情 private void BindDetail() { StudentInfoEntiy entity = new StudentInfoEntiy(); entity = stuBll.Detail(this.StuID); this.txtId.Text = entity.StuID; this.txtName.Text = entity.StuName; this.txtAge.Text = entity.StuAge.ToString(); this.cmbPro.SelectedValue = entity.ProfessionID; //性别处理 if (entity.StuSex.Equals("男")) this.rbBoy.Checked = true; else this.rbGirl.Checked = true; //爱好处理 string[] arrHobby = entity.StuHobby.Split(','); foreach (string hobby in arrHobby) { foreach (CheckBox ck in this.panel2.Controls) { if (ck.Text.Equals(hobby)) ck.Checked = true; } } } #endregion private void FrmEdit_Load(object sender, EventArgs e) { BindPro(); BindDetail(); } private void btUpdate_Click(object sender, EventArgs e) { //性别处理 string sex = ""; if (this.rbBoy.Checked == true) sex = this.rbBoy.Text; if (this.rbGirl.Checked == true) sex = this.rbGirl.Text; //爱好处理 string hobby = ""; foreach (CheckBox ck in this.panel2.Controls) { if (ck.Checked == true) { if (!hobby.Equals("")) hobby += ","; hobby += ck.Text; } } StudentInfoEntiy entity = new StudentInfoEntiy(); entity.StuID = this.txtId.Text; entity.StuName = this.txtName.Text; entity.StuAge = int.Parse(this.txtAge.Text); entity.StuSex = sex; entity.StuHobby = hobby; entity.ProfessionID = int.Parse(this.cmbPro.SelectedValue.ToString()); if (stuBll.Update(entity) == 1) MessageBox.Show("修改成功!"); else MessageBox.Show("修改失败!"); this.Close(); }查询窗体中"新增"和"编辑"按钮代码:private void btAdd_Click(object sender, EventArgs e) { FrmAdd frm = new FrmAdd(); frm.Show(); } private void btEdit_Click(object sender, EventArgs e) { string stuid = this.dataGridView1.SelectedRows[0].Cells[0].Value.ToString(); FrmEdit frm = new FrmEdit(); frm.StuID = stuid; frm.Show(); }本文来自博客园,作者:码农阿亮,转载请注明原文链接:https://www.cnblogs.com/wml-it/p/15967883.html
-
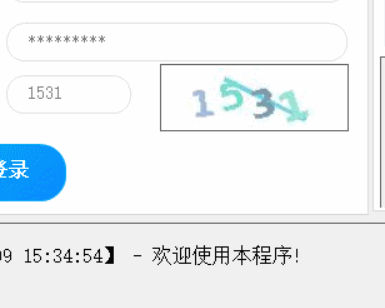
csharp调用OCR和DDDDOCR的DLL进行验证码识别 一、方式1:使用OCR.dll参考了一下精易论坛的这个易语言版的例程:https://bbs.125.la/forum.php?mod=viewthread&tid=14273813效果图:工具类代码:public class OCR { [DllImport("ocr.dll", EntryPoint = "init")] public static extern int Init(); [DllImport("ocr.dll", EntryPoint = "ocr")] public extern static string ocr(byte[] img, int imgLength); } }将ocr.dll放在项目工程的bin\Debug目录下即可。Winform程序中使用:// 1.OCR初始化,全局初始化一次即可,建议放在Program.cs的Main方法中 OCR.Init(); // 2.请求验证码图片 byte[] tmp = "https://passport2.chaoxing.com/num/code" .WithHeader("User-Agent", Constant.USER_AGENT) .WithCookies(out cookies) .GetBytesAsync().Result; // 3.调用DLL进行识别 code = OCR.ocr(tmp, tmp.Length);分流下载链接:{cloud title="OCR.DLL和易语言调用例程" type="bd" url="https://pan.baidu.com/s/1mmHUKscFIMghlm0l7ADS-A?pwd=xq82 " password="xq82 "/}二、方式2:使用DDDDOCR之前写过一篇python调用这个库的文章:记录一次调用OCR验证码识别库的过程,识别率不是很高,最终没有采用今天看到网络上有大神打成了DLL包:ddddocr 单dll版本,记录一下使用,算是多一种验证码的解决方案。效果图:工具类代码:public class OCR { [DllImport("ddocr_qs.dll", EntryPoint = "InitModel")] public static extern int Init(int threadnum); [DllImport("ddocr_qs.dll", EntryPoint = "Identify")] public extern static string ocr(byte[] img, int length); [DllImport("ddocr_qs.dll", EntryPoint = "FreeModel")] public extern static void FreeModel(); } }将ddocr_qs.dll放在项目工程的bin\Debug目录下即可。Winform程序中使用:// 1.OCR初始化,全局初始化一次即可,建议放在Program.cs的Main方法中 // 这里的参数是Thread Number OCR.Init(1); // 2.请求验证码图片 byte[] tmp = "https://passport2.chaoxing.com/num/code" .WithHeader("User-Agent", Constant.USER_AGENT) .WithCookies(out cookies) .GetBytesAsync().Result; // 3.调用DLL进行识别 code = OCR.ocr(tmp, tmp.Length);{cloud title="DDDDOCR_DLL和易语言调用例程" type="bd" url="https://pan.baidu.com/s/1yqY8uTIieeicYt2yow9ogw?pwd=py1l " password="py1l "/}三、附:查看DLL中的可用函数本小白第一次在csharp中调用DLL中的函数,刚拿到OCR.dll后不知道怎么写调用的代码于是上网查了一下,有推荐使用Dependency和Dependencies这两个工具,都有下载使用,感觉上还是后者更强打开GUI界面后直接将OCR.DLL拖入,可以看到函数名这样子但是参数和类型是看不到的 = =,似乎只能问开发者中获取引用1.C#调用论坛发布过的一个OCR.dll崩溃(易语言调用没问题):https://bbs.125.la/forum.php?mod=viewthread&tid=14451756&highlight=ocr.dll2.几百种网站的本地验证码识别源码(字母和数字通杀):https://bbs.125.la/forum.php?mod=viewthread&tid=142738133.ddddocr 单dll版本https://bbs.125.la/forum.php?mod=viewthread&tid=147328384.好工具推荐系列:VC++开发必备神器 -- Dependencies,查看依赖库DLL,支持win10,比depends更好用:https://blog.csdn.net/libaineu2004/article/details/896707265.Dependency Walker 2.2:http://www.dependencywalker.com/6.Dependencies GITHUB : https://github.com/lucasg/Dependencies
-
搞明白C#的Async和Await 本文参考: bilibili视频{bilibili bvid="BV1b54y1J72M" page=""/}讲的非常棒!{dotted startColor="#ff6c6c" endColor="#1989fa"/}需求引入 - 下载数据从不同的网站中下载很大的数据量,并且将数据结果呈现在UI客户端的一个经典的实际场景界面代码public partial class Form1 : Form { private readonly HttpClient httpClient = new HttpClient(); public Form1() { InitializeComponent(); } }界面中有一个同步下载按钮(SyncDownload)、异步下载按钮(AsyncDownload)、信息输出的文本框常量类public class Contents { public static readonly IEnumerable<string> WebSites = new string[] { "https://www.zhihu.com", "https://www.baidu.com", "https://www.weibo.com", "https://www.stackoverflow.com", "https://docs.microsoft.com", "https://docs.microsoft.com/aspnet/core", "https://docs.microsoft.com/azure", "https://docs.microsoft.com/azure/devops", "https://docs.microsoft.com/dotnet", "https://docs.microsoft.com/dynamics365", "https://docs.microsoft.com/education", "https://docs.microsoft.com/enterprise-mobility-security", "https://docs.microsoft.com/gaming", "https://docs.microsoft.com/graph", "https://docs.microsoft.com/microsoft-365", "https://docs.microsoft.com/office", "https://docs.microsoft.com/powershell", "https://docs.microsoft.com/sql", "https://docs.microsoft.com/surface", "https://docs.microsoft.com/system-center", "https://docs.microsoft.com/visualstudio", "https://docs.microsoft.com/windows", "https://docs.microsoft.com/xamarin" }; }一、同步下载/// 输出显示 private void ReportResult(string result) { Result.Text += result; } /// 同步下载按钮被单击 private void SyncDownload_Click(object sender, EventArgs e) { // 同步下载按钮点击后执行的代码 Result.Text = ""; // 为了测量程序的执行时间 var stopwatch = Stopwatch.StartNew(); // 启动下载的主函数 DownloadWebsitesSync(); // 输出函数执行的耗时情况 Result.Text += $"Elapsed time: {stopwatch.Elapsed}{Environment.NewLine}"; } /// 遍历所有站点 private void DownloadWebsitesSync() { foreach(var site in Contents.WebSites) { var result = DownloadWebSiteSync(site); ReportResult(result); } } /// 访问网站获取源代码 private string DownloadWebSiteSync(string url) { var response = httpClient.GetAsync(url).GetAwaiter().GetResult(); var responsePayloadBytes = response.Content.ReadAsByteArrayAsync().GetAwaiter().GetResult(); return $"Finish downloding data from {url}. Total bytes returned {responsePayloadBytes.Length}. {Environment.NewLine}"; }测试Finish downloding data from https://www.zhihu.com. Total bytes returned 35556. Finish downloding data from https://www.baidu.com. Total bytes returned 9508. Finish downloding data from https://www.weibo.com. Total bytes returned 0. Finish downloding data from https://www.stackoverflow.com. Total bytes returned 173712. Finish downloding data from https://docs.microsoft.com. Total bytes returned 132907. Finish downloding data from https://docs.microsoft.com/aspnet/core. Total bytes returned 90052. Finish downloding data from https://docs.microsoft.com/azure. Total bytes returned 428349. Finish downloding data from https://docs.microsoft.com/azure/devops. Total bytes returned 86931. Finish downloding data from https://docs.microsoft.com/dotnet. Total bytes returned 79622. Finish downloding data from https://docs.microsoft.com/dynamics365. Total bytes returned 56803. Finish downloding data from https://docs.microsoft.com/education. Total bytes returned 39267. Finish downloding data from https://docs.microsoft.com/enterprise-mobility-security. Total bytes returned 31372. Finish downloding data from https://docs.microsoft.com/gaming. Total bytes returned 61895. Finish downloding data from https://docs.microsoft.com/graph. Total bytes returned 45606. Finish downloding data from https://docs.microsoft.com/microsoft-365. Total bytes returned 68829. Finish downloding data from https://docs.microsoft.com/office. Total bytes returned 68829. Finish downloding data from https://docs.microsoft.com/powershell. Total bytes returned 57777. Finish downloding data from https://docs.microsoft.com/sql. Total bytes returned 55297. Finish downloding data from https://docs.microsoft.com/surface. Total bytes returned 40182. Finish downloding data from https://docs.microsoft.com/system-center. Total bytes returned 43407. Finish downloding data from https://docs.microsoft.com/visualstudio. Total bytes returned 31543. Finish downloding data from https://docs.microsoft.com/windows. Total bytes returned 27177. Finish downloding data from https://docs.microsoft.com/xamarin. Total bytes returned 56064. Elapsed time: 00:00:50.6908524缺点:使用了Foreach循环遍历网站请求数据占用了UI界面刷新的主线程,造成了UI刷新线程的阻塞在函数执行过程中,界面无法拖动,无法互动,用户体验效果差耗时50秒,由于是一个一个网址去请求,所以需要等待一个完成或失败后再去进行下一个请求,执行速度较慢!二、异步下载(一)-异步下载/// 异步下载按钮被单击 private void AsyncDownload_Click(object sender, EventArgs e) { Result.Text = ""; var stopwatch = Stopwatch.StartNew(); DownloadWebsitesAsync(); Result.Text += $"Elapsed time: {stopwatch.Elapsed}{Environment.NewLine}"; } /// 使用 async 用于提醒编译器 该方法中使用到了 Await 关键字 /// 对于希望使用Async和Await关键字的方法,返回值必须是Task或者是Task泛型 private async Task DownloadWebsitesAsync() { foreach (var site in Contents.WebSites) { var result = await Task.Run(() => DownloadWebSiteSync(site)); ReportResult(result); } }测试AsyncDownload_Click中并没有等待DownloadWebSitesAsync执行结束就打印了最后的执行时间相当于DownloadWebSitesAsync被忽略了。修改/// 异步下载按钮被单击 private async void AsyncDownload_Click(object sender, EventArgs e) { Result.Text = ""; var stopwatch = Stopwatch.StartNew(); await DownloadWebsitesAsync(); Result.Text += $"Elapsed time: {stopwatch.Elapsed}{Environment.NewLine}"; }总结经过如上编写,发现在测试异步下载时,UI界面线程不会阻塞,可以在下载时与界面进行交互。通过对比同步和异步两种下载方式,发现两者下载速度并没有太大差别。于是我们可以发现仅仅使用async和await并不能够提升我们处理数据的速度,给我们带来的仅仅是这个UI的响应更加及时。三、异步下载(二)-并发下载在上一节分发下载任务时,使用的是foreach进行遍历网址列表,逐个进行下载数据。虽然Ui Thread并没有被阻塞,但这并没有改变下载数据的策略,数据还是需要从这些网站中一个一个的下载。这样其实就很好理解,为什么在异步的模型中下载数据的时间总时长并没有被缩短。如果想缩短下载所有数据的总时间,那么就需要引入: 并行下载 即我们需要更多的线程并发的从这些网站中下载数据。/// 分发下载任务的主函数 private async Task DownloadWebsitesAsync() { /// 用于存储所有的Task List<Task<string>> downloadWebsiteTasks = new List<Task<string>>(); /// 将原来的下载完成一个再进行下一个,改成快速遍历所有站点,将每一个下载任务存入集合,集合中所有元素并发进行下载。 foreach (var site in Contents.WebSites) { downloadWebsiteTasks.Add(Task.Run(() => DownloadWebSiteSync(site))); } // 当集合所有任务都完成时,统一拿到Result Array<string>返回值 var results = await Task.WhenAll(downloadWebsiteTasks).Result; // 将所有results 全部打印出去。 foreach(var result in results) { ReportResult(result); } }注意:每次程序的第一次完成IO操作时,尤其是这种多线程从远端服务器需要用http下载数据,程序往往会经历一些冷启动的现象,原因是因为我们的 CLR 需要创建相应的Thread Pool来初始化Thread,而初始化每一个Thread也是需要时间的,并且完成这些Http Connection的TCP Connection的建立也是需要时间的。因此程序运行的第一次下载耗时不太稳定,会花费额外的时间,如果想要查看稳定的数据下载,需要多次Run一下这个实验的结果。测试观测到 异步下载+并行下载的时间稳定在2s左右修改减少由于初始化很多线程而造成的速度不稳定冷启动时间/// 访问网站获取源代码 更改为异步操作,命名遵循范式 private async Task<string> DownloadWebSiteAsync(string url) { var response = await httpClient.GetAsync(url); // 直接调用异步方法 var responsePayloadBytes = await response.Content.ReadAsByteArrayAsync(); // 直接调用异步方法 return $"Finish downloding data from {url}. Total bytes returned {responsePayloadBytes.Length}. {Environment.NewLine}"; } private async Task DownloadWebsitesAsync() { List<Task<string>> downloadWebsiteTasks = new List<Task<string>>(); foreach (var site in Contents.WebSites) { // 这时候不需要一个额外的Thread来进行等待 // 所以不再需要Tash.Run,可以直接调用方法。 downloadWebsiteTasks.Add(DownloadWebSiteAsync()); } var results = await Task.WhenAll(downloadWebsiteTasks).Result; foreach(var result in results) { ReportResult(result); } }程序运行后的第一次下载:耗时2s