


搜索到
72
篇与
的结果
-
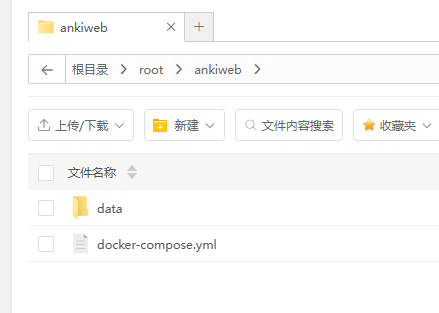
 DockerCompose自建Anki服务端 services: anki-sync-server: image: johngong/anki-sync-server:latest container_name: anki-sync-server ports: - XXXX:8080 # 同步服务器地址,冒号前面请勿和本地冲突 volumes: - /root/ankiweb/data:/ankisyncdir # 冒号前面映射ankisyncdir文件夹实际路径 environment: - SYNC_USER1=admin:password # anki-sync-server同步服务器用户名及密码,建议用邮箱格式用户名,稍后会用到 - TZ=Asia/Shanghai - SYNC_BASE=/ankisyncdir # anki-sync-server同步文件位置,默认为/ankisyncdir - SYNC_PORT=8080 # anki-sync-server同步端口,默认8080 - MAX_SYNC_PAYLOAD_MEGS=100 # anki-sync-server同步服务器上传限制设置,默认100(100M大小) - UID=0 - GID=0 restart: unless-stopped需要更改ports,volumes,SYNC_USER1等几个变量引用https://zhuanlan.zhihu.com/p/1932906999001088832https://www.bt.cn/bbs/thread-141540-1-1.html
 -
Claude Code 开发笔记 Claude Code 开发笔记Vsc辅助插件:代理站点推荐[1]:AgentRouter: https://agentrouter.org/register?aff=r3VD每邀请一位好友注册,您和好友将分别获得 $100 奖励通过划转功能将奖励额度转入到您的账户余额中邀请的好友越多,获得的奖励越多代理站点推荐[2]:Claude Code中国:https://code.nonocode.org/register?ref=2BXARU好友通过您的链接注册,立即获得 500 积分核心配置技术栈偏好:Next.js + TypeScript + React + Tailwind CSS v4 + shadcn/ui + SQLite文件管理文件名描述CLAUDE.md基本开发规则todo.md开发清单开发流程规范任务管理:开发前将商定任务添加到 todo.md进度跟踪:完成任务后及时标记为已完成并行开发:使用 Task 工具创建子代理,支持多任务并行对应的Prompt:在项目根目录下我创建了一个 todo 文件,每次在开发之前,你都应该先将我们商量好的代办任务添加到这个文件中。每完成一个任务时,记得把对应的任务标记为已完成,这样可以方便我们实时跟踪开发进度。 合理使用 Task 工具创建多个子代理来提高开发的效率,每一个子代理负责一个独立的任务,互不干扰,支持并行开发。高效开发命令:plan -seq -verbose --ultra-think "Rationally Spawn more than 3 agents work together to Complete the task accurately."常用命令速查命令描述claude mcp list查看安装的所有MCPclaude -c恢复上一次异常关闭的会话claude -r查看所有的历史会话claude --dangerously-skip-permissions进入狂飙模式,会自动跳过所有权限确认,不需要你手动点允许。快捷指令指令描述/memory管理当前的记忆,通过编辑器自动打开/clear清除当前的会话/compact压缩对话历史/init阅读并分析整个项目的代码/mcp查看mcp连接状态/resume查看所有的历史会话/model切换模型#记忆的内容添加记忆MCP 配置示例示例安装(默认项目生效):# Claude Code Remote Server Connection claude mcp add --transport http context7 https://mcp.context7.com/mcp --header "CONTEXT7_API_KEY: YOUR_API_KEY" # Claude Code Local Server Connection claude mcp add context7 -- npx -y @upstash/context7-mcp --api-key YOUR_API_KEY添加-s user 即对当前系统用户生效操作快捷键快捷键描述双击Esc快速清空输入框中的内容,避免长按删除键输入框为空时 输入Esc浏览所有的历史记录进行跳转 资源引用方式图片:直接粘贴,自动显示为 [Image #1]格式文件:使用 @引用当前目录文件使用 @/进行全局文件搜索输入文件名后按 Tab自动补全,默认自己也会读入当前激活的文件选中行数 claude 也会自动检测到模式切换解决方法来自于:https://linux.do/t/topic/794815/2切换模式使用 Shift + TAB 无效的话可以试试 Alt + M模式描述plan mode on (alt+m to cycle)计划模式,不执行编辑,项目初始使用,商讨好开始执行accept edits on (alt+m to cycle)自动编辑模式深度思考触发在问题描述后添加以下关键词启用深度思考模式:thinkthink hardthink harderultra think参阅1.Claude Code 用法全面拆解!26 项核心功能 + 实战技巧(建议收藏!): https://zhuanlan.zhihu.com/p/1928918331810886674
-
PHP THINKPHP6 预打印SQL public static function getPageList(array $params = array(), int $page = 1, int $limit = 10) { $where = self::getWhere($params); $model = new HolidayBenefitExclusionModel(); // $model = $model->alias('HolidayBenefitExclusionModel'); +++++++ $query = HolidayBenefitExclusionModel::buildWith($model, $params); $query = $query->where($where); return $query->order('id', 'desc') ->paginate(array( 'list_rows' => $limit, 'page' => $page, )) ->toArray(); } /** * 构建Query的With关联 * @author: LiSongKun * @date: 2025/9/11 14:23 * @param $query * @param array $params * @return mixed */ public static function buildWith($query, array $params) { return $query->with([ 'user' => function ($innerQuery) { $innerQuery->field('oa,name'); } ])->hasWhere('user', function ($innerQuery) use ($params) { $innerQuery->where(1, 1); $innerQuery->field('oa,name'); if (isset($params['name_like']) && $params['name_like'] !== '') { $innerQuery->where('name', 'like', '%' . $params['name_like'] . '%'); } }); }在使用模型查询同时调用 with 和 hasWhere 时候会遇到 :SQLSTATE[42S22]: Column not found: 1054 Unknown column 'HolidayBenefitExclusionModel.oa' in 'on clause'" 问题需要加一个别名:alias('HolidayBenefitExclusionModel')通过如下的方式可以在不执行语句的时候获取预执行的SQL输出。<?php $list = Vod::order('vod_addtime desc') ->where($where) ->fetchSql(true) // true 代表不执行语句 ->select(); dump($list);exit; ?>
-
发现个小技巧, 本地开发配置域名不用再修改hosts了 由于 windows hosts 文件配置域名只能一个个手动配置,不支持泛解析 (没有通配符)所以每次在本地新建个站点都需要打开 hosts 文件添加一条记录尝试搜索 windows hosts 通配符 , 没有找到解决方案,却无意间找到这么个曲线救国的办法~先说结论使用 .localhost 后缀的域名比如: my-site.localhost owladmin.localhost demo.shop.localhost …为什么要用,以及为什么能用本地搭建站点,配个域名更方便访问,更方便的管理多个不同的站点docker 容器运行起来后没法动态映射端口,部分程序需要通过 nginx 反向代理才能在本机访问.localhost 后缀的域名,会默认指向本地无需写入 hosts————————————————原文作者:slowlyo转自链接:https://learnku.com/articles/86228?order_by=created_at&版权声明:著作权归作者所有。商业转载请联系作者获得授权,非商业转载请保留以上作者信息和原文链接。
-
Anaconda的Python环境使用 简述安装完 Anaconda 会自带一个Base环境, 该环境是包含 Conda 自带的 Python 和基础工具(如 pip、conda 命令)。如果直接在此环境中安装大量第三方包,可能导致:依赖冲突:不同包对同一依赖的版本要求不同(例如 numpy 的版本冲突)。环境臃肿:base 环境被污染,影响其他项目的独立性。因此,建议创建独立的环境,然后在其中安装所需的包。Conda 的包管理机制独立环境管理Conda 不仅管理 Python 包,还能管理非 Python 依赖(如 OpenSSL、C++ 库等)。每个 Conda 环境(包括 base)都有自己独立的 bin(或 Scripts)目录和 site-packages 目录。全局可执行文件(关键区别)Conda 在安装某些工具(如 mitmproxy)时,会在环境的 bin(Linux/macOS)或 Scripts(Windows)目录下生成可执行文件(如 mitmproxy.exe)。如果 Conda 的 base 环境被添加到系统 PATH 中,这些命令就可以全局调用。例如,conda install mitmproxy 会在 %CONDA_PREFIX%\Scripts\mitmproxy.exe 生成可执行文件,如果 %CONDA_PREFIX%\Scripts 在 PATH 里,就能全局运行。常用命令# Conda操作: # 1. 安装全局包时使用 conda install -c conda-forge mitmproxy # conda install # Conda 的核心命令,用于安装指定软件包。 # -c conda-forge # 指定从 conda-forge 渠道(社区维护的软件仓库)下载包。conda-forge 通常提供更新更全的软件版本。 # mitmproxy # 目标软件包名称,即交互式 HTTPS 代理工具。 # Python环境操作: # 1.创建新环境并指定环境的Python版本 conda create --name env_name python=version 例如: conda create --name python36 python=3.6 # 2.激活环境 activate env_name # 3.关闭环境 deactivate env_name # 4.删除环境 conda env remove -n env_name # 5.显示所有环境 conda env list # 6.查看anaconda中已经存在的镜像源 conda config --show channels # 7.添加镜像源(永久添加) conda config --add channels https://mirrors.tuna.tsinghua.edu.cn/anaconda/pkgs/free/ conda config --add channels https://mirrors.tuna.tsinghua.edu.cn/anaconda/pkgs/main/ conda config --add channels https://mirrors.tuna.tsinghua.edu.cn/anaconda/cloud/conda-forge/ # 8.设置搜索时显示通道地址 conda config --set show_channel_urls yes
-
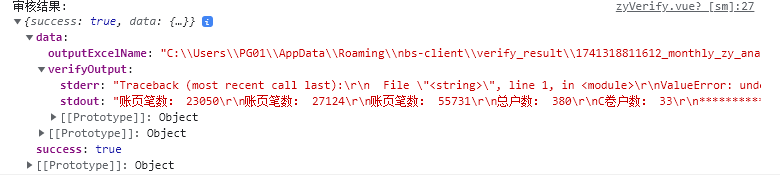
解决Node Electron下调用Python脚本输出中文乱码的问题 解决Node Electron下调用Python脚本输出中文乱码的问题调用Pyinstaller打包后的可执行文件方式如下:import { promisify } from 'util' import { exec } from 'child_process' import { app } from 'electron' async handleVerifyZy(id) { const entity = await this.findById(id) const execPromise = promisify(exec) let args = `-a 202501 -c community-sample.json -r resident-sample.json -t ${entity.timestamp}` const verifyOutput = await execPromise( `verify.exe ${args}` ) // 正常运行结束需要取出结果的excel let outputExcelName = join( app.getPath('userData'), 'verify_result', `${entity.timestamp}_monthly_zy_analysis_result.xlsx` ) return { outputExcelName, verifyOutput } }打印在渲染层发现标准输出的中文乱码需要修改Python脚本,定义全局的stdout的编码# encoding:utf-8 import io import sys sys.stdout = io.TextIOWrapper(sys.stdout.detach(), encoding="utf-8")打包后再次调用,问题解决参考1.nodejs调用python输出中文乱码的问题:https://blog.csdn.net/qq_40185480/article/details/105910329
-
初试编写油猴脚本 每日闲逛吾爱破解发现发现有人求脚本:https://www.52pojie.cn/thread-2003050-1-1.html就是让百度首页底部的关注栏变宽,简单的CSS修改一下就可以用的框架为vite-plugin-monkey : https://github.com/lisonge/vite-plugin-monkey最后打包后的代码如下:// ==UserScript== // @name make-baidu-weightify // @namespace npm/vite-plugin-monkey // @version 0.0.0 // @author monkey // @icon https://vitejs.dev/logo.svg // @match https://www.baidu.com/ // @require https://cdn.jsdelivr.net/npm/vue@3.5.13/dist/vue.global.prod.js // ==/UserScript== (function () { 'use strict'; (function() { function init() { const mainElement = document.getElementById("s_main"); if (mainElement) { mainElement.classList.remove("c-wrapper-hot-news-all"); } const styleElement = document.createElement("style"); styleElement.textContent = ` .san-card > div { width: 100% !important; } .site-wrapper > div { width: 100% !important; } .site-wrapper > div > div { width: 100% !important; } `; document.head.appendChild(styleElement); } console.log("baidu-weightify"); if (document.readyState === "loading") { document.addEventListener("DOMContentLoaded", init); } else { init(); } })(); })();引用:1.【轻松上手】油猴脚本开发:https://juejin.cn/post/7022654292880424991#heading-132.油猴脚本开发指南教程目录:https://bbs.tampermonkey.net.cn/thread-184-1-1.html
-
解决Fiddler代理 Python Request请求报错Unable to get local issuer certificate 1.查询Python Requests默认调用的cert证书位置import certifi certifi.where()如果提示没有certifi,需要安装certifi包(pip install certifi)2.配置fiddler,打开 127.0.0.1:8888下载证书文件并导出base64编码3.将第三步中导出的证书信息复制出来,粘贴到第一步中输出cacert.pem文件末尾,保存重新运行代码,即可。引用Unable to get local issuer certificate when using requests:https://stackoverflow.com/questions/51925384/unable-to-get-local-issuer-certificate-when-using-requests-in-python执行python时,使用fiddler代理,提示Unable to get local issuer certificate when using requests in python:https://blog.csdn.net/iKaChu/article/details/106787413
-
NW.js将Web端打包成客户端安装包 NW.js将Web端打包成客户端安装包前言项目交付时需要将Web端后台入口打包成exe安装在客户电脑上,本文记录一下操作流程。使用csharp为客户端封装壳的时候,打包建议使用.NET Framework 3.5.1 SP1作为构建框架,可以支持Windows7系统,我当时使用了4.8打包的程序无法在Windows7中打开,结果现场在客户机器上操作一番装其他的环境才得以解决。各系统的支持情况如下:Windows版本自带的.NET Framework 版本Windows 7.NET Framework 3.5.1 SP1Windows 7 SP1.NET Framework 3.5.1 SP1Windows 8.NET Framework 3.5.1 SP1 + 4.5本文不涉及套壳,套壳当时只是为了校验客户机的mac地址。一、创建app.nwapp.nw就是打包后的web页面,操作流程如下:1.使用Npm初始化一个含package.json的目录package.json如下,参数基本一眼就知道什么作用{ "name": "大兴社保", "main": "index.html", "version": "1.0.0", "window": { "frame": true, "icon": "logo.jpg", "width": 1400, "height": 1100, "position": "center", "resizable": true, "show_in_taskbar":true } }2.创建一个重定向页面index.html:<!DOCTYPE html> <html lang="en"> <head> <meta charset="UTF-8"> <meta name="viewport" content="width=device-width, initial-scale=1.0"> <title>大兴社保</title> <script> window.location.href = "https://xxx/login.html"; </script> </head> <body> </body> </html>3.全选当前目录下所有文件压缩成.zip后更名为.nw二、封入nw.js我预览使用的是nwjs-sdk-v0.93.0-win-x64开发版本,可以打开开发者工具进行调试最后分别使用nwjs-v0.45.0-win-ia32和nwjs-v0.45.0-win-x64进行成果打包1.预览app.nw直接将上一步骤打包并更名的app.nw使用nwjs-sdk中的nw.exe打开显示没有问题,就进行打包操作,出现问题可以按F12进行调试。将app.nw移至nw.exe同目录,输入如下命令进行合并$ copy /b nw.exe+[fileName].nw [output].exe eg: copy /b nw.exe+app.nw dxsb.exe至此打包完成,在nw.exe所在文件目录下已生成可执行文件。然后使用Resource Hacker进行修改icon该可执行文件依赖于目录下的其他文件,若需要单独运行,还得继续封包三、打成安装包使用Inno Setup来打包成安装程序,即将一开始的web应用源文件和node-webkit的nw.exe和环境dll直接压缩成一个安装文件,用户在使用你的exe后会出现setup wizard把程序安装到Program Files目录中,将nw.exe,dll,web应用释放出来,这个时候所生成的安装文件其实size会小很多。这一步添加上主执行文件和依赖文件夹即可成功运行引用nwjs: https://nwjs.io/基于NW.JS全屏无边框程序将HTML打包成可执行文件.EXE: https://blog.csdn.net/suoyue_py/article/details/105469271修改 node-webkit 的默认图标:https://keenwon.com/1311/
-
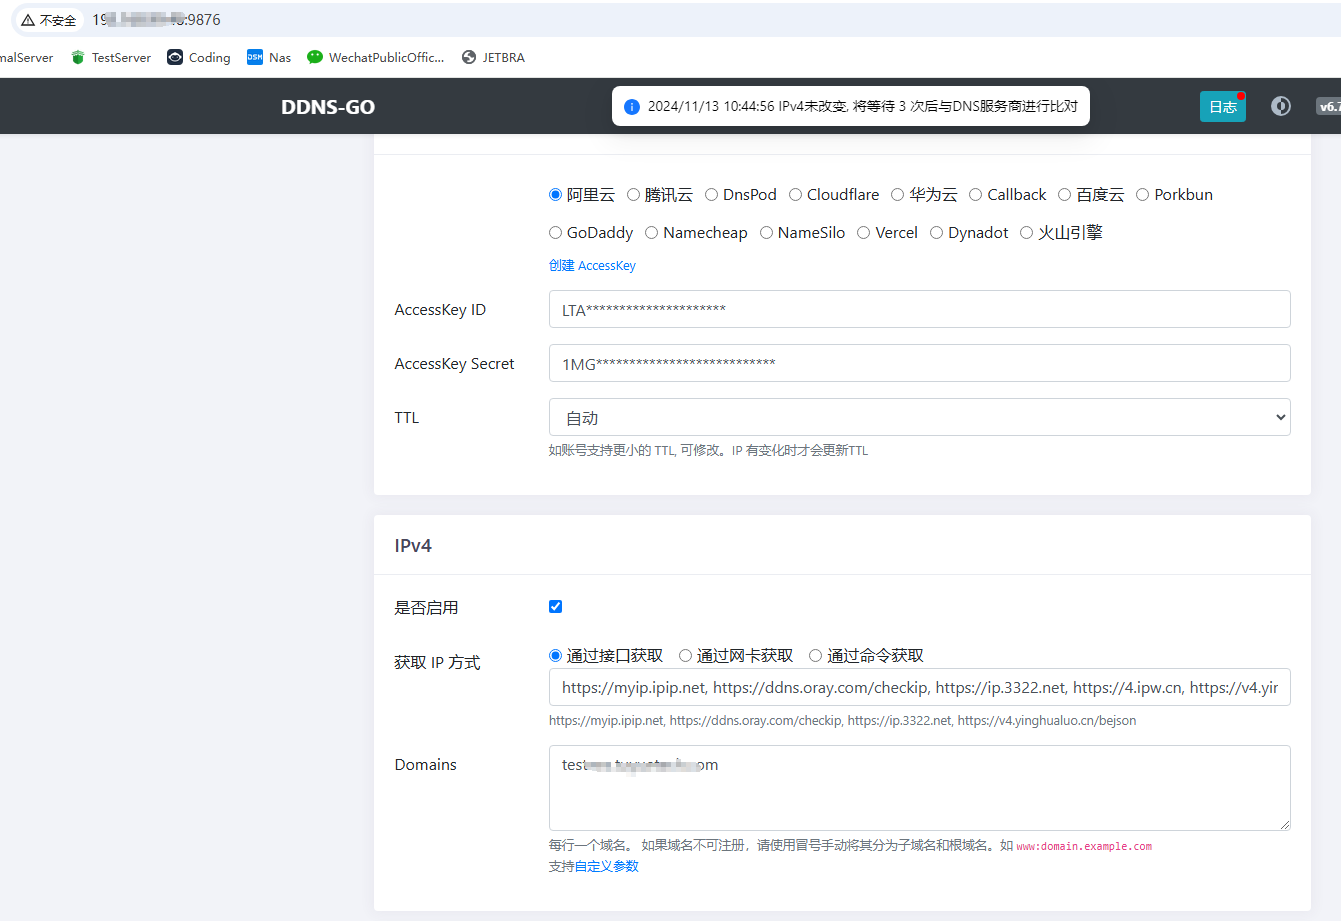
ddns-go实现域名动态解析公网IP+公网访问虚拟机内多项目 ddns-go: GitHub - jeessy2/ddns-go: Simple and easy to use DDNS. Support Aliyun, Tencent Cloud, Dnspod, Cloudflare, Callback, Huawei Cloud, Baidu Cloud, Porkbun, GoDaddy, Namecheap, NameSilo...前言公司买了一台服务器后需要将原先阿里云的测试机上部署的站点迁移到公司内,正好有公网IP,只不过是动态的需要借助技术实现域名动态dns解析。内容实现效果:主机开放380作为http协议端口,转发端口到虚拟机的80。主机开放3443作为https协议端口,转发端口到虚拟机的443。通过域名http://A.com:380或https://A.com:3443访问虚拟机的项目A通过域名http://B.com:380或https://B.com:3443访问虚拟机的项目B直接通过文件运行的方式比docker方便的多。./ddns-go -s install -f 600 -c /Users/name/.ddns_go_config.yaml运行后访问虚拟机的http://192.168.99.48:9876/进入ddns-go的控制面板,配置一下信息。配置完事使用Itdog进行ping域名测试域名已经成功解析到公司的公网IP上了。虚拟机内使用宝塔配置一下域名即可。域名描述https://xxx:3443/HTTPS协议http://xxx:380/HTTP协议